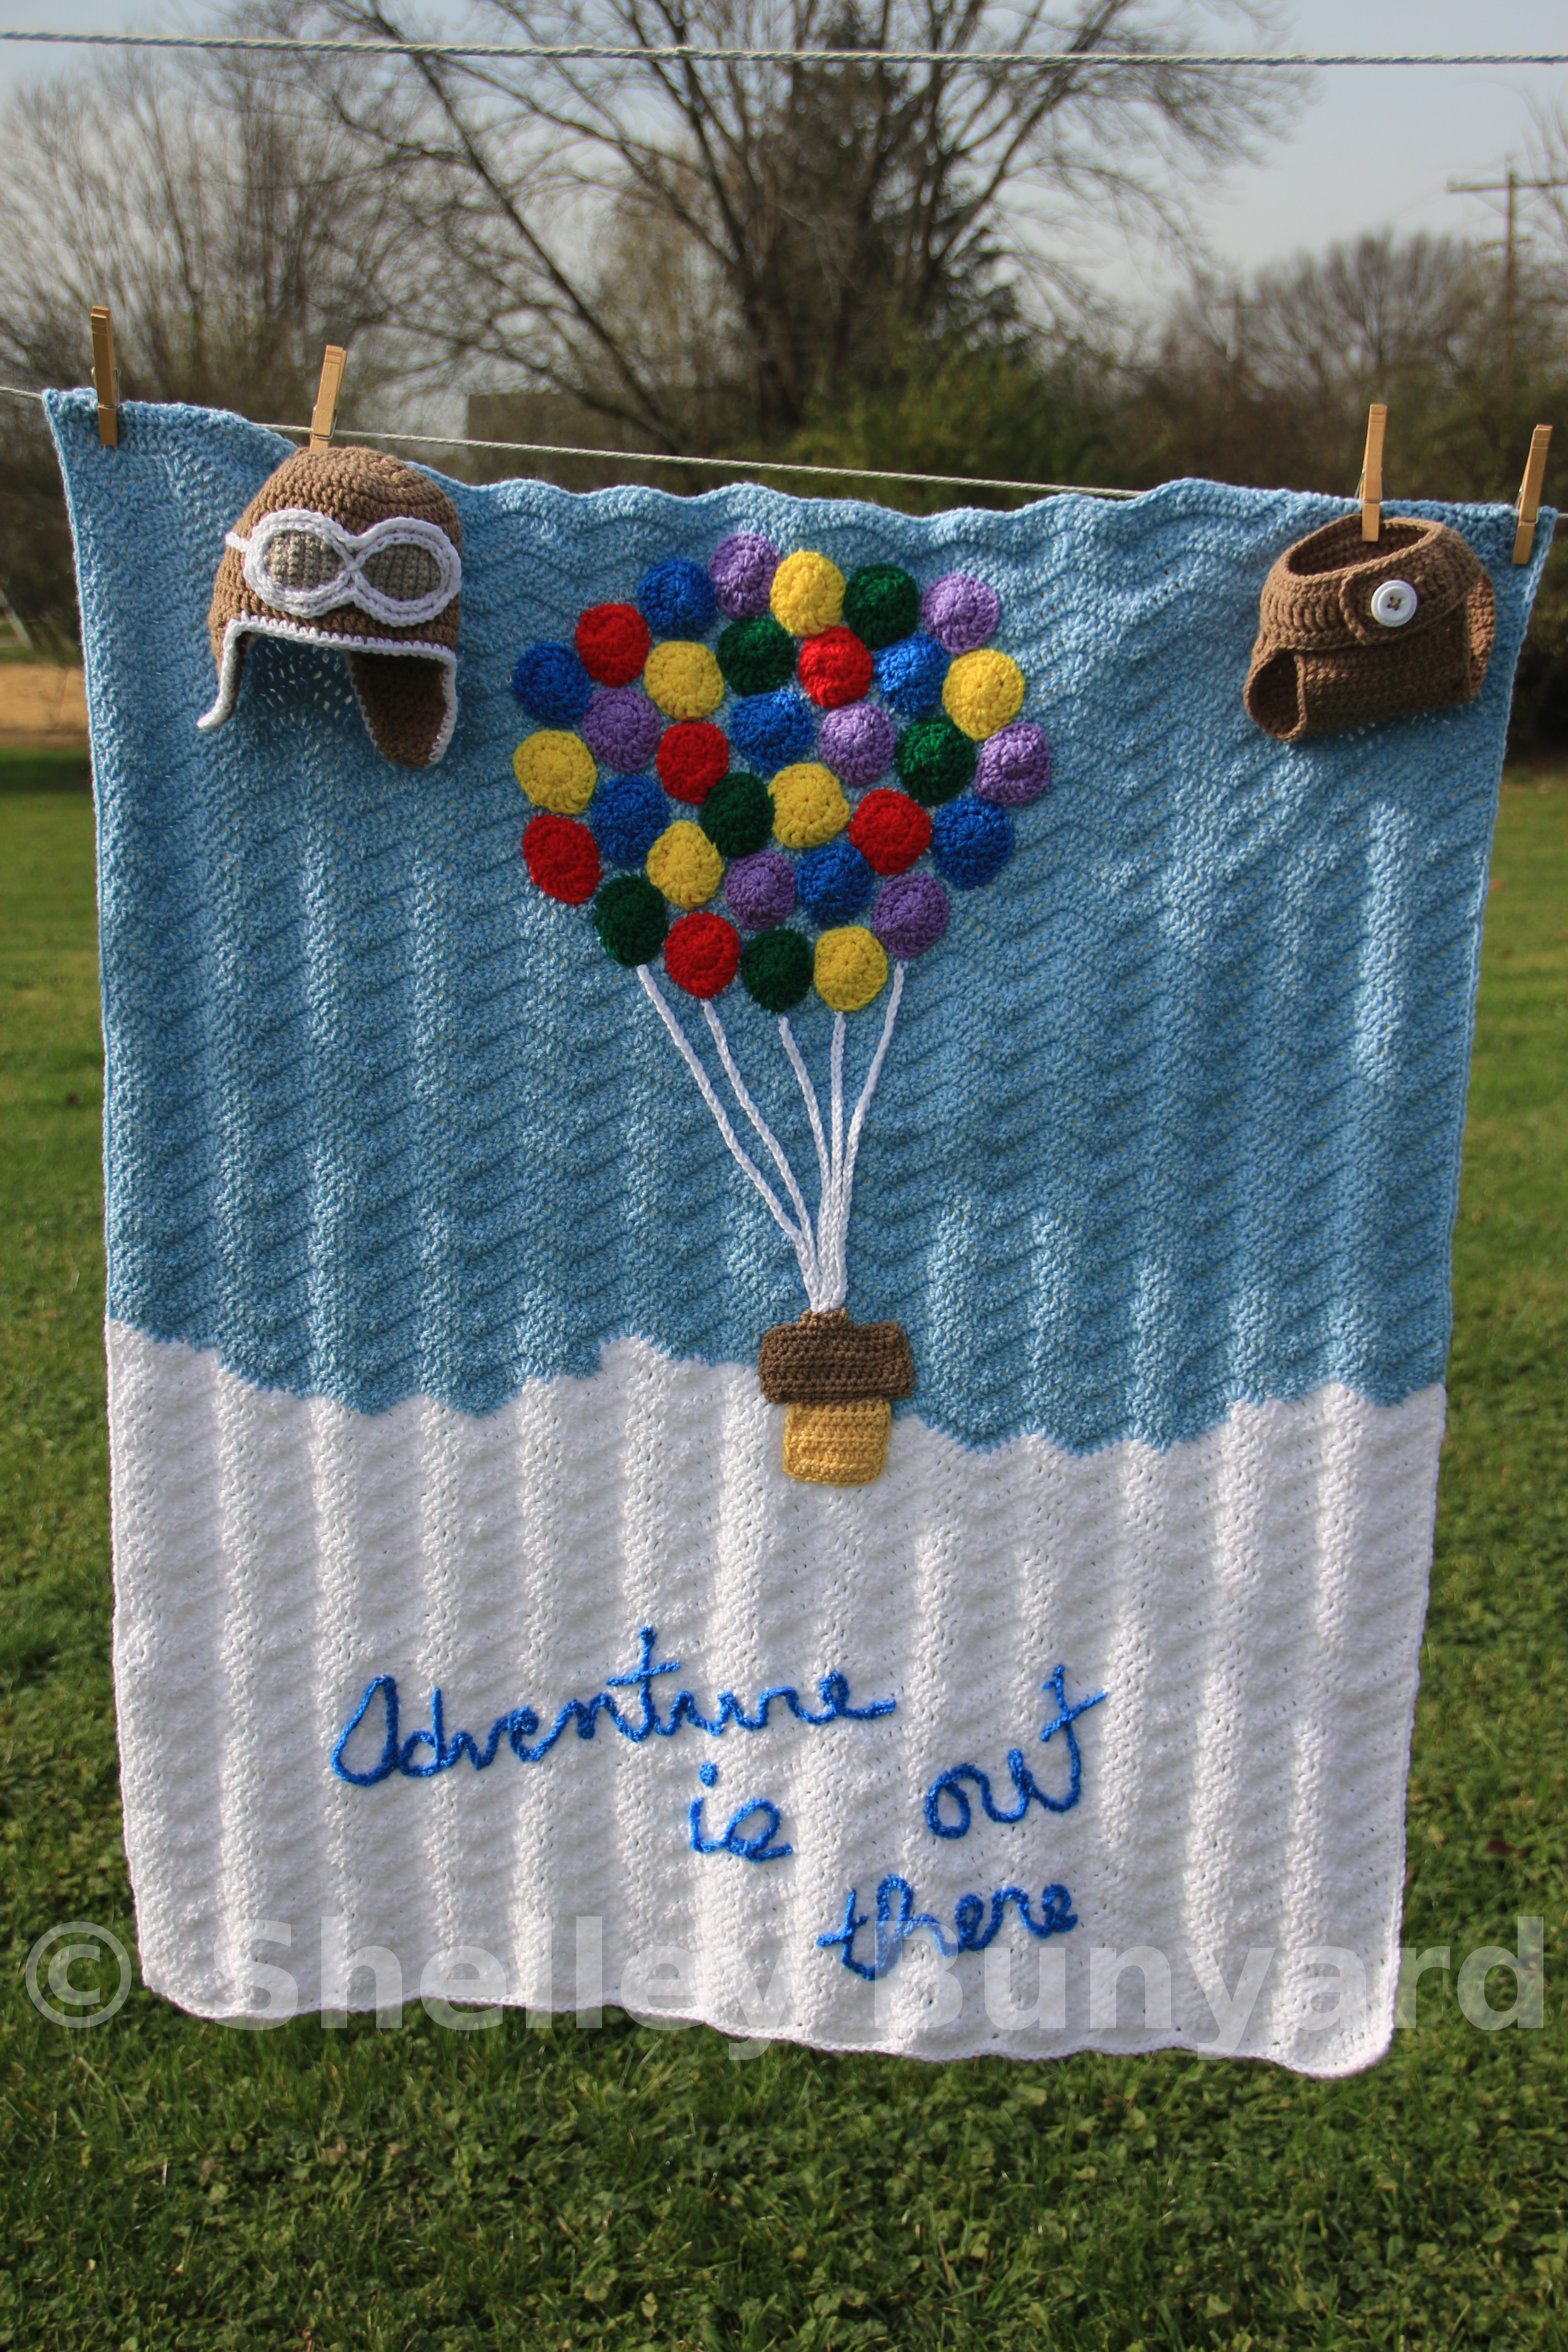
This blanket started by me needing a gift set. Mom to be had mentioned she liked the UP movie and some of the items for the nursery. So me and my grand ideas saw a poster online that I loved. I also loved the quote “Adventure is out there” that was on it as well. This was my humble attempt to pay homage to such a lovely movie.
Note before starting: there is A LOT of sewing. Seriously, not kidding, A LOT!
Caron one pound yarn in white and sky blue
Other colors as needed for the appliques
Size H hook
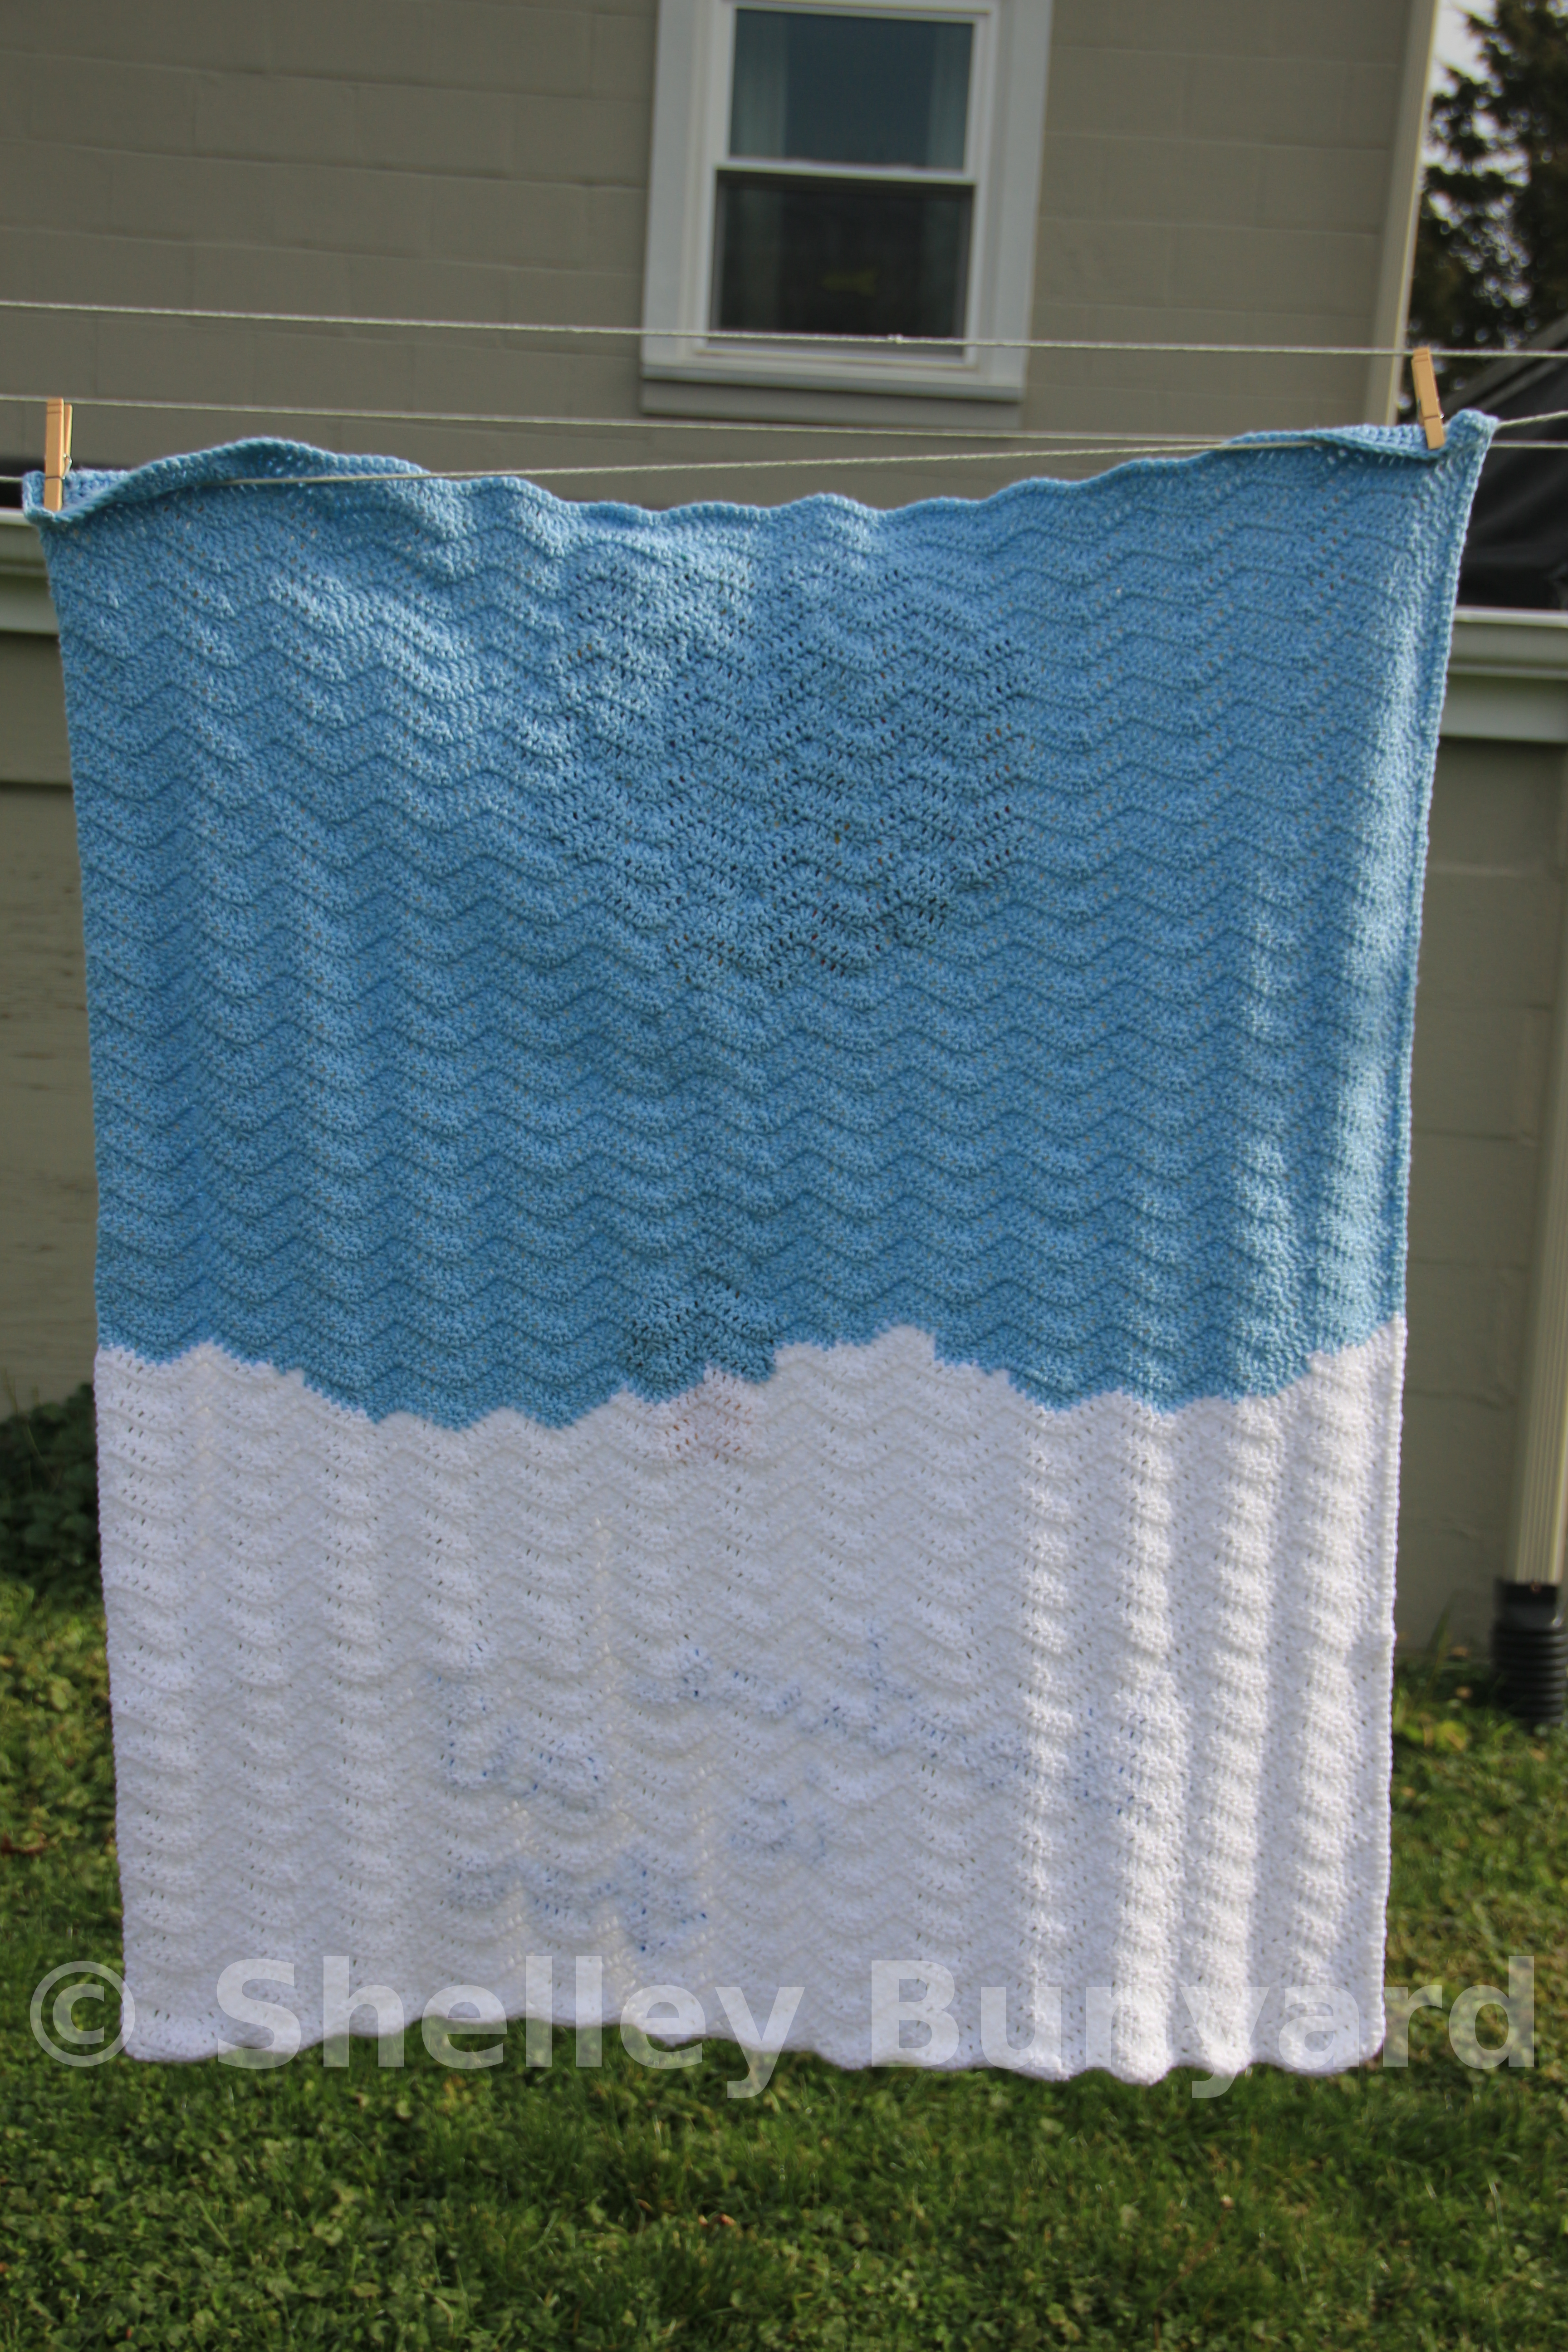
We start with a basic ripple blanket. Nothing special, but you will be so tired of counting to three by the time you are finished…
Note: dc3tog – Yarn over, insert hook into st and draw up a loop, yarn over and draw through 2 loops (yarn over, insert hook into next st and draw up a loop. Yarn over, draw through 2 loops) twice, yarn over and draw through all loops on hook.
ch 134.
Row 1: Dc in 4th ch from hook (beginning ch counts as dc), *dc in next 3 ch, dc3tog, dc in next 3 ch, 3 dc in next ch; rep from * 11 more times, dc in next 3 ch, dc3tog, dc in next 3 ch, 2 dc in last ch – 13 ripples.
Row 2: Ch 3 (counts as dc), turn, dc in first dc, *dc in next 3 dc, dc3tog, dc in next 3 dc, 3 dc in next dc; rep from * 11 more times, dc in next 3 dc, dc3tog, dc in next 3 dc, 2 dc in top of turning ch.
Repeat row 2 for a total of 30 rows… or not, whatever you choose honestly. Less white, more white… also you can choose to do the color changes like I did, or just switch straight to the blue. Mind you, the color changes I did are not strict. I say to change in the valley (dc3tog) or peak (3 dc group). You can change the dc before or after the grouping. Whatever is easier for you. Also, some people prefer to carry the yarn they aren’t using behind the color they are… I didn’t. I find with white and dc it shows up and I wanted this to be seen front and back. I choose to bind off and change colors that way. Now, that being said, go have a drink, then change colors if you want.
Row 31: at the third valley change to blue for 3 peaks and switch back to white for the remainder of the row.
Row 32: at the second valley change to blue for 3 peaks. Change back to white for 3 valleys, changing to blue on the next peak for 4 valleys then back to white on the next peak. White for the remainder of the row.
Row 33: at the second valley change to blue for 5 valleys and switch back to white. After 2 valleys switch back to blue for 3 valleys. Switch back to white at the next peak and continue for the rest of the row.
Row 34: change to blue after the first valley. Change back to white after 4 valleys for 1 peak. Change to blue after the next valley and for the remainder of the row.
Row 35: all blue! Woot! No more color changes!
Alright, remind yourself you have come this far, keep going and make 40 rows in blue… ah, now you remember why you don’t like making blankets often…
Edging: for this one I choose just to do a real simple SC all around, placing 3 in every corner and changing color where need be. By the time everything is added I didn’t want it to be too busy.
Also, you might have noticed, you could decide to do a ocean blanket at this point. Up is down and down is up kind of thing…
Now on to the appliques!
Balloons:
Now I ended up making 33 balloons using 5 different colors. You can use whatever colors you want though. Good time to use up some yarn from the stash! Or if you know the colors the baby’s room are to be done in, that could be a cute addition as well!
You can also decide to just make the whole blanket the balloons and the house and not even bother with the words… trust me, that would save some time and frustration so I’m not going to judge.
Starting with a magic circle, ch 2 then place 10 dc in the circle. Tighten circle and sl st into first dc.
Then ch 2, 2 dc in joining then 2 tc in next, 2 dc in each of the next 2 dc, 2 hdc in each of the next 2 dc, 2 sc in each of the next 2 dc, 2 hdc in each of the next 2 dc, sl st to top of first dc and bind off, making sure to leave enough for sewing later. Shape a little as necessary. Then repeat for as many balloons as you need.
House:
Again I used some yarn I had on hand. It was a brown for the roof and a really pale yellow for the house. Not exactly the right colors, I know, but you’ll have that. I knew to make a house this small I wasn’t going to get the detail that the house truly calls for.
House part:
Ch 10, hdc in 3rd ch and across.
*ch 2, hdc across* for 4 rows
Ch 1, sc around, putting 2 sc in the corners, bind off and leave a tail for sewing
Roof:
Ch 14, hdc in 3rd ch and across
*ch 2, hdc across* for 3 rows
Ch 1, sc around, putting 2 sc in the corners, bind off and leave a tail for sewing
Attach to the top of the roof part at the 5th hdc in. Ch 2, hdc in same as joining, hdc in each of the next 2 st. Bind off.
Now, you sew. I don’t have any real great words of wisdom except hide your stitches as you sew. That or use the clear thread (I’ve never done so, but others like it) or use some fabric to put on the back when you are done.
Attach the balloons in a overall balloon shape. The house goes below.
How I did the words and the balloon ties are the same principal. What you do is crochet a chain that is the length you need. Sounds easy, but it takes a little bit of getting used to for the words. Then you simply sew it on, making sure to hide your ends and stitches. Pinning it in place would help quite a bit. I would also highly suggest doing this with the balloon strings before attempting the words.
And then after many hours, you are done with the blanket.

Aviator hat I found on the Repeat Crafted Me site found here: http://www.repeatcrafterme.com/2014/05/crochet-aviator-hat-pattern.html
I did use the Caron white yarn from the blanket though instead of the bulky white she did because I had some left and didn’t want to go buy yet some more yarn… OK I did want to buy more yarn, but my husband has started to notice the stash more…
The diaper cover I used can be found at this link: http://flowerscreations.blogspot.com/2012/05/free-diaper-cover-pattern.html
Mad Hooking!

Recent Comments