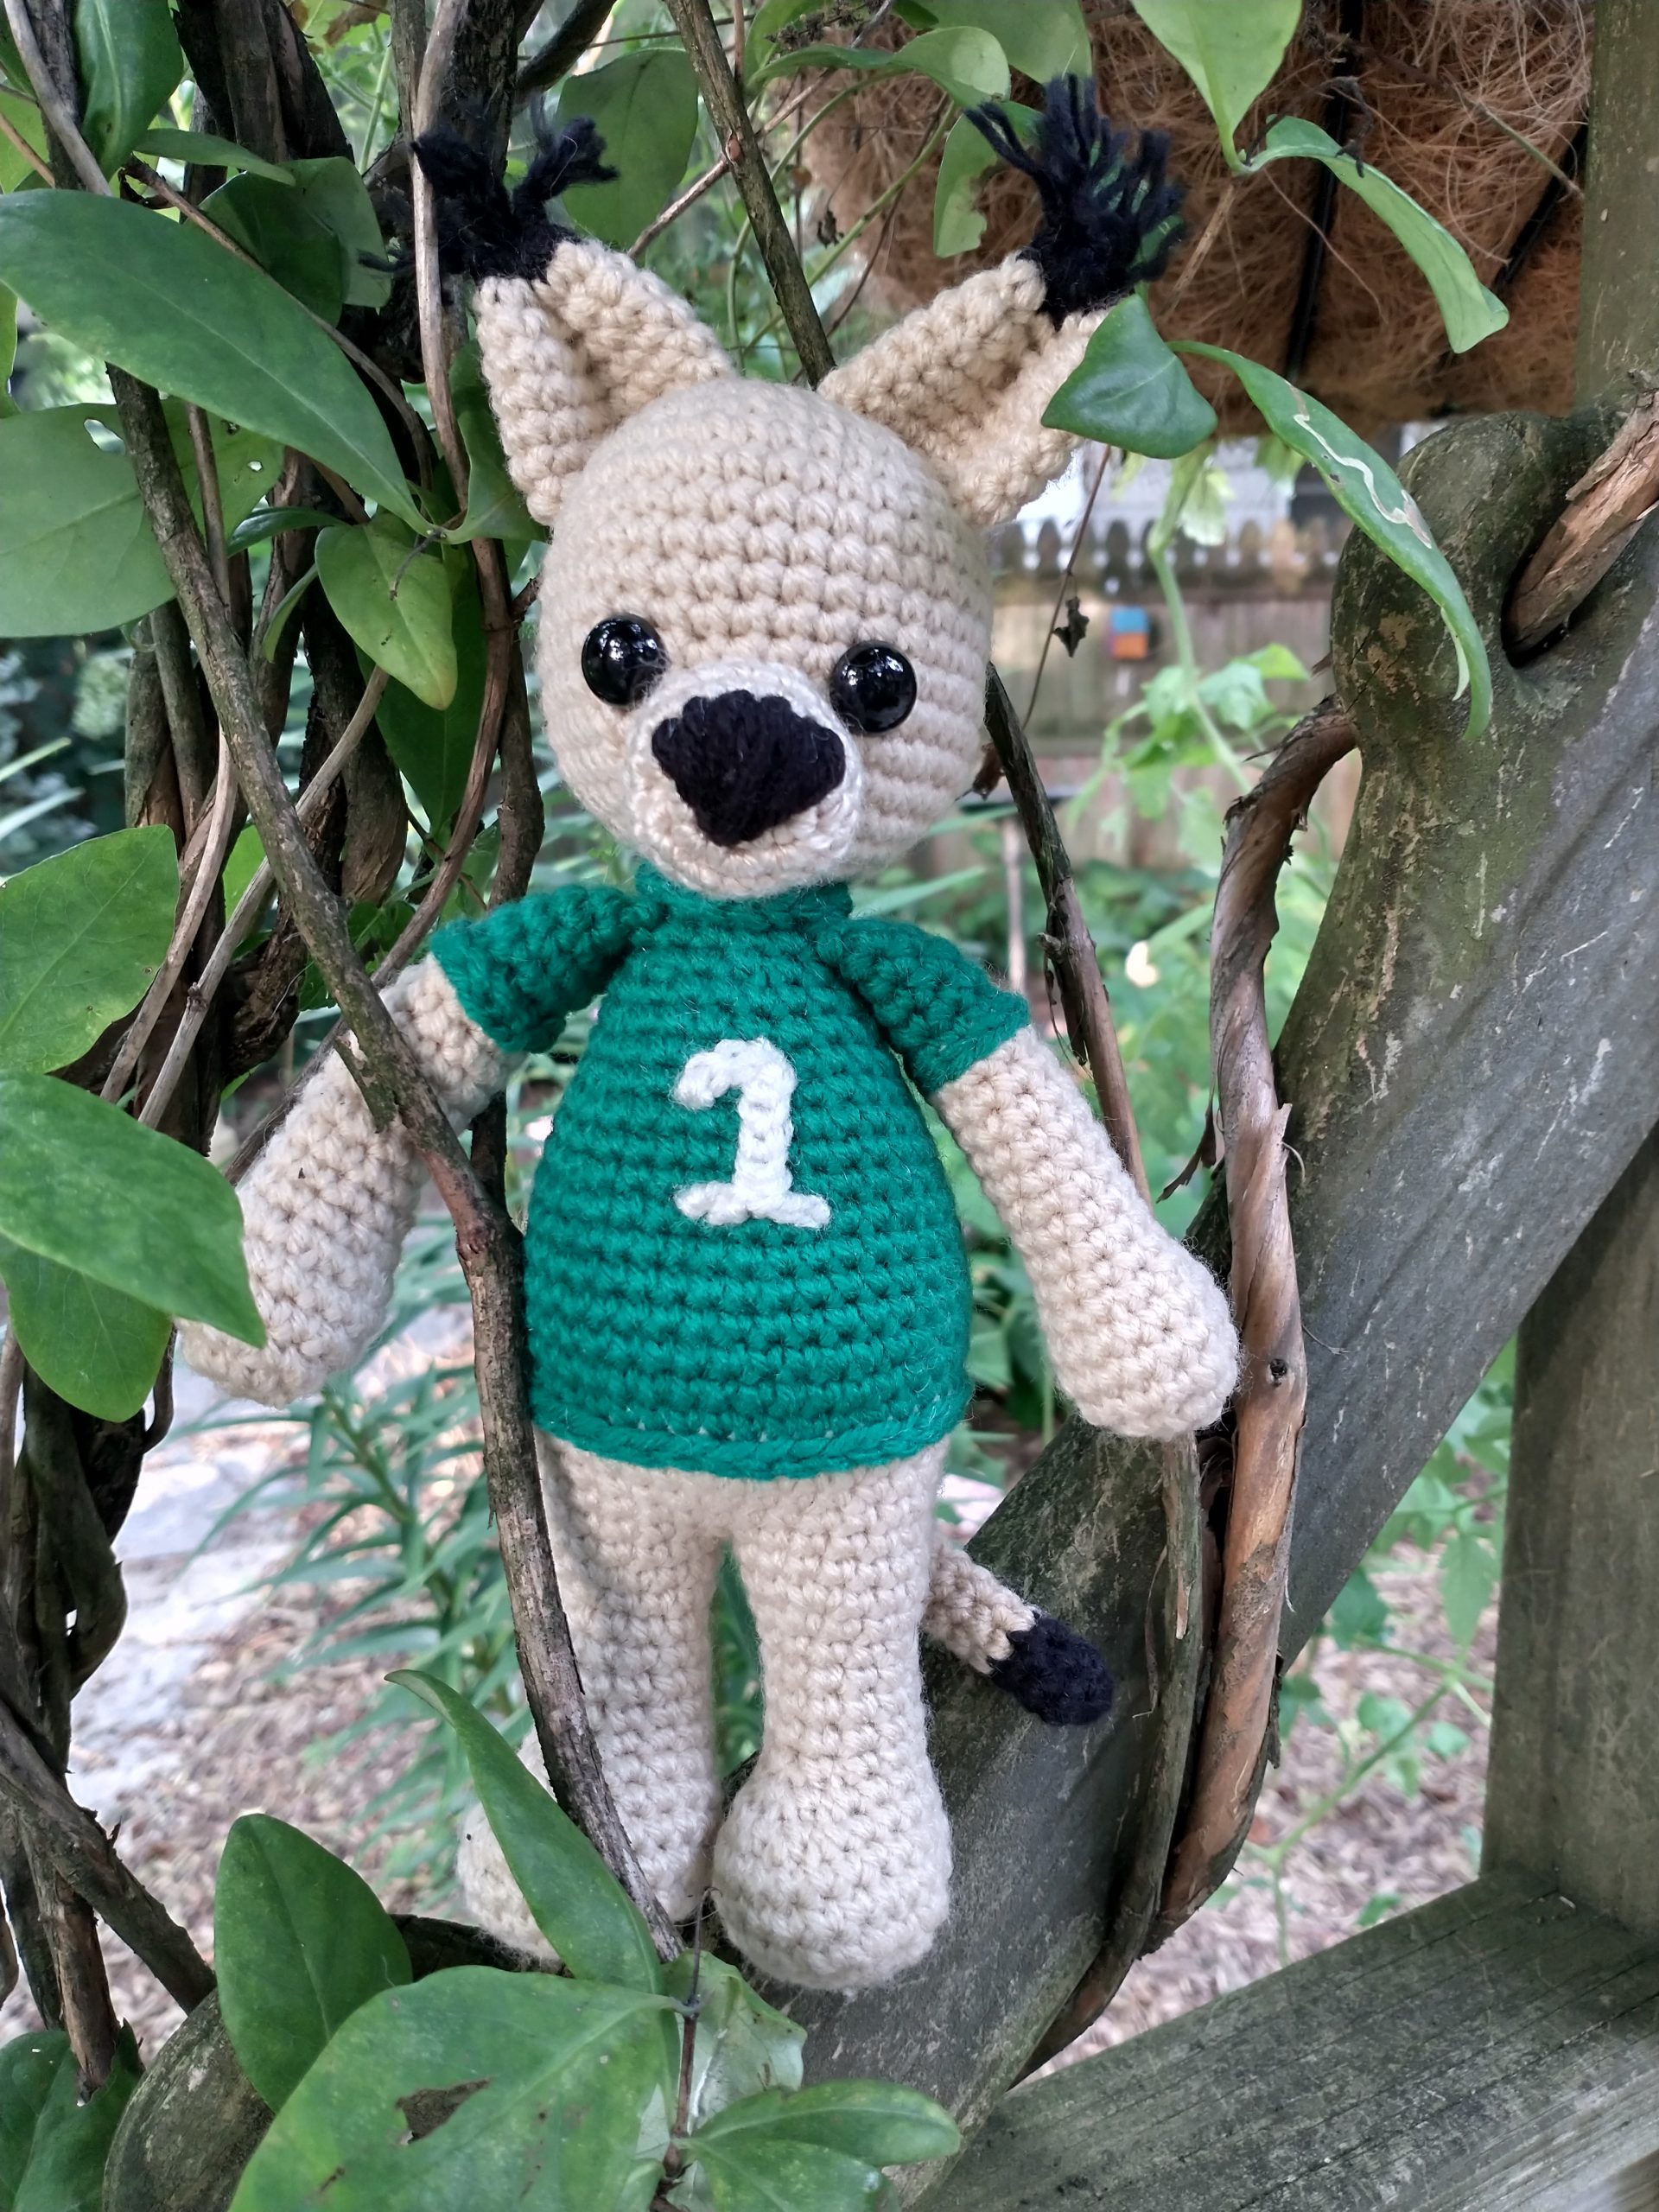
So as my daughter is now leaving the nest to college, I wanted to send her some care boxes. I saw a lovely idea of a crochet mascot, which is nothing new, but thought it would be great to have a ‘basic’ shape that would be easy for people to adapt to their needs. I wanted to keep it more basic and smaller size to fit in the limited dorm room space. Here’s my take on a ‘cat’ mascot… not exactly the colors I wanted, but I did promise my husband I wouldn’t buy anymore yarn until I had a least used up one of the 12 large storage containers in my craft room…
If you are familiar with my patterns, you know that I’m more of a relax, it’s chill, grab something to drink and it will be fine. This pattern isn’t a step by step walk through and assumes you understand amigurumi construction. Also, this is my hobby so I try to make it as non stressful on me as possible. Please feel free to use my pattern, make as many of these as you want, sell or give them away, but please just give me credit as the designer if asked and point people my way. Also, don’t be that person and take my design for your own… that’s so not cool.
worsted weight yarn in chosen colors
size 12 mm safety eyes
3.5mm hook or hook to make it where you don’t see stuffing showing out
Head (in primary body color)
Rnd 1: 6 sc in magic circle
Rnd 2: inc around
Rnd 3: *inc, sc* around
Rnd 4: *inc, sc next 2* around
Rnd 5: *inc, sc next 3* around
Rnd 6: *inc, sc next 4* around
Rnd 7-11: sc around
Rnd 12: *inc, sc next 5* around
Rnd 13-14: sc around
Rnd 15: *dec, sc in next 5* around
Go ahead and insert your safety eyes between rounds 12-13 with 6 st apart
Rnd 16: *dec, sc next 4* around
Rnd 17: *dec, sc next 3* around
Rnd 18: *dec, sc next 2* around, make sure to stuff the head
Rnd 19: *inc, sc* around, bind off and set aside
Arms, make 2, start with primary body color, making sure to stuff as you go, primarily stuff in just the hands and very lightly stuff in the actual arms
Rnd 1: 6 sc in magic circle
Rnd 2: inc around
Rnd 4: *inc, sc next 1* around
Rnd 4-5: sc around
Rnd 6: *dec, sc in next 1* around
Rnd 7: dec x1, sc around
Rnd 8-15: sc around, change to jersey color
Rnd 16-20: sc around, no need to leave a long tail for sewing
Legs, make 2, primary body color, no need to leave tail for sewing for the first one and DO NOT bind off on the second. Second will lead to the body part. Make sure to stuff as you go.
Rnd 1: 6 sc in magic circle
Rnd 2: inc around
Rnd 3: *inc, sc* around
Rnd 4: *inc, sc next 2* around
Rnd 5-6: sc around
Rnd 7: dec x2, sc in next 6 st, dec x4, sc in next 6 st
Rnd 8: dec, sc in next 5, dec x3, sc in next 5 st
Rnd 9: sc in next 5 st, dec x2, sc in next 5st
Rnd 10-13: sc around
Rnd 14: *inc, sc in next 5* around
Rnd 15: *inc, sc in next 6* around
Rnd 16: sc around, bind off leg #1, but not leg 2, continue to body with leg two.
Body, starting with leg 2
Rnd 17: sc in next 4, dec using next sc and the 3rd from the end sc of rnd 16 on leg 1, sc around leg 1, dec using last sc in leg 1 and leg 2, sc around (the dec across keeps the gap from happening)
Rnd 18: sc around
Rnd 19: *inc, sc in next 9* around
Rnd 20: *inc, sc in next 10* around
Rnd 21: *inc, sc in next 5* around, change to jersey color
Rnd 22-28: sc around
Rnd 29: *dec, sc in next 5* around
Rnd 30-31: sc around
Rnd 32: *dec, sc in next 4* around
Rnd 33: sc around
Rnd 34: *dec, sc in next 3* around
Rnd 35: sc around
Rnd 36: *dec, sc in next 2* around
Rnd 37: now, here is how I attach the arms. You can always choose to just sew them on. If you do, just sc this row. I look and see about where the arms should go. Now, crochet around the back, for me it was 5 st, but don’t get hung up on that. Just where it looks right. Now, flatten the arm hole, sc through both sc on the arm and the next one on the body. Do this for the next 4 st. Yes, technically the arm has 11, but it will be fine. Now, sc to where the next arm should go. For me it was 4 sc. Repeat the process for the next arm. This moves your start over a bit, but it’s fine.
Rnd 38: sc and bind off.
Sew head to body.
OK, so a couple things here. I currently like to chain how ever many I need and then sew that chain over the color changes and around the neck. I like the look, so that’s what I did. Conversely, you don’t have to at all. To make the head sew on look better, you can change to the body color on the last SC round to make it easier.
Tail, start in black (only because the mascot I was making had a black tail. Adjust as necessary. Also, I didn’t stuff my tail, but just left the tails inside. You can stuff as you go or even add a pipe cleaner if you want.)
Rnd 1: 6 sc in magic circle
Rnd 2-4: sc around, change to body color
Rnd 5-16: sc around, bind off, sew to butt.
Ears, make 2, start it black (because of the mascot I was making has black ear tuffs)
Rnd 1: 6 sc in magic circle, change to body color
Rnd 2: Inc around
Rnd 3: *Inc, sc in next* around
Rnd 4-8: sc around, bind off, and make flat and concave, sewing onto the head between rnds 2 and 7 roughly. For the ear tuffs, I just added/latch hooked style 3 pieces of ‘hair’ and split the yarn. Trim as necessary.
Mouth, in slightly lighter color
Rnd 1: 6 sc in magic circle, change to body color
Rnd 2: Inc around
Rnd 3: *Inc, sc in next* around
Rnd 4-6: sc around, bind off, sew to mouth area making sure to stuff before you close up. You can add a safety nose. or embroider one like I did… because I didn’t feel like trying to find them at this time honestly. The craft room needs some organizing currently.
For the number, I chain to make the number and sewed it on. For the ‘1’ it was two chains sewed on, but that just made it easier for me.
And that’s really it, Mad Hooking!

Recent Comments