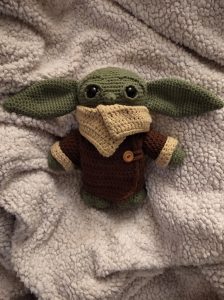
Just like anyone who crochets or knits I have been asked to make up this adorable Child. Here is my take on it. I chose to use medium weight because I had it in my stash. It uses up just a little of the brown colors, but expect to use about 250 yds of the green. Bernat Super Value comes in 426 yds… so I have found that you can almost make two with one green. The format of this pattern is the amigurumi style and assumes you have working knowledge of that style.
You are free to make as many of these as you want. Please link back to me as the designer if someone asks is all I request. Do not copy it as your own pattern work. However please note, this (and any other copyrighted toys I design) is for personal reasons only. This is fan art. Selling them can get you into some serious issues.
Materials:
Bernat Super Value yarn (medium 4 weight) in Forest Green, Dark Heather, and Walnut)
Poly fil for stuffing
G hook or hook needed to make sure no stuffing is visible
Safety eyes size 18mm
Darning needle
Stitch Markers
Arms (make 2)
Rnd 1: 6 sc in magic circle
Rnd 2: *inc* around
Rnd 3: sc around
Rnd 4: *inc, sc* around
Rnd 5-20: sc around. Each arm should be lightly stuffed.
Legs starting with feet. We will make each leg then connect the two legs together and move on to the body and head attaching the arms as we go.
Rnd 1: 6 sc in magic circle
Rnd 2: *inc* around
Rnd 3: *inc, sc 1* around
Rnd 4: *inc, sc 2* around
Rnd 5: sc, *(hdc, 2dc) in next, (2 dc, hdc) in next, sl st in next* x3. Sc in rest 14 st.
Rnd 6: sc around (should be 36 sc)
Rnd 7: sc *hdc, dc dec, dc dec, hdc, sl st* x3. Sc in rest 14 st (30 st)
Rnd 8: *dec, sc 3* around (24 sc)
Rnd 9-13: sc around
Rnd 14: *inc, sc in next 7* around
Rnd 15: *inc, sc in next 8* around
Rnd 16: sc around (should be 30 sc). Bind off for the first leg, but continue on with second leg.
Now, for the slightly tricky part. Put both feet together and use markers to mark the middle 6 stitches. The second leg is the child’s left foot and the toes should point slightly outwards.
Rnd 17: sc to the first marker. Sc through both feet for 6 st. This ends this rnd. Remove markers and place in the next st on the left leg.
Rnd 18-26: sc around (48 sc)
Rnd 27: *dec, sc 4* around
Rnd 28: *dec, sc 3* around
Now to attach the arms
Rnd 29: sc around. For the first round of the arms you will be crocheting through 9 stitches of the arms and body at the same time. So, to make it exact you can find the center of each side, count over 4 sc and that is where you start each arm. Conversely, you can do what I do and go, yeah, about there looks right.
Rnd 30: sc around. Like the previous round you are going to sc through 9 sc of the arm (this time top of the arm). Tada, arm attached and no sewing!
Rnd 31-32: sc around (32 sc, I’m pretty sure. I forgot to count to make sure. Need to make again to see) Go ahead and stuff the toes and body up to this point and be sure to continue to stuff as you go.
Rnd 33: *dec, sc 2* around
Rnd 34-35: sc around
Rnd 36: *inc, sc in next 3* around
Rnd 37: *inc, sc in next 4* around
Rnd 38: *inc, sc in next 5* around
Rnd 39: *inc, sc in next 6* around
Rnd 40: *inc, sc in next 7* around
Rnd 41: *inc, sc in next 8* around
Rnd 42: *inc, sc in next 9* around
Rnd 43: *inc, sc in next 10* around
Rnd 44-48: sc around
Now, because of how increasing work you will not be in the middle of the back of the head. Just to make things a touch easier sc over until you are at the middle. For me this was only 6 sc over.
Rnd 49: sc in next 12, dec x3, sc in next 30, dec x3, sc in next 18
Rnd 50: *dec, sc in next 4* around
Rnd 51: sc in next 10, *dec, sc* x3, sc in next 16, *dec, sc* x3, sc in last 11
Rnd 52: *dec, sc in next 5* around
So now is a good time to go ahead and pop in those safety eyes between rounds 46-47 about 12 sc apart. Make sure you are stuffing as you go as we finally only have a few rounds left! WOOt!
Rnd 53: *dec, sc in next 4* around
Rnd 54: *dec, sc in next 3* around
Rnd 55: *dec, sc in next 2* around
Rnd 56: *dec, sc in next 1* around
Rnd 57: *dec* around, bind off and weave in the end
Ears, make 2
Rnd 1: 6 sc in magic circle
Rnd 2: sc around
Rnd 3: *inc, sc* around
Rnd 4: sc around
Rnd 5: *inc, sc in next 2* around
Rnd 6: sc around
Rnd 7: *inc, sc in next 3* around
Rnd 8: sc around
Rnd 9: *inc, sc in next 4* around
Rnd 10: sc around
Rnd 11: *inc, sc in next 5* around
Rnd 12: sc around
Rnd 13: *inc, sc in next 6* around
Rnd 14: sc around
Rnd 15: *inc, sc in next 7* around
Rnd 16-20: sc around
Rnd 21: *dec, sc in next 7* around
Rnd 22: sc around
Rnd 23: *dec, sc in next 6* around
Rnd 24: sc around
Rnd 25: *dec, sc in next 5* around
Rnd 26 : sc around and bind off leaving an extra long tail for sewing.
Now, you can choose to sew them on now. Flatten them out and sew in line with the middle of the arms, roughly two rounds above and below with a slight little curve. I have found that I prefer to use a tiny bit of stuffing around the edges of the ears and after I sew it on I do a running stitch up and down the ear on either side of the middle of the ear. While not necessary it does give it a fuller look that I prefer.
Nose
Rnd 1: 6 sc in magic circle
Rnd 2: sc around, bind off and sew onto face in the middle and one round down from the center of the eyes.
Lower eyelid (make 2)
Ch 9 and sew onto face under the eyes. I like to sew one side loops leaving the opposite side against the eye.
Upper eyelid (make 2)
Ch 10 and sew onto face above the eyes going over the ends of the lower eyelids. I like to sew one side loops leaving the opposite side against the eye.
Eyebrow (make 2)
Ch 12 and sew onto face above the eyes with a slight curve starting about 2 rounds above the eyelid to about 3 st from the eyelid on the side. I like to sew this with the back bumps/ridges up and sew both loops down.
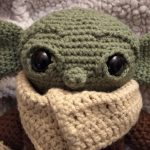
Now you have a cute naked child… or creepy looking one. Time to get it dressed!
Robe
Starting at the top with the lighter cream color (Dark Heather)
Row 1: Ch 62, dc in 3rd ch and across, ch 2 and turn (60 dc)
Row 2-8: dc across, ch 2 and turn. At the end of row 8 change to Walnut
Row 9-10: dc across, ch 2 and turn
Row 11: dc in next 18, ch 10 and skip 5 st, dc in next 14, ch 10 and skip 5 st, dc in next 18, ch 2 and turn (50 dc)
Row 12: dc across including a dc in each of the chains, ch 2 and turn
Row 13: dc in next 13, dec x2, dc in next 2, dec x2, dc in next 14, dec x2, dc in next 2, dec x2, dc in next 13, ch 2 and turn
Row 14: dc across, ch 2 and turn (62 dc)
Row 15: dc in next 13, dec, dc in next 22, dec, dc in next 13, ch 2 and turn
Row 16-19: dc across, ch 2 and turn (60 dc). On row 19 ch 1 and turn
Row 20: sc around the outside of the robe making sure to change colors where appropriate and placing 3 sc in the corners. When you get to the last corner, place 2 sc then sl st to the first. Bin off and weave in ends. This is optional of course. The ch 2 makes a cleaner edge, but old habits and all… I prefer the look.
Robe arms, do this twice:
Row 1: join Walnut yarn at the middle of the ch 5 you did to create the openings. Ch 1 and sc in that st. Now sc around, placing a sc in the corner ‘gaps’ between the ch and where you skipped 10. Sl st to the first, ch 1 and do NOT turn. (17 sc)
Row 2-3: hdc around, sl st to first and ch 1
Row 4: 2 hdc in first, hdc in rest, sl st to first and ch 1 (18 hdc)
Row 5: hdc around, sl st to first and ch 1
Row 6: *hdc inc, hdc in next 8* around, change to Dark Heather, sl st and ch 1 (20hdc)
Row 7-10: hdc around, sl st to first and ch 1. On row 10 sl st and bind off, weaving in the end.
When putting the robe on, the Dark Heather part is folded up once.
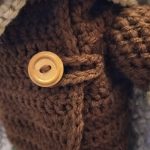
Now, you could sew the robe on the child in place and call it a day. Maybe adding a button for looks. Mind you, if a youngling is getting this, keep that in mind. Buttons are easy for kids to get off and it looks like candy. I’m including how I did the button to make it where the robe can be removed. Now, this isn’t an exact science because it depends a lot on your button size, but it is simple enough to be able to alter it to your needs.
Put the robe on the child. The child’s left side of the robe goes under the right. It should have quite a bit of room for it. So, sew the button between rows 11-12 about 3-4 stitches in. Be careful to not sew into the child. Next make a chain that is just long enough to go from under the left armpit around the button and back (for me it was 15 ch). Attach both ends under the armpit making a loop.
And that’s it!
Like all my patterns, they are posted for free. In fact this site as of right now has no ads either. If you like my work and want to pay something for the pattern, there is a donate button.
Mad Hooking!

Regarding the robe, if I’m dc 18 skip 10 dc 14 skip 10 dc 18 that is 50 DC’s but I skip 20 that makes it’s a 70 st not 60….. I’m so confused
It should read: Row 11: dc in next 18, ch 10 and skip 5 st, dc in next 14, ch 10 and skip 5 st, dc in next 18, ch 2 and turn (50 dc)
So you are skipping 10 total, 5 for each arm. Sorry!
Thank you for getting back to me.
Row 13 is troubling me too, dc 13 dec x 2 is that decrease twice or dc 13 dec twice.
Here is mine. Some if the counts seemed off in the robe. Chain 10 for the arm gives it a bigger area under the arm than above.
So I have a question when you say *inc* sc do you mean one or in every stitch ? Sorry I am new at reading other people’s patterns I love your work
Thank you for the pattern.
Hi how do you stitch the eyelids on? Can you post some pictures? Thanks. Su
Row 13: dc in next 13, dec x2, dc in next 2, dec x2, dc in next 14, dec x2, dc in next 2, dec x2, dc in next 13, ch 2 and turn
IT all adds up correctly for the next row and dc across being 62 how ever when I get to DC in the last 13 there is more stiches? BUt the total is right of how many dc you end up with sois there a mistake?
Row 15 same thing I have made two yodas so far an it ends up looking fine in the end but then there is an error in how it is written.
Hi there, this pattern is adorable! Can you please tell me how tall the doll is?
Thank you❤️
Hi, i’m truble in robe. In row 11 i’ve 50 dc and 20 chain, In row 12 i’ve 70 dc, Is it True? In row 13 It serena i have 60 st ti decrease. I don’t understand, Sorry, thank you. Bye Noemi
Hi! You are very talented!! Thank you for this pattern! Also, I was wondering, could you tell me what is the final size? I would love to make it. Thank you 🙂
Robe: Row 13 is dec x 2 (do two separate decreases, i.e turn 4 stitches into 2 stitches), dc 12, dec x2. The decreases come at the ends of the sleeve gaps. You go from 70 stitches in the previous row down to 62 in this row. Don’t worry about how many there are between, it’ll be fine if you just decrease 8x total somewhere in there that looks ok and is not the sleeve gap.
I mean, you could probably put it under the sleeves actually. Put it wherever you want.
Robe : Row 13 – you just need to put 8 decreases in there to take 70 stitches down to 62. I’m not sure how important it is for them to be anywhere in particular, as long as they are more or less symmetrically placed. Instead of dc in next 2, I did dc in next 12. Seems ok.