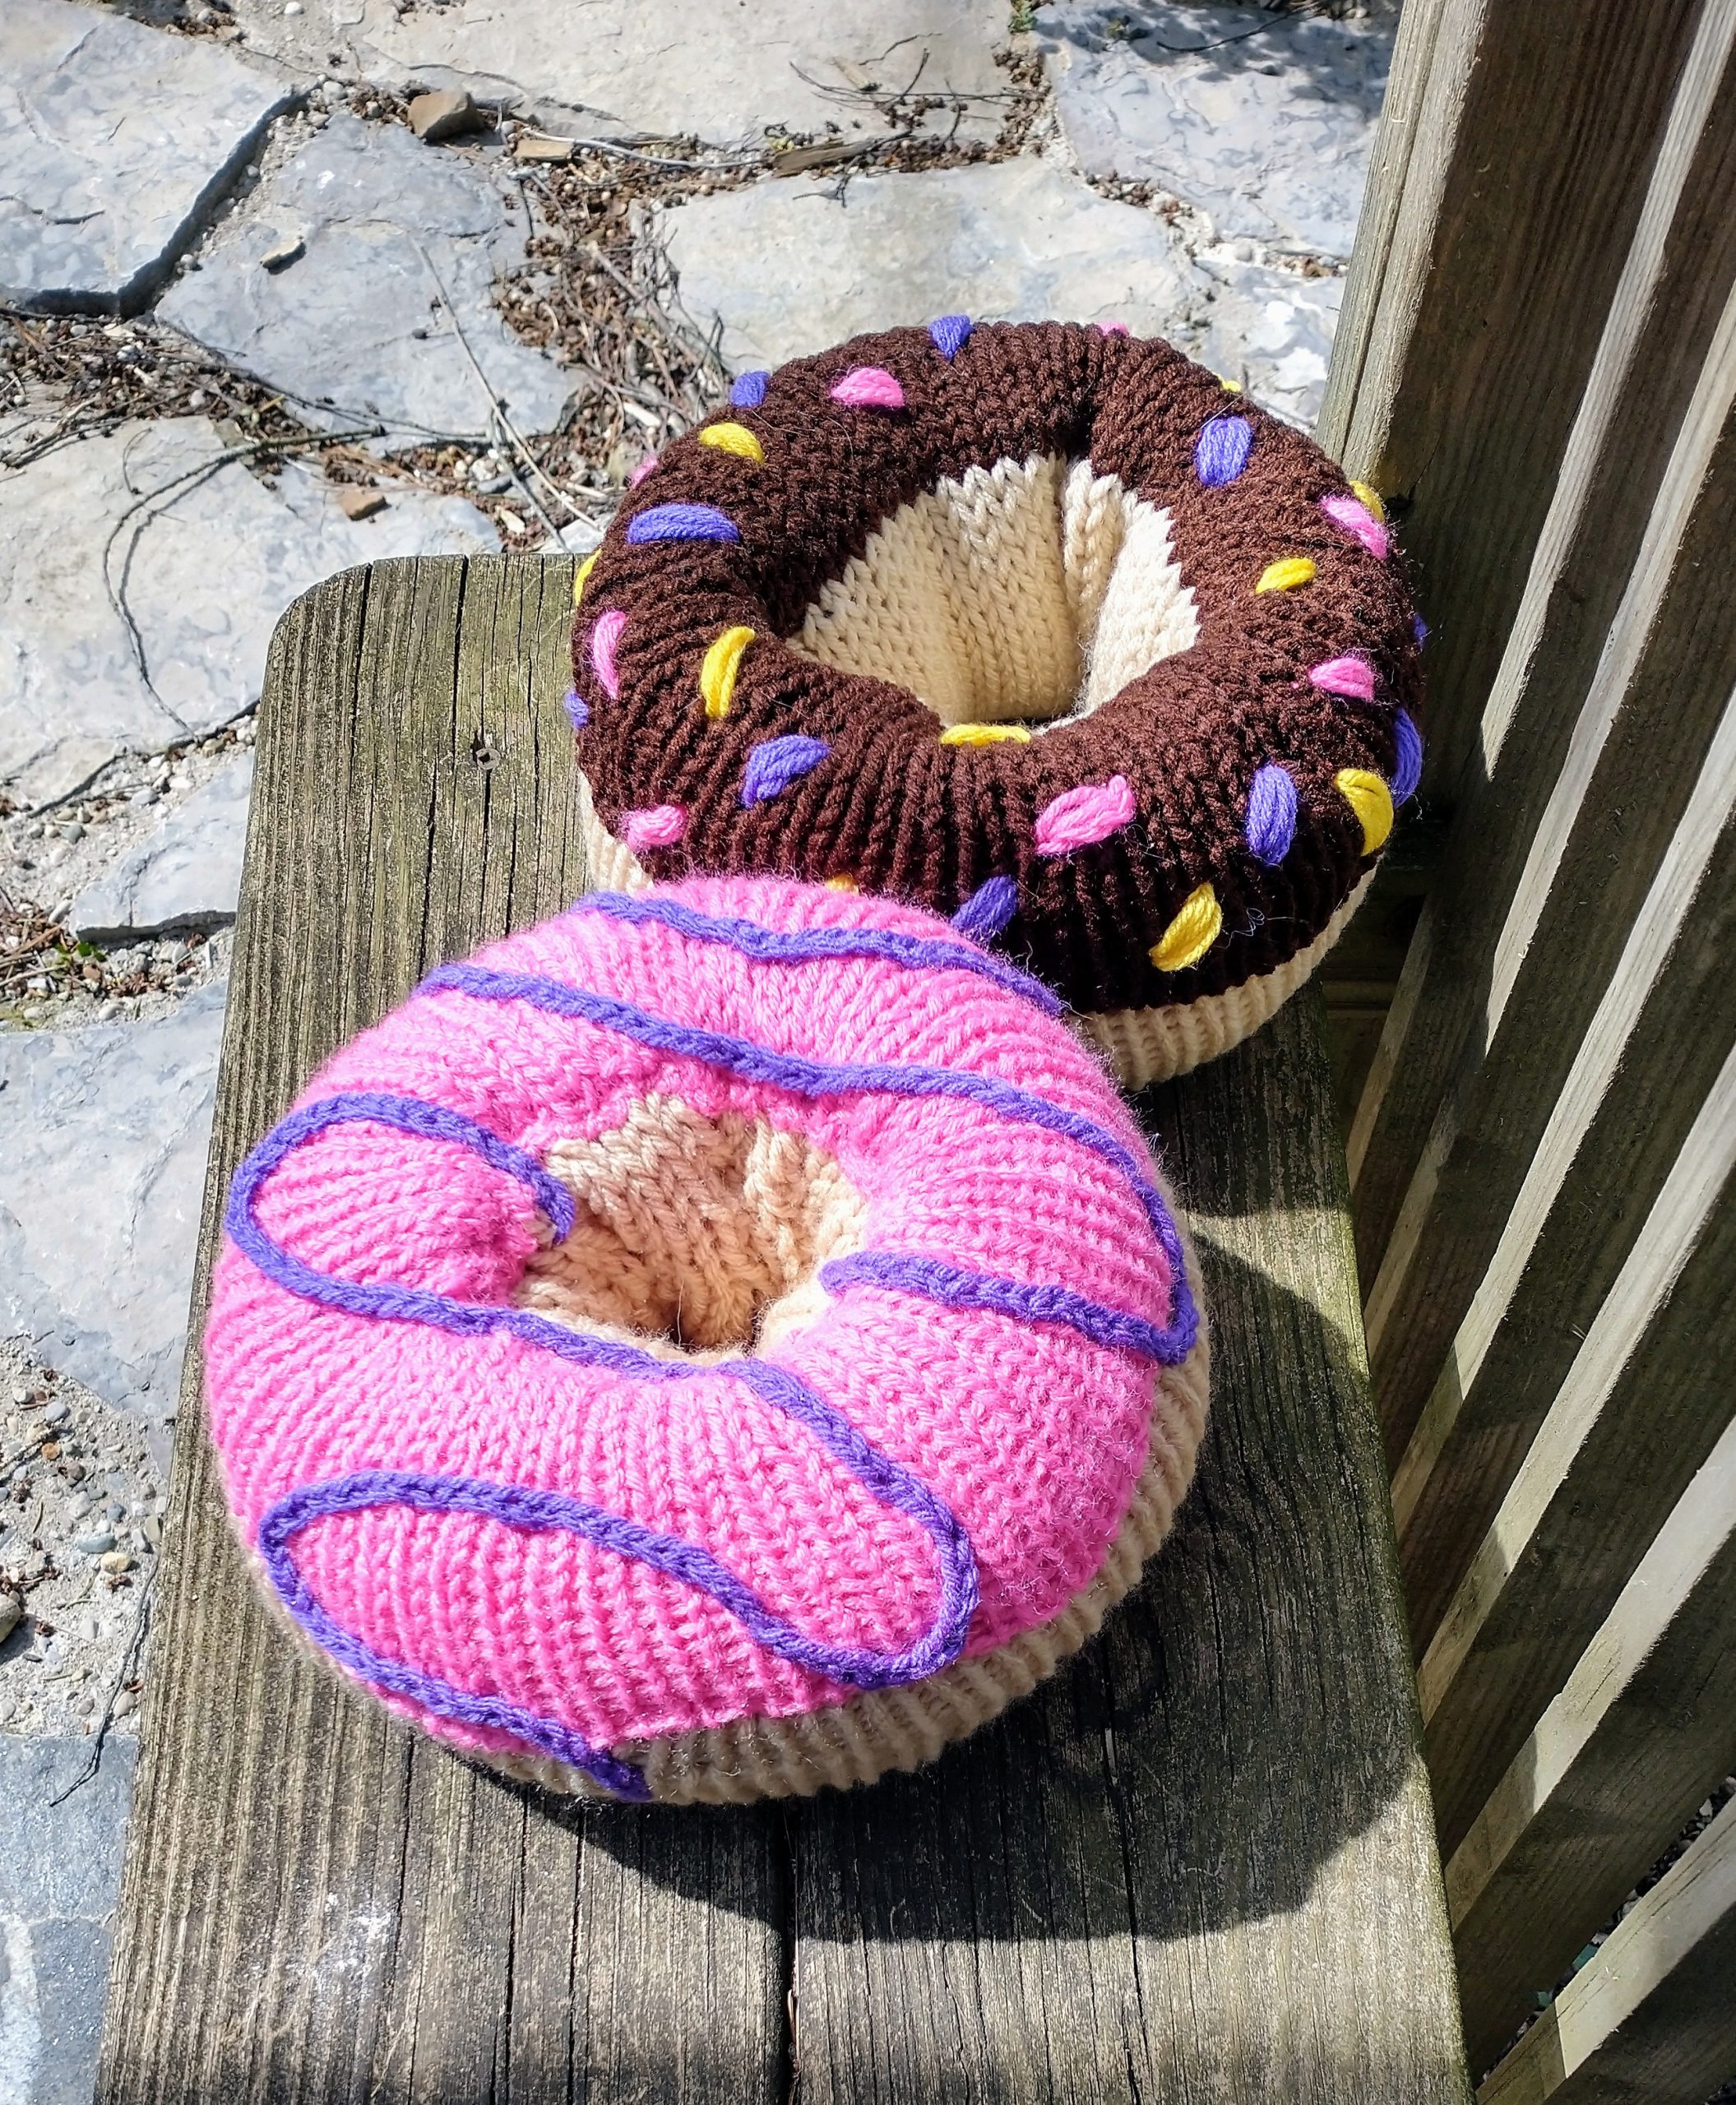
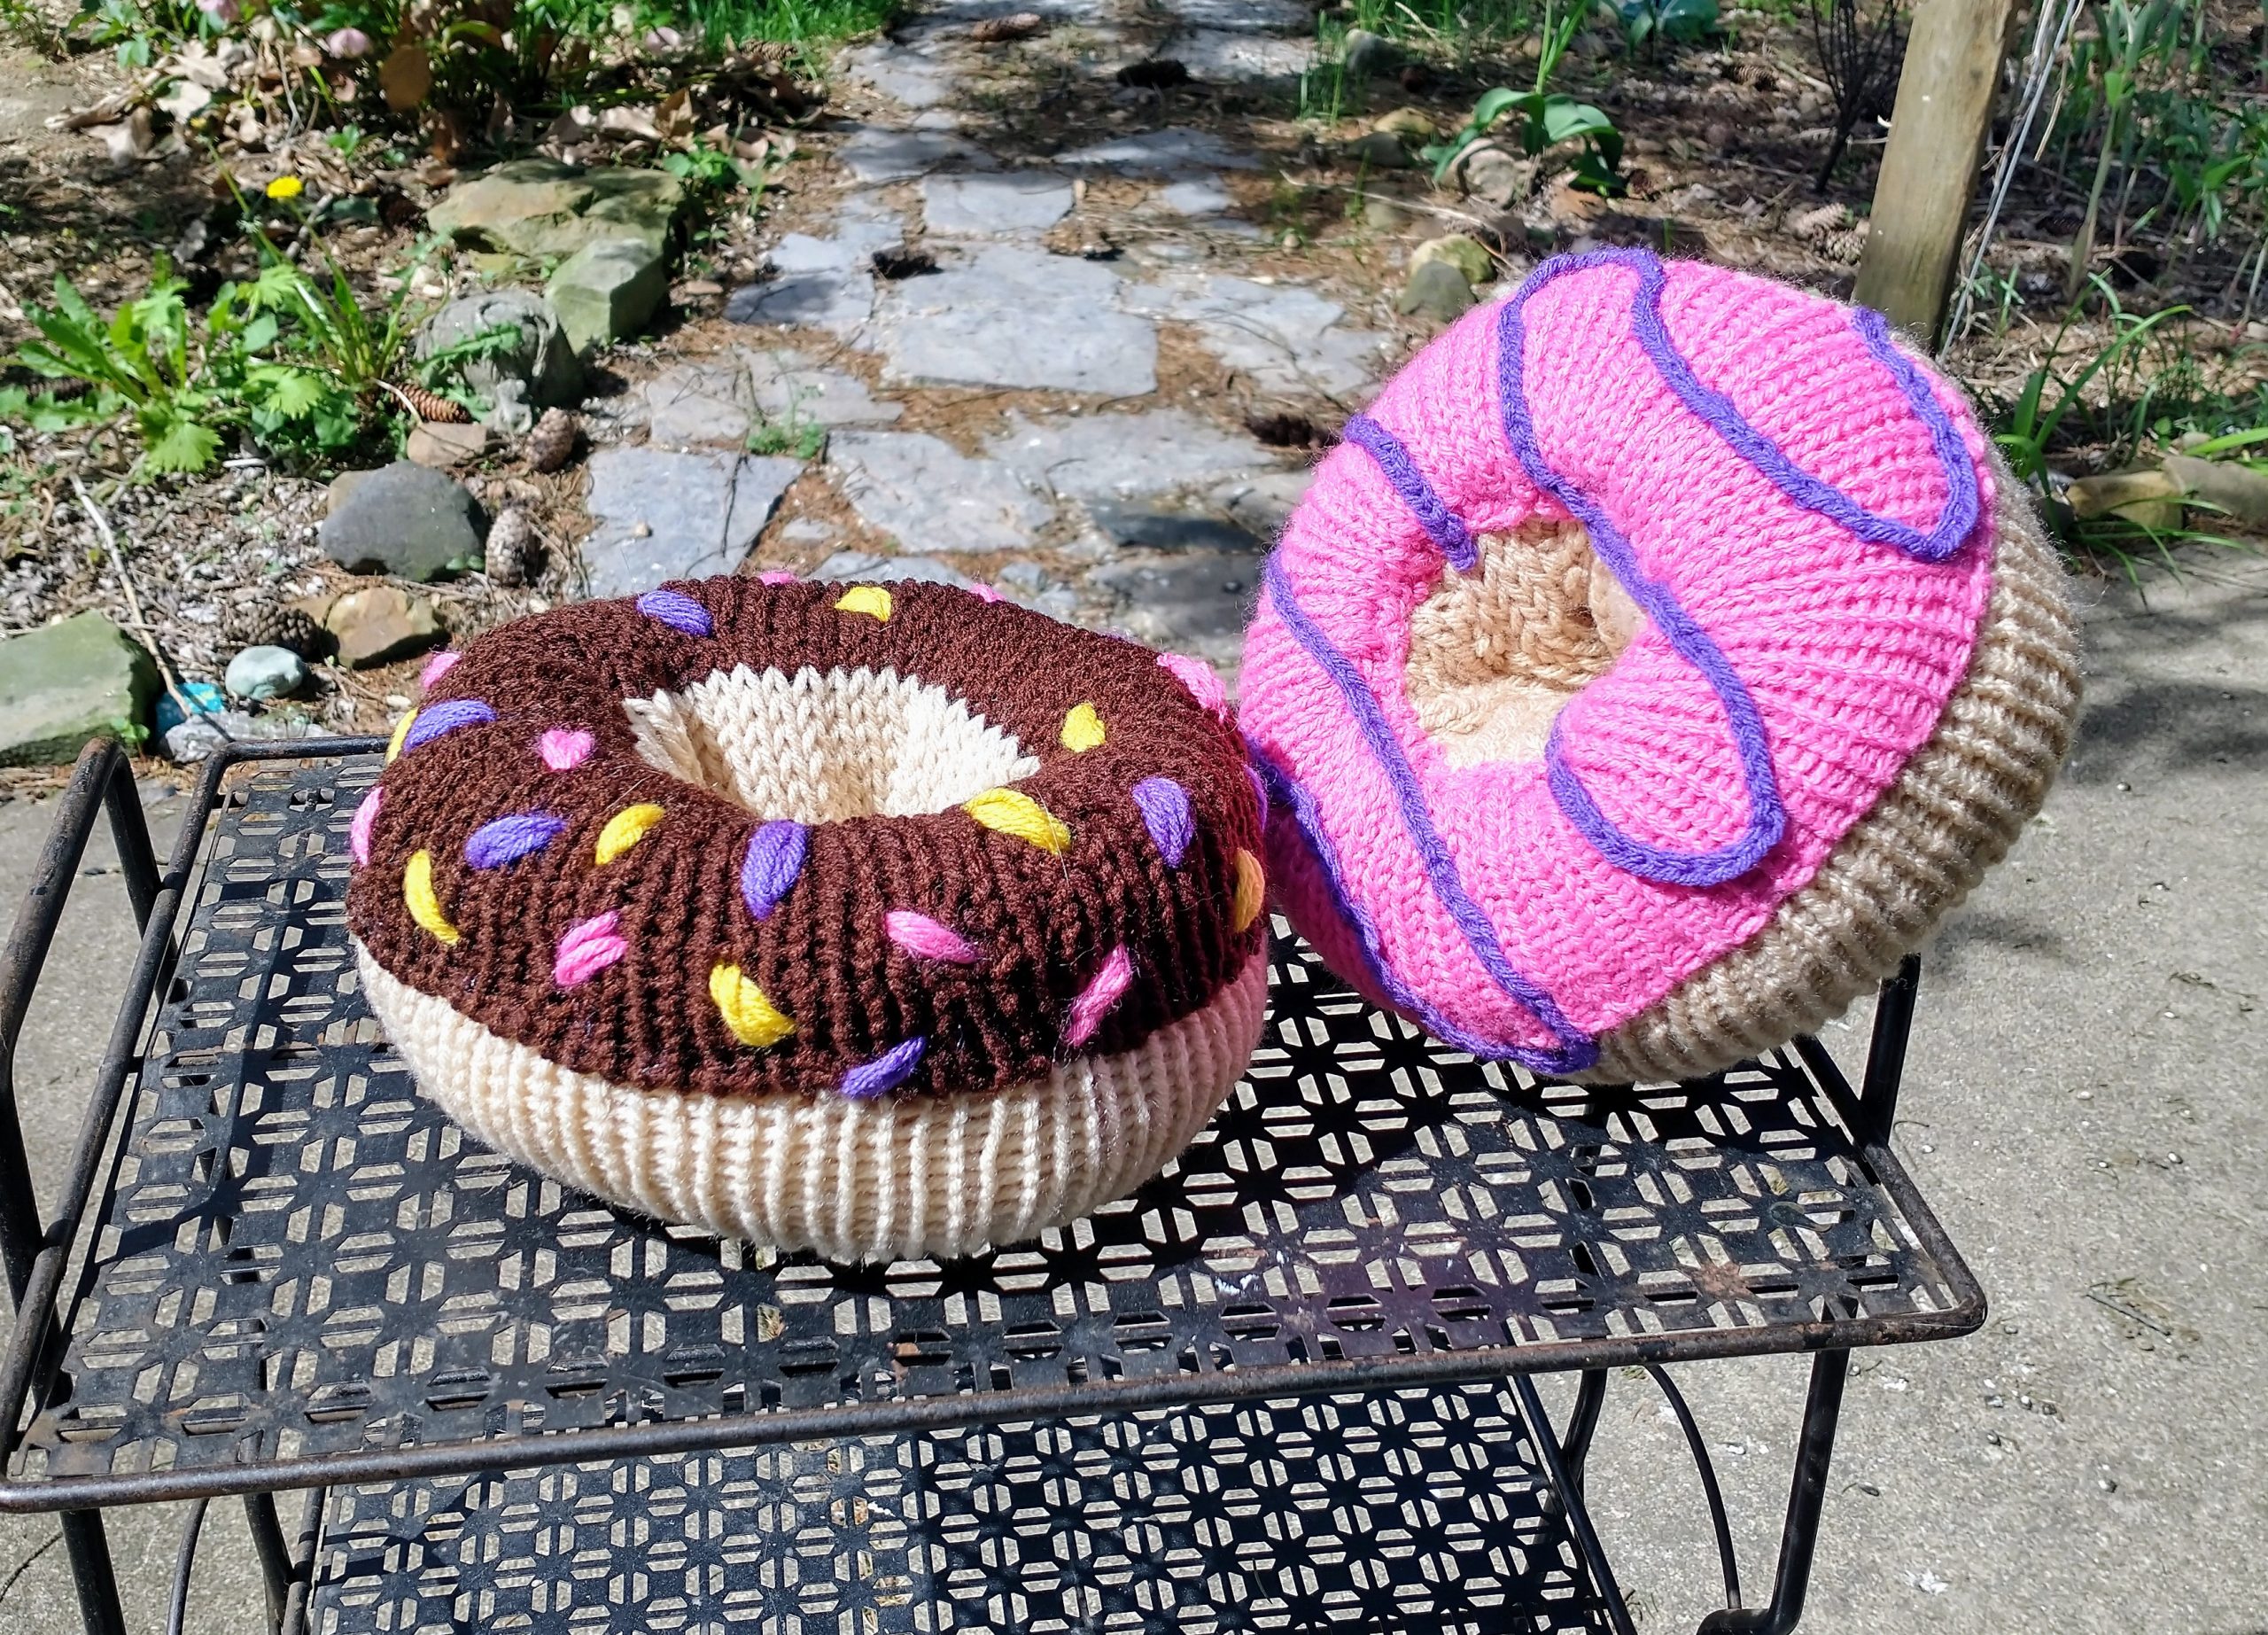
So, I recently found out about knitting machines and I absolutely fell in love. There are some really wonderful and supportive people out there that I have creeped on and watched so many videos on! I started with the Sentro, but quickly put the Addi express (22 and 36) on my watch list for when the price went down. My husband surprised me with both! We are celebrating Easter late this year due to when our oldest is home from college and I wanted to make something for both the kids. Sadly they are not into hats or scarves and I was running low on time for a blanket. I really wanted to make them a stuffy and loved the idea of a doughnut. The only one I could find was in a pattern book (that’s now on my birthday wish list) and that was a bit bigger than I was thinking. Since I roll my work like a doughnut anyway, I trial and errored and I think it turned out quite well! The pink icing was the first (way too much sewing) so by the chocolate one I kinda had it figured out.
For these I used the addi 46 pin.
In the doughnut color crank out 120 rows. Change to icing color and crank out 40 rows for a total of 160 rows and leave a LONG tail for sewing if you are slightly lazy like me. Remove from the machine carefully not to pull it tight.
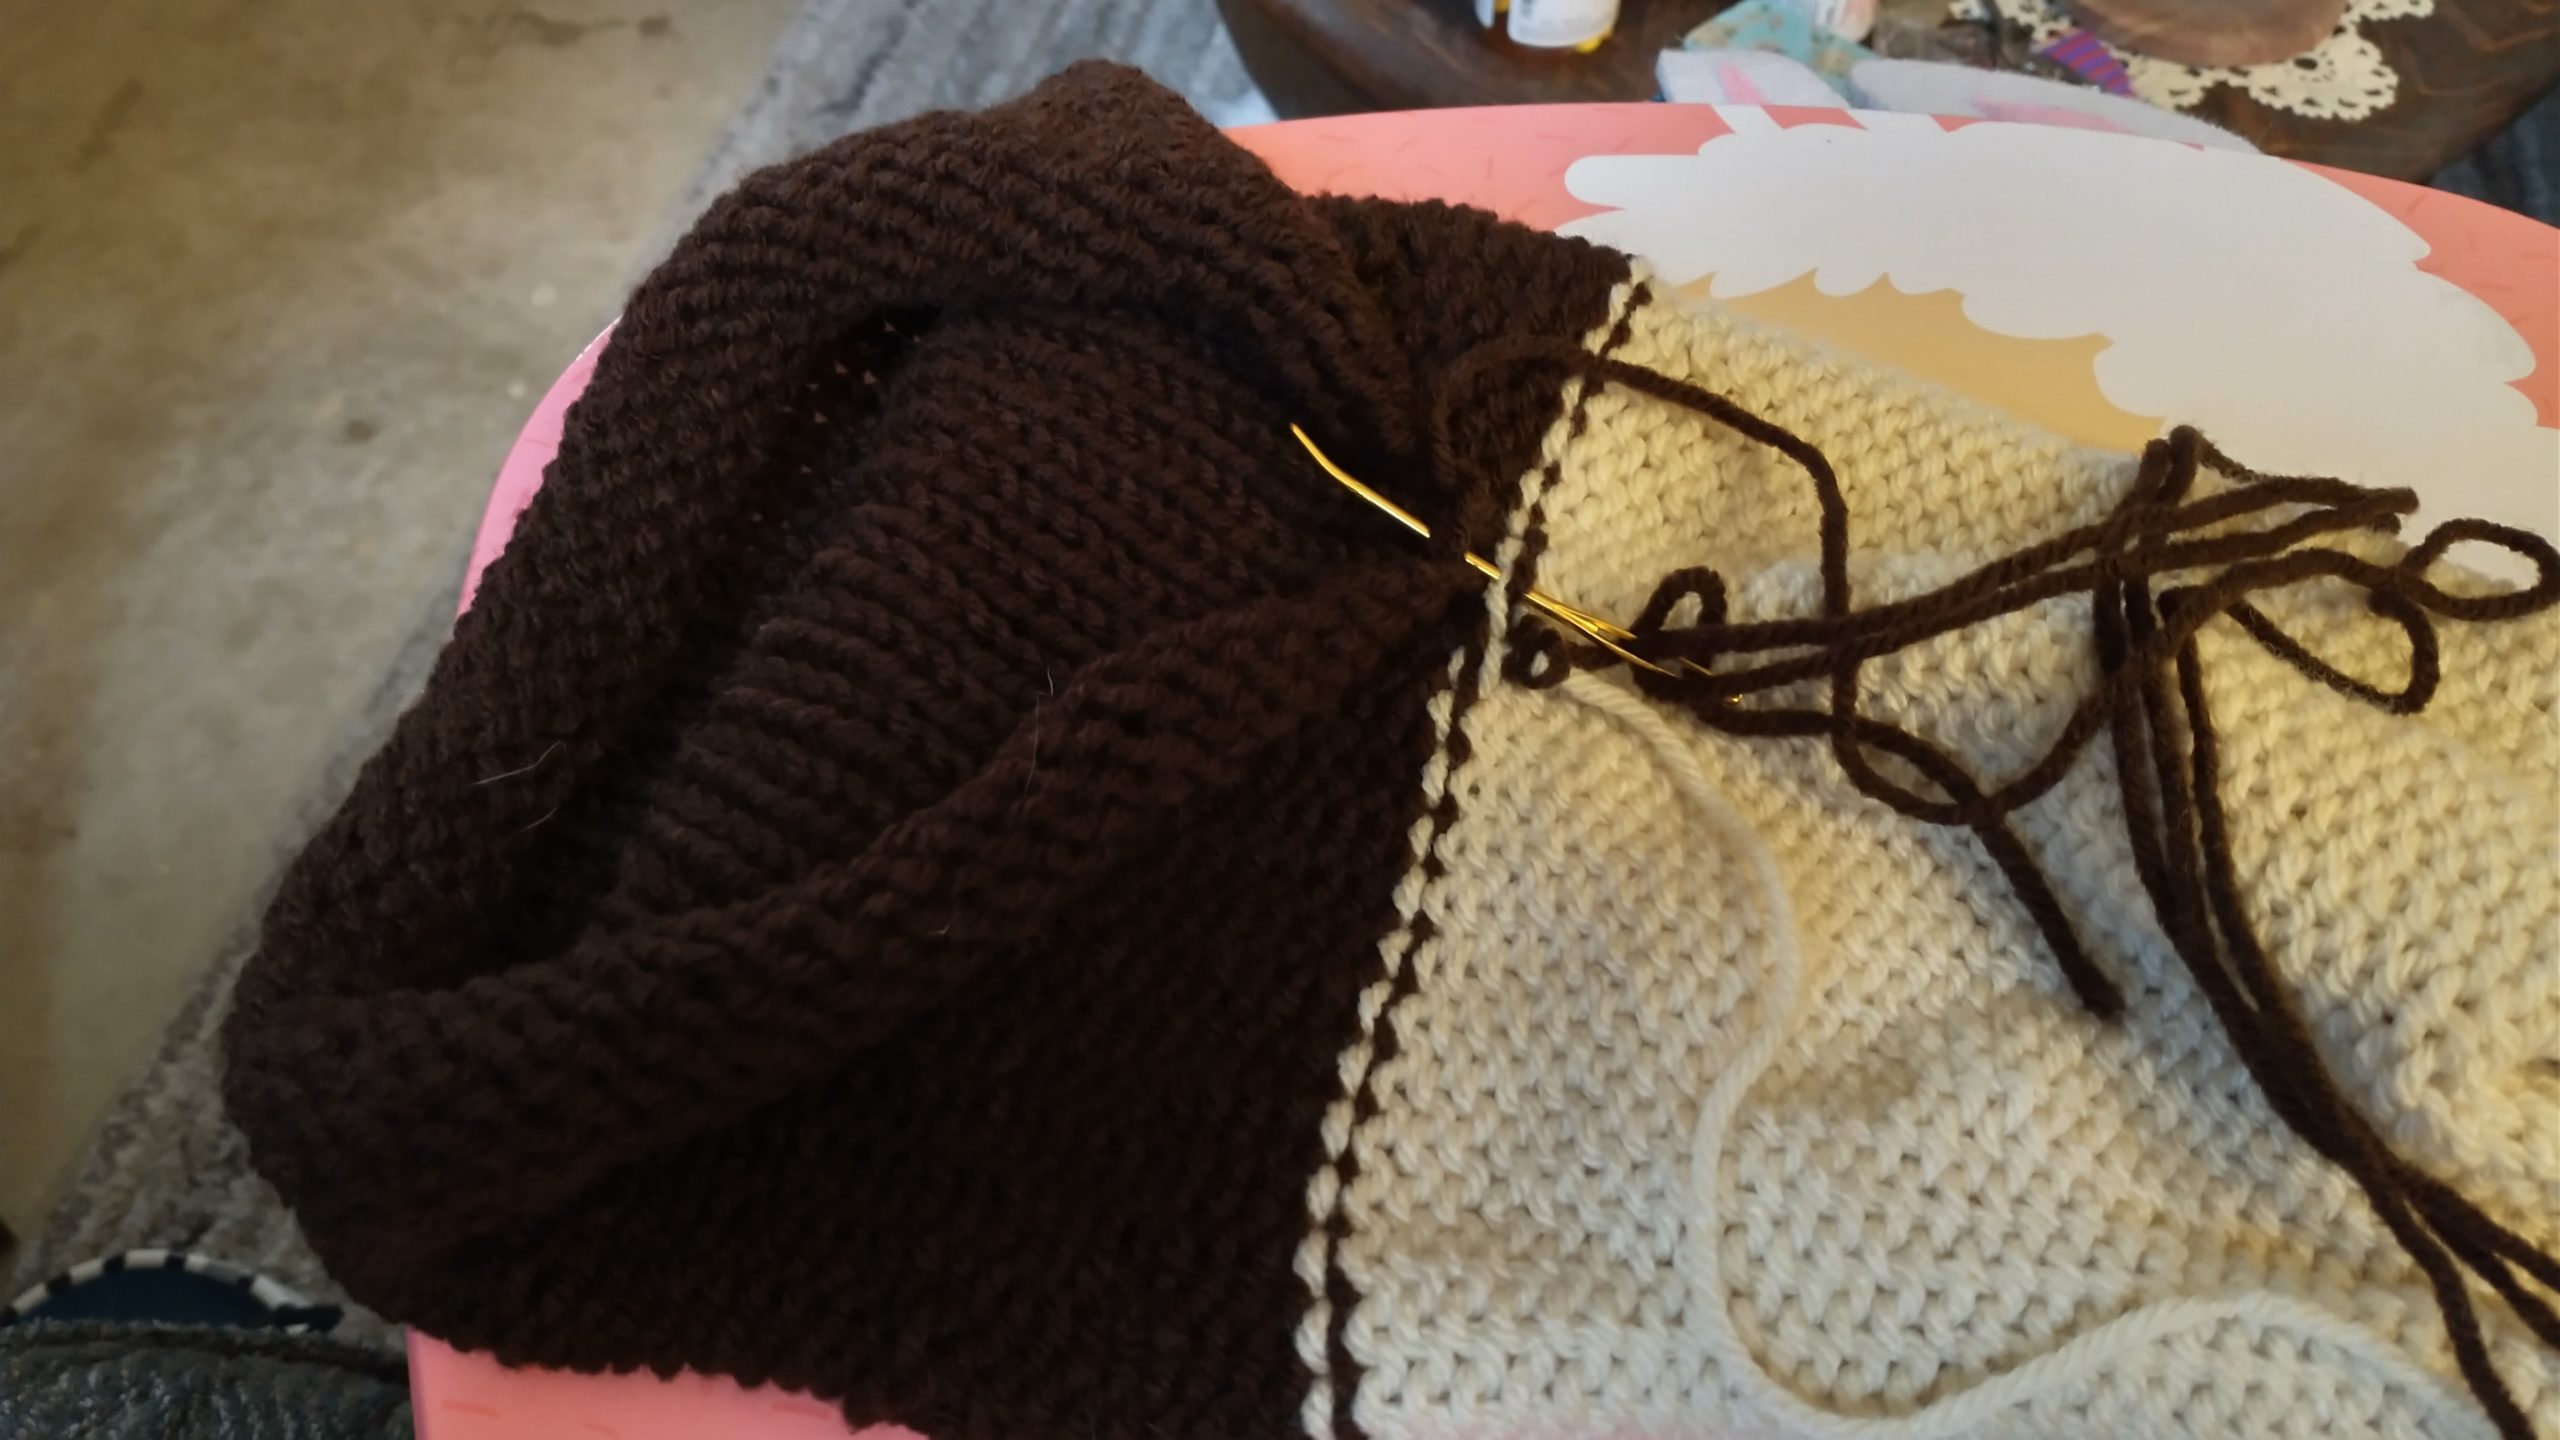
Turn it inside out. Sew the last icing row to the first icing row. This leaves the knitted side out.
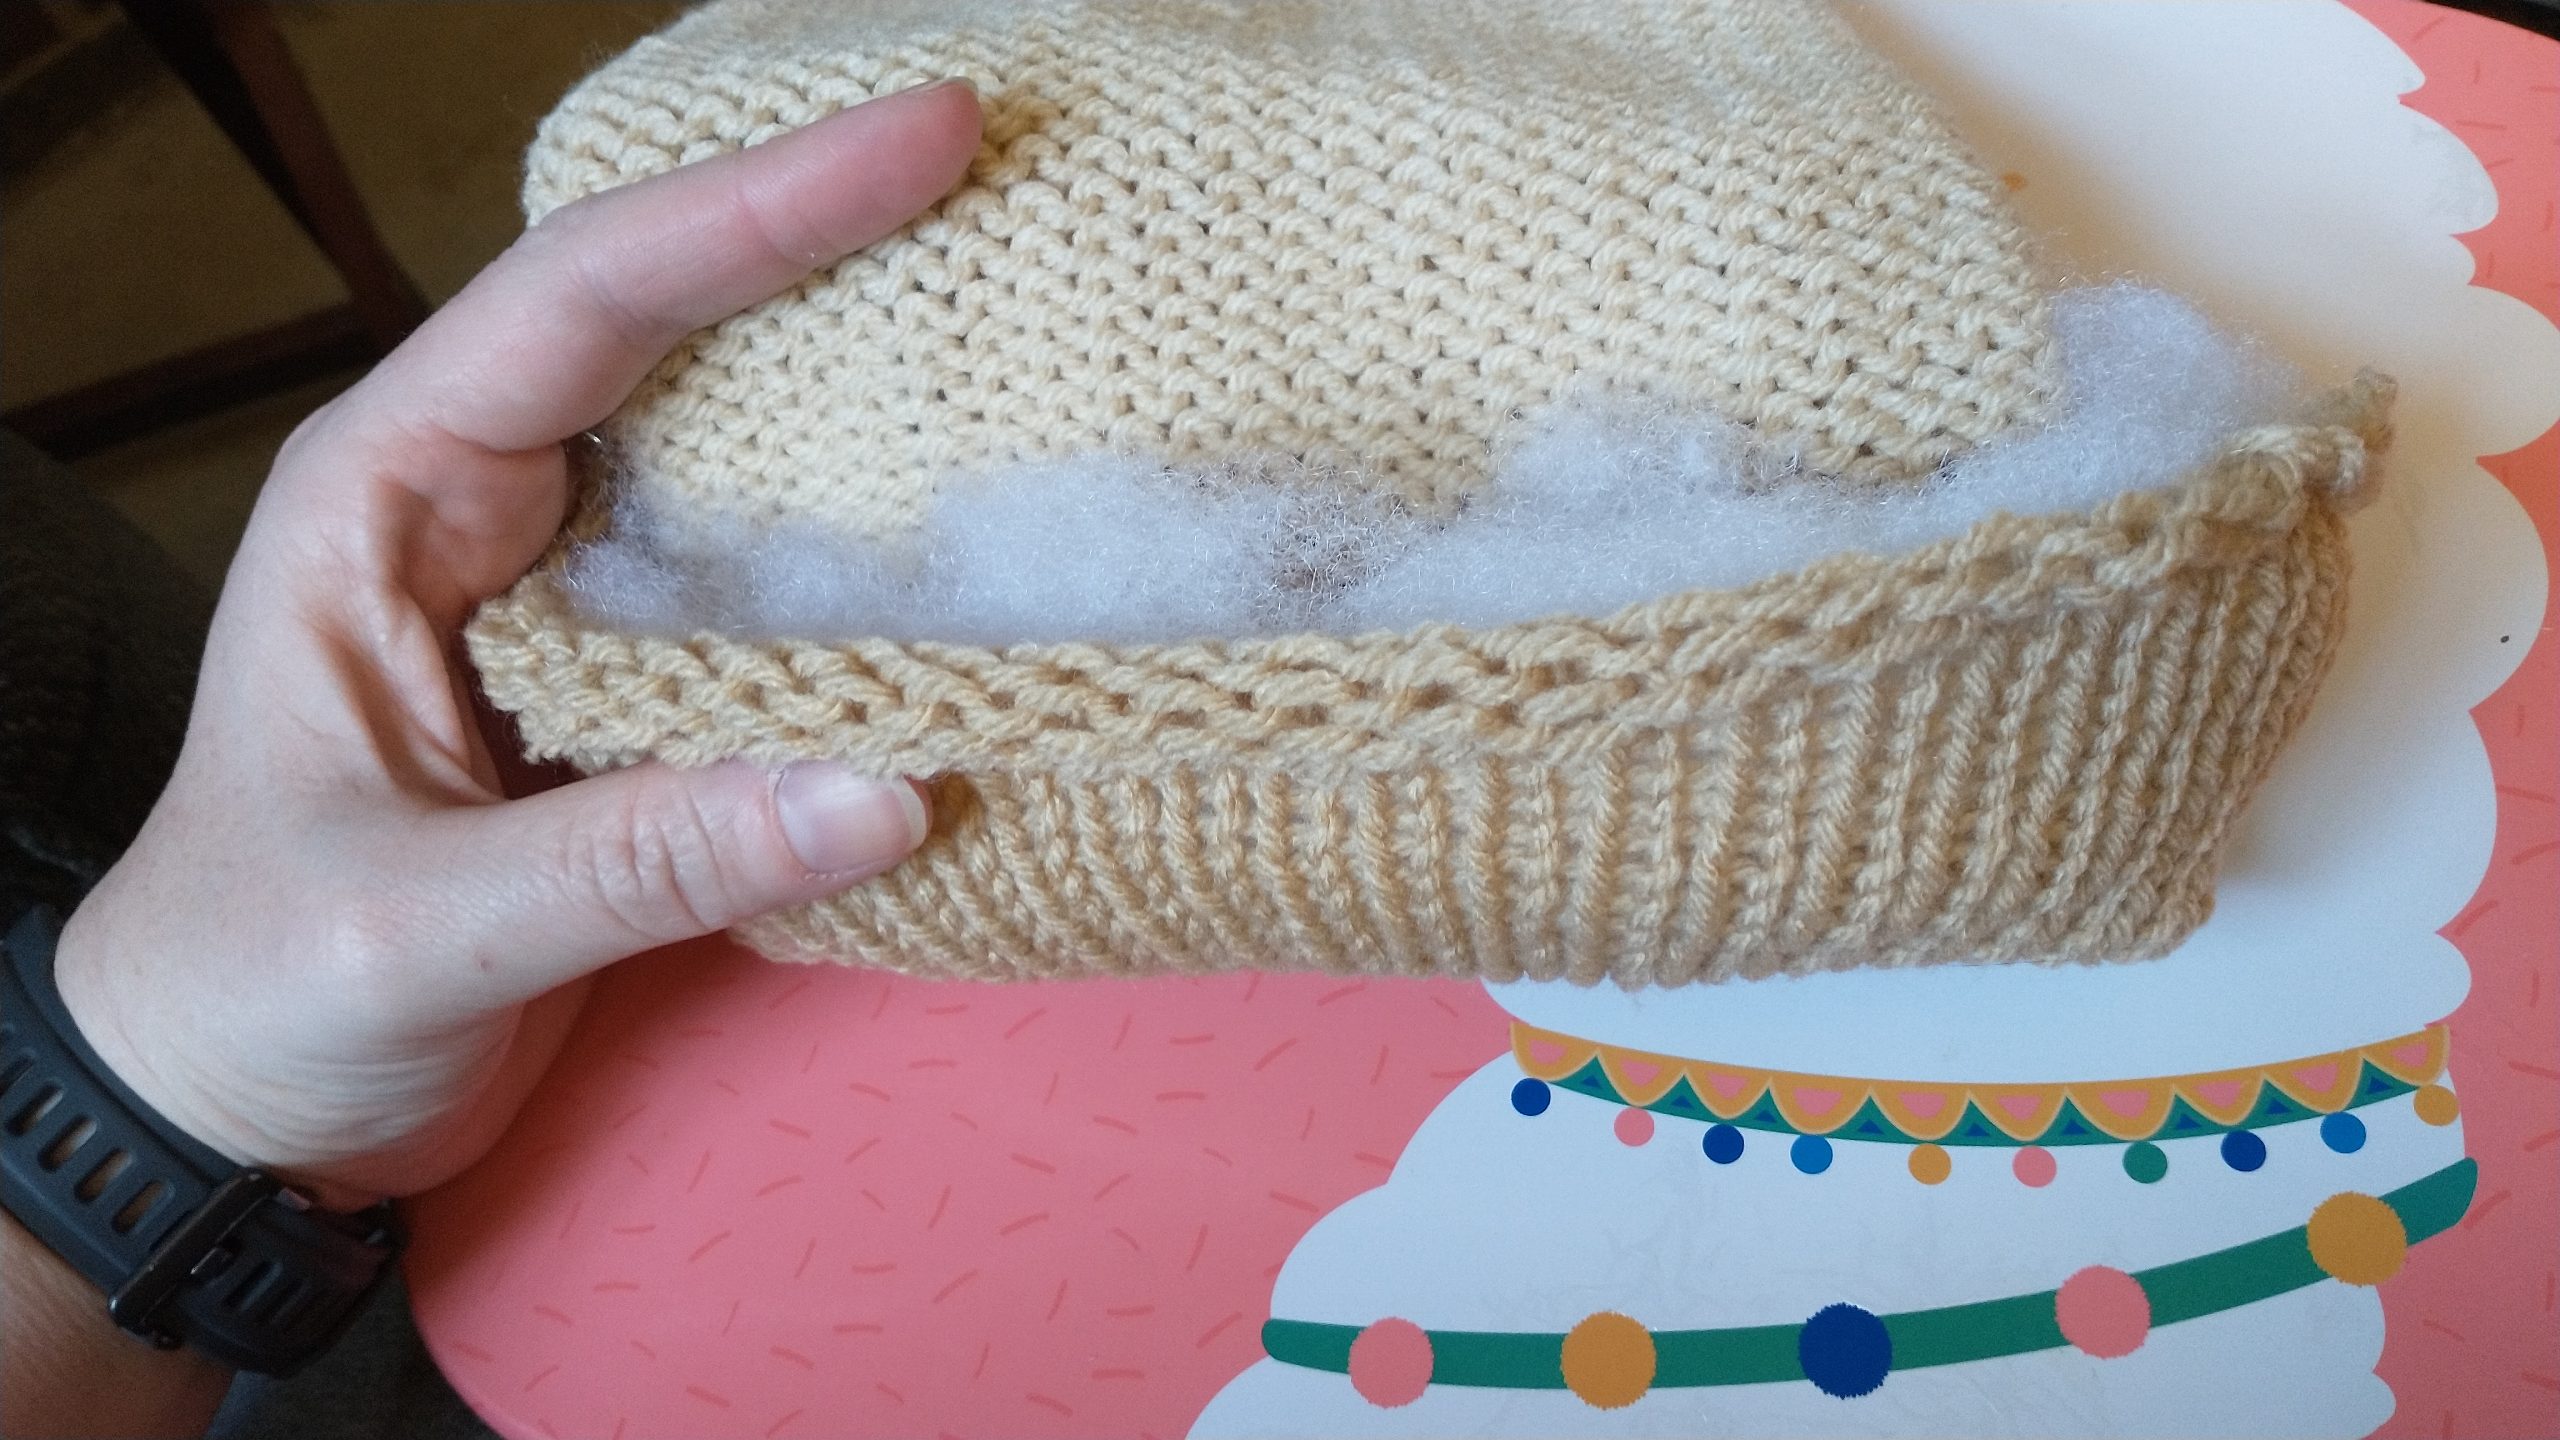
Starting on the other end, start to roll the doughnut. Place stuffing all around the middle. You don’t need too much, but a this is the only place I stuffed it. Continue to roll and it takes a little fiddling to get exactly where you want the icing, but not bad honestly.
Now sew the icing onto the doughnut. Don’t worry about being straight. I actually made the pink one to be more random.
For the swirl I crocheted a chain (I kept placing it on the doughnut to see how long to make it) and sewed it on. Note, if you start with the start of the swirl I left a long tail and started from the center of the doughnut and went outward. Then I left a long tail, made the chain and started again at the center. That way if your chain is a bit long or short you can easily adjust.
For the sprinkles I doubled up my yarn and did a quick 3 stitch satin stitch. So, up and down 3 times in the same space. Spaced it out as randomly as I could around.
And it’s that easy! I hope you like this as much as I do… and I hope the kids do as well.
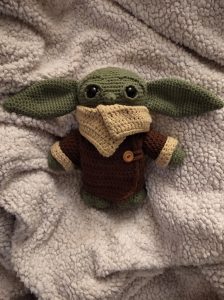
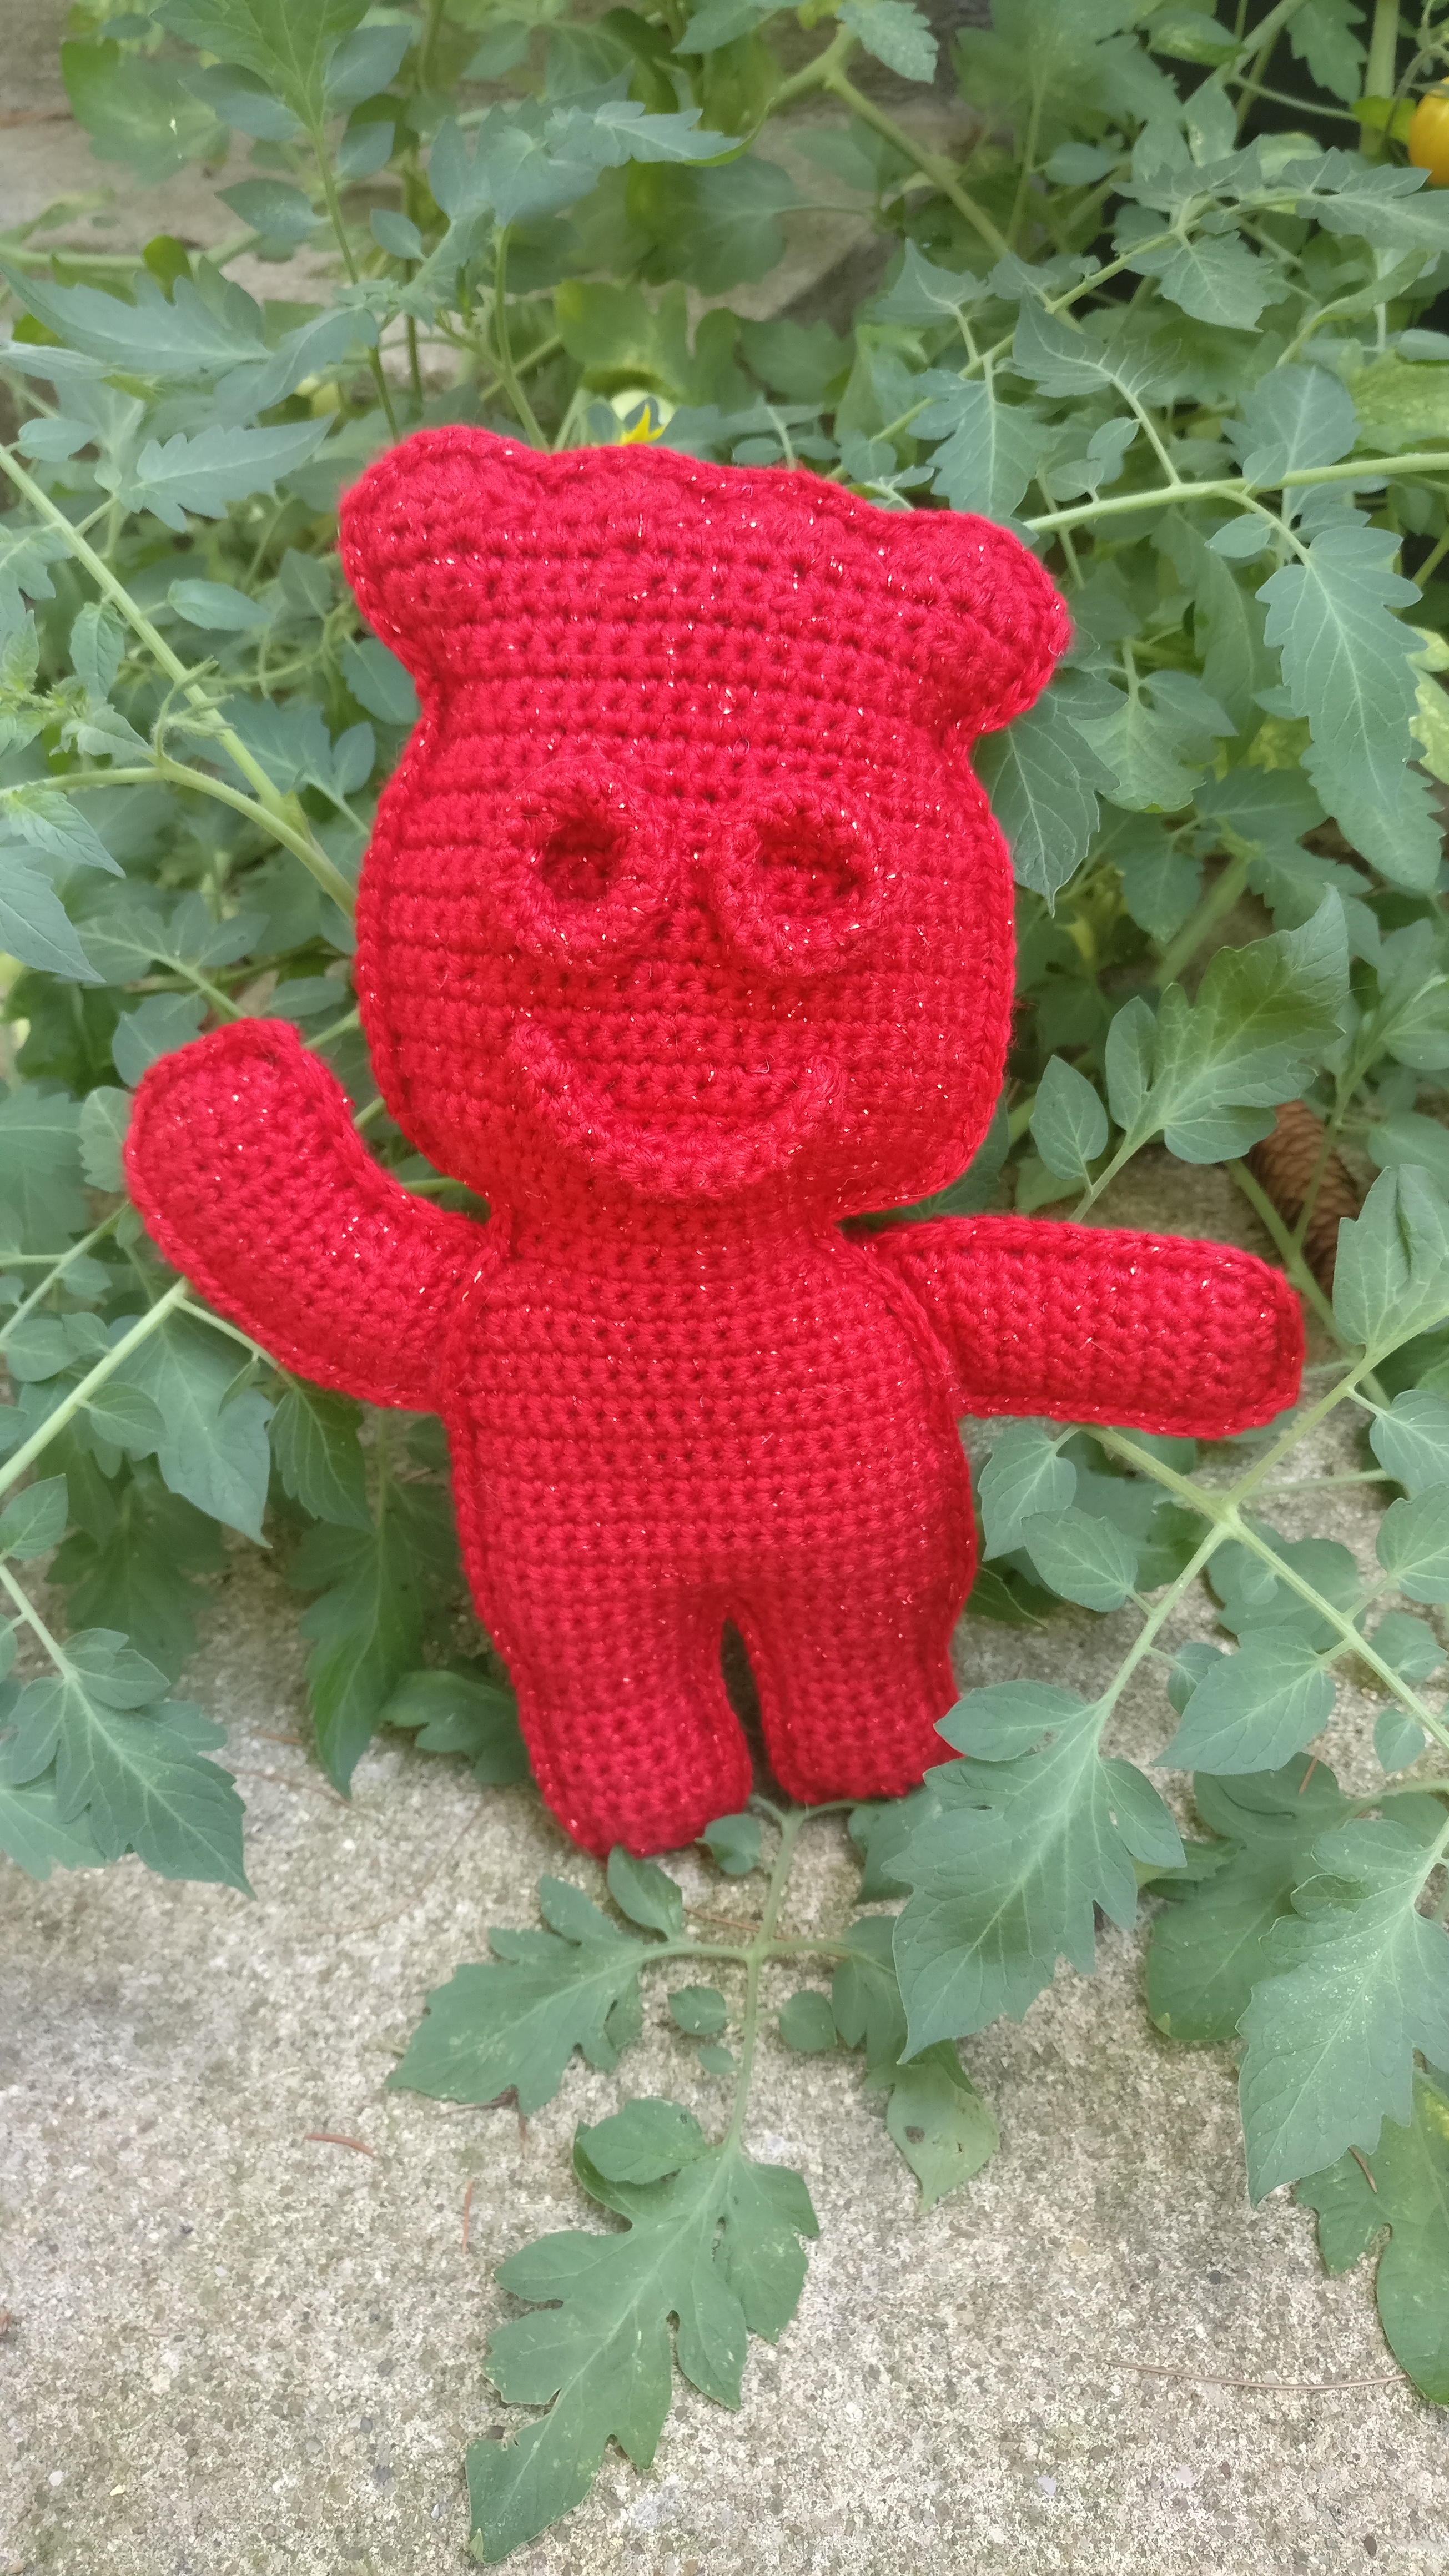
Just like anyone who crochets or knits I have been asked to make up this adorable Child. Here is my take on it. I chose to use medium weight because I had it in my stash. It uses up just a little of the brown colors, but expect to use about 250 yds of the green. Bernat Super Value comes in 426 yds… so I have found that you can almost make two with one green. The format of this pattern is the amigurumi style and assumes you have working knowledge of that style.
You are free to make as many of these as you want. Please link back to me as the designer if someone asks is all I request. Do not copy it as your own pattern work. However please note, this (and any other copyrighted toys I design) is for personal reasons only. This is fan art. Selling them can get you into some serious issues.
Materials:
Bernat Super Value yarn (medium 4 weight) in Forest Green, Dark Heather, and Walnut)
Poly fil for stuffing
G hook or hook needed to make sure no stuffing is visible
Safety eyes size 18mm
Darning needle
Stitch Markers
Arms (make 2)
Rnd 1: 6 sc in magic circle
Rnd 2: *inc* around
Rnd 3: sc around
Rnd 4: *inc, sc* around
Rnd 5-20: sc around. Each arm should be lightly stuffed.
Legs starting with feet. We will make each leg then connect the two legs together and move on to the body and head attaching the arms as we go.
Rnd 1: 6 sc in magic circle
Rnd 2: *inc* around
Rnd 3: *inc, sc 1* around
Rnd 4: *inc, sc 2* around
Rnd 5: sc, *(hdc, 2dc) in next, (2 dc, hdc) in next, sl st in next* x3. Sc in rest 14 st.
Rnd 6: sc around (should be 36 sc)
Rnd 7: sc *hdc, dc dec, dc dec, hdc, sl st* x3. Sc in rest 14 st (30 st)
Rnd 8: *dec, sc 3* around (24 sc)
Rnd 9-13: sc around
Rnd 14: *inc, sc in next 7* around
Rnd 15: *inc, sc in next 8* around
Rnd 16: sc around (should be 30 sc). Bind off for the first leg, but continue on with second leg.
Now, for the slightly tricky part. Put both feet together and use markers to mark the middle 6 stitches. The second leg is the child’s left foot and the toes should point slightly outwards.
Rnd 17: sc to the first marker. Sc through both feet for 6 st. This ends this rnd. Remove markers and place in the next st on the left leg.
Rnd 18-26: sc around (48 sc)
Rnd 27: *dec, sc 4* around
Rnd 28: *dec, sc 3* around
Now to attach the arms
Rnd 29: sc around. For the first round of the arms you will be crocheting through 9 stitches of the arms and body at the same time. So, to make it exact you can find the center of each side, count over 4 sc and that is where you start each arm. Conversely, you can do what I do and go, yeah, about there looks right.
Rnd 30: sc around. Like the previous round you are going to sc through 9 sc of the arm (this time top of the arm). Tada, arm attached and no sewing!
Rnd 31-32: sc around (32 sc, I’m pretty sure. I forgot to count to make sure. Need to make again to see) Go ahead and stuff the toes and body up to this point and be sure to continue to stuff as you go.
Rnd 33: *dec, sc 2* around
Rnd 34-35: sc around
Rnd 36: *inc, sc in next 3* around
Rnd 37: *inc, sc in next 4* around
Rnd 38: *inc, sc in next 5* around
Rnd 39: *inc, sc in next 6* around
Rnd 40: *inc, sc in next 7* around
Rnd 41: *inc, sc in next 8* around
Rnd 42: *inc, sc in next 9* around
Rnd 43: *inc, sc in next 10* around
Rnd 44-48: sc around
Now, because of how increasing work you will not be in the middle of the back of the head. Just to make things a touch easier sc over until you are at the middle. For me this was only 6 sc over.
Rnd 49: sc in next 12, dec x3, sc in next 30, dec x3, sc in next 18
Rnd 50: *dec, sc in next 4* around
Rnd 51: sc in next 10, *dec, sc* x3, sc in next 16, *dec, sc* x3, sc in last 11
Rnd 52: *dec, sc in next 5* around
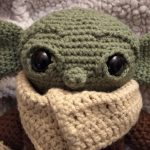
So now is a good time to go ahead and pop in those safety eyes between rounds 46-47 about 12 sc apart. Make sure you are stuffing as you go as we finally only have a few rounds left! WOOt!
Rnd 53: *dec, sc in next 4* around
Rnd 54: *dec, sc in next 3* around
Rnd 55: *dec, sc in next 2* around
Rnd 56: *dec, sc in next 1* around
Rnd 57: *dec* around, bind off and weave in the end
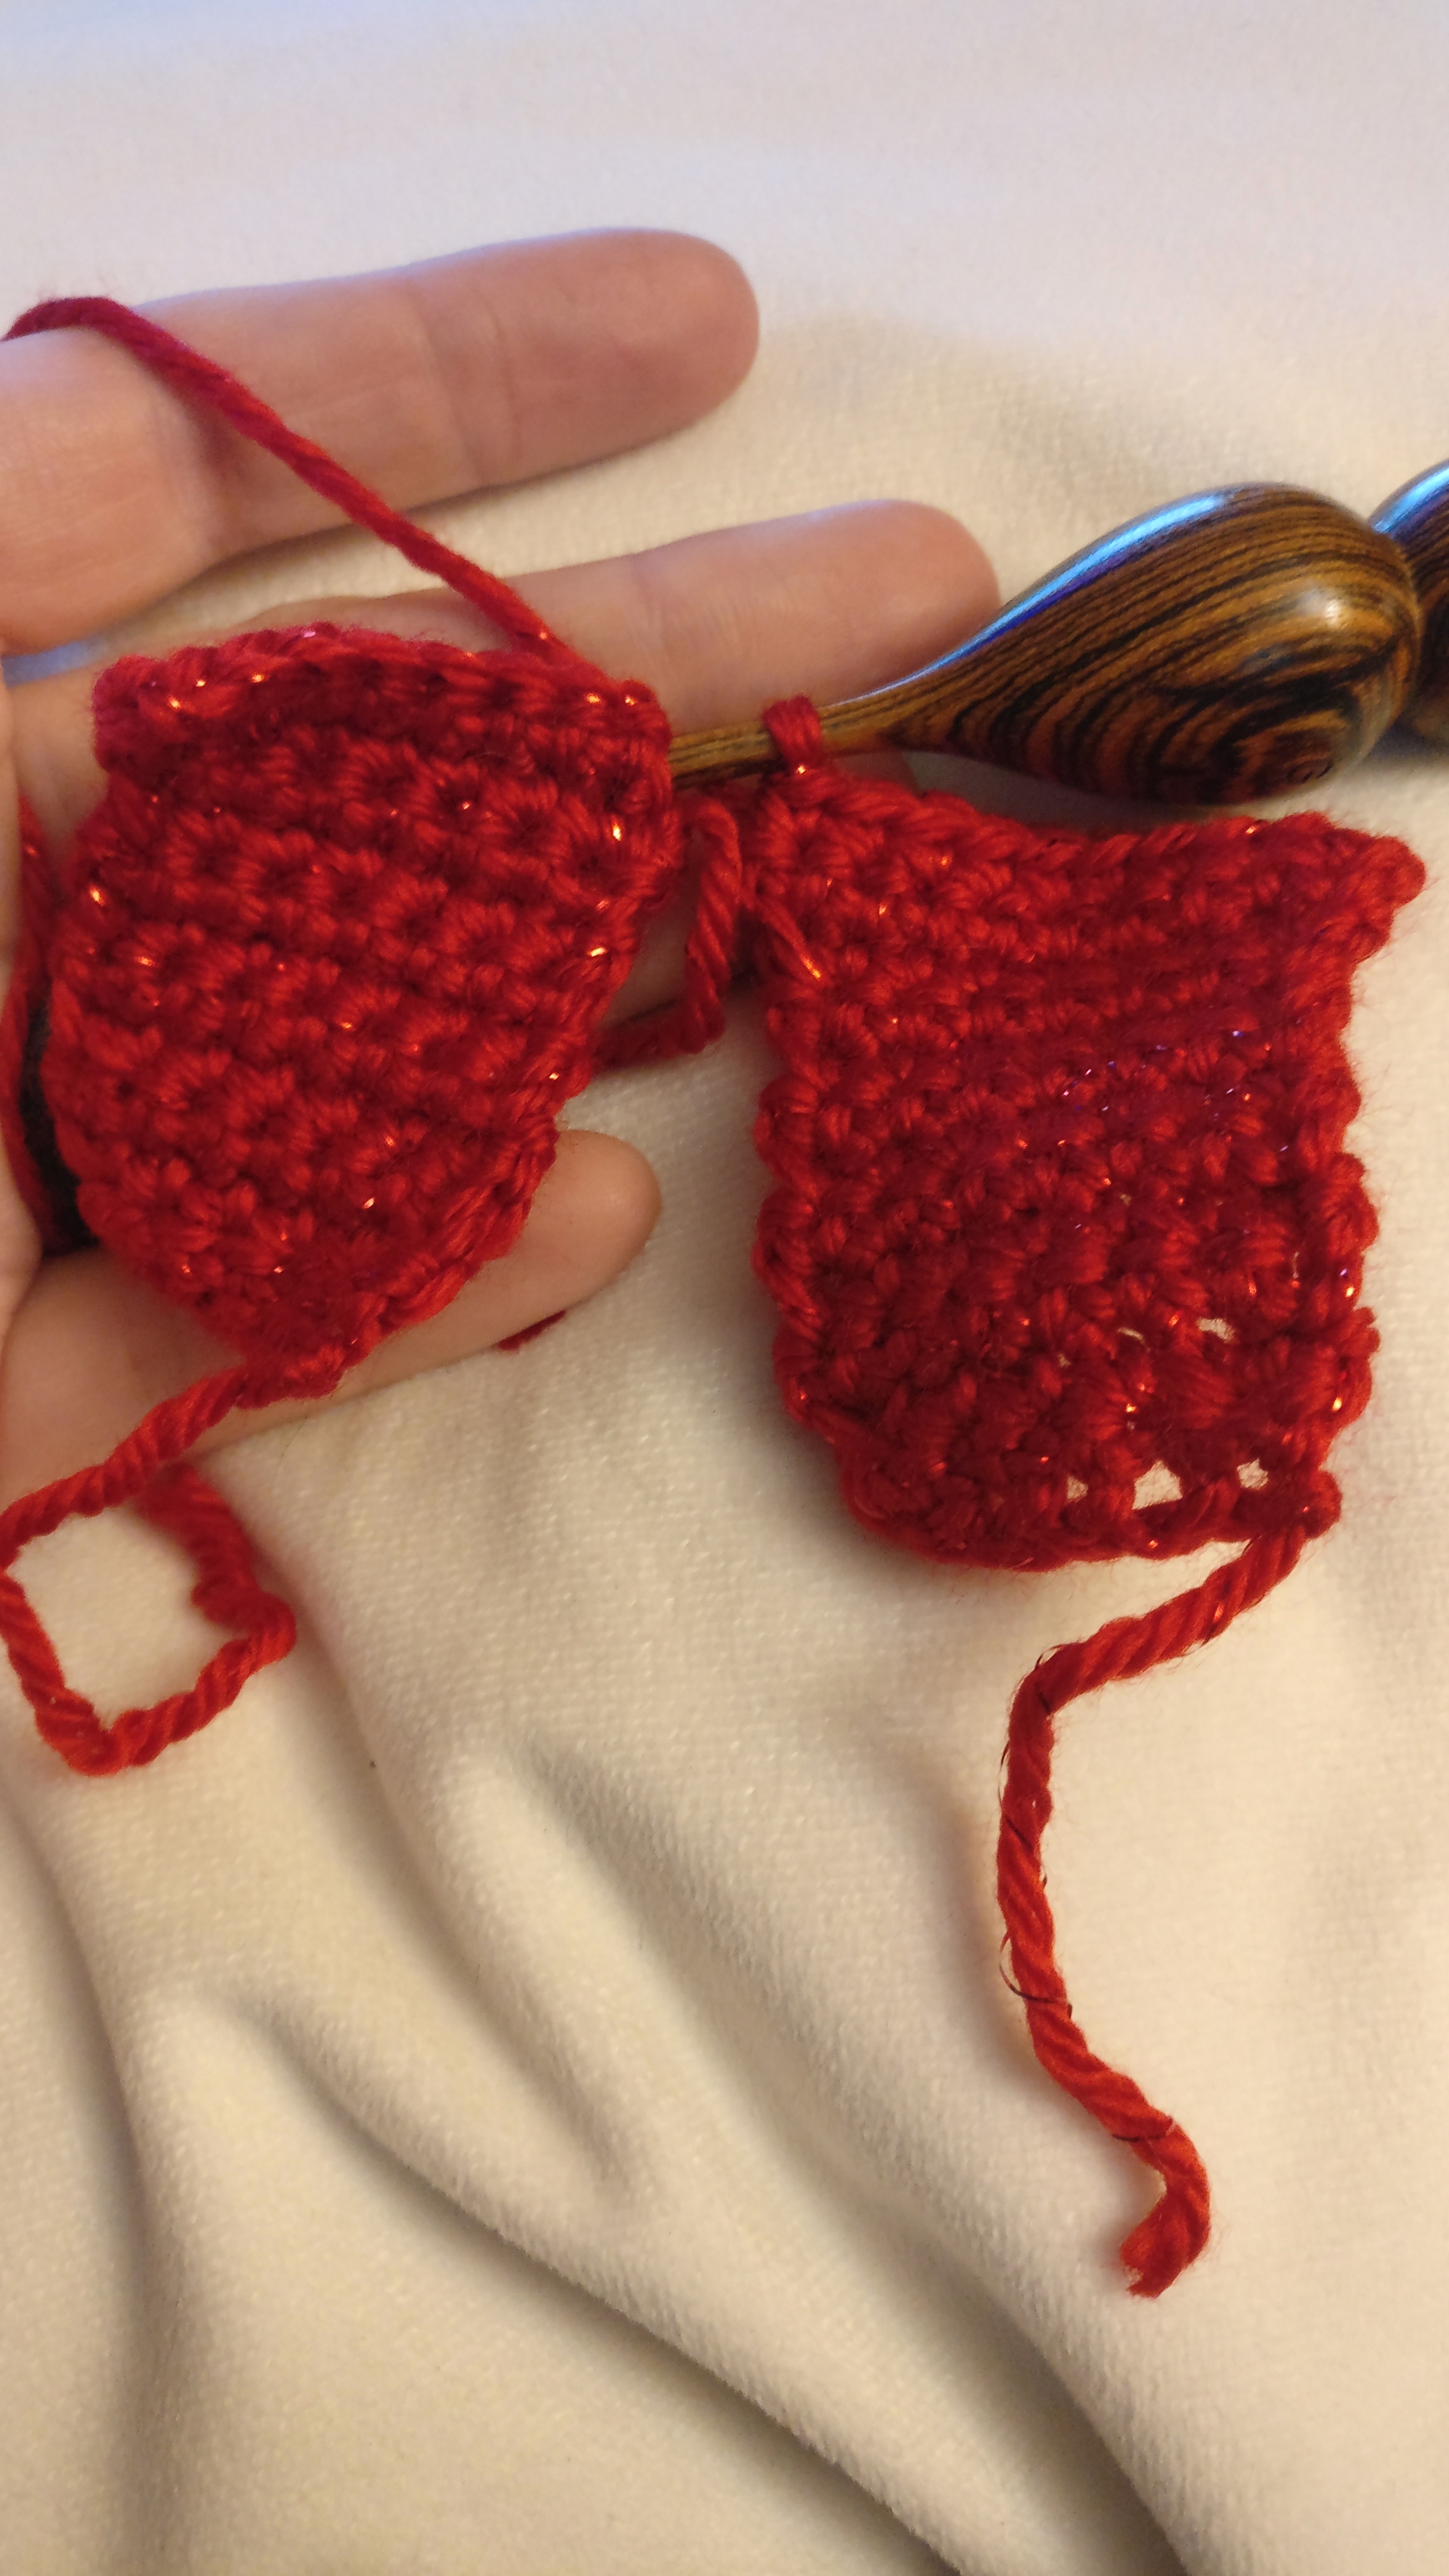
Ears, make 2
Rnd 1: 6 sc in magic circle
Rnd 2: sc around
Rnd 3: *inc, sc* around
Rnd 4: sc around
Rnd 5: *inc, sc in next 2* around
Rnd 6: sc around
Rnd 7: *inc, sc in next 3* around
Rnd 8: sc around
Rnd 9: *inc, sc in next 4* around
Rnd 10: sc around
Rnd 11: *inc, sc in next 5* around
Rnd 12: sc around
Rnd 13: *inc, sc in next 6* around
Rnd 14: sc around
Rnd 15: *inc, sc in next 7* around
Rnd 16-20: sc around
Rnd 21: *dec, sc in next 7* around
Rnd 22: sc around
Rnd 23: *dec, sc in next 6* around
Rnd 24: sc around
Rnd 25: *dec, sc in next 5* around
Rnd 26 : sc around and bind off leaving an extra long tail for sewing.
Now, you can choose to sew them on now. Flatten them out and sew in line with the middle of the arms, roughly two rounds above and below with a slight little curve. I have found that I prefer to use a tiny bit of stuffing around the edges of the ears and after I sew it on I do a running stitch up and down the ear on either side of the middle of the ear. While not necessary it does give it a fuller look that I prefer.
Nose
Rnd 1: 6 sc in magic circle
Rnd 2: sc around, bind off and sew onto face in the middle and one round down from the center of the eyes.
Lower eyelid (make 2)
Ch 9 and sew onto face under the eyes. I like to sew one side loops leaving the opposite side against the eye.
Upper eyelid (make 2)
Ch 10 and sew onto face above the eyes going over the ends of the lower eyelids. I like to sew one side loops leaving the opposite side against the eye.
Eyebrow (make 2)
Ch 12 and sew onto face above the eyes with a slight curve starting about 2 rounds above the eyelid to about 3 st from the eyelid on the side. I like to sew this with the back bumps/ridges up and sew both loops down.
Now you have a cute naked child… or creepy looking one. Time to get it dressed!
Robe
Starting at the top with the lighter cream color (Dark Heather)
Row 1: Ch 62, dc in 3rd ch and across, ch 2 and turn (60 dc)
Row 2-8: dc across, ch 2 and turn. At the end of row 8 change to Walnut
Row 9-10: dc across, ch 2 and turn
Row 11: dc in next 18, ch 10 and skip 5 st, dc in next 14, ch 10 and skip 5 st, dc in next 18, ch 2 and turn (50 dc)
Row 12: dc across including a dc in each of the chains, ch 2 and turn
Row 13: dc in next 13, dec x2, dc in next 2, dec x2, dc in next 14, dec x2, dc in next 2, dec x2, dc in next 13, ch 2 and turn
Row 14: dc across, ch 2 and turn (62 dc)
Row 15: dc in next 13, dec, dc in next 22, dec, dc in next 13, ch 2 and turn
Row 16-19: dc across, ch 2 and turn (60 dc). On row 19 ch 1 and turn
Row 20: sc around the outside of the robe making sure to change colors where appropriate and placing 3 sc in the corners. When you get to the last corner, place 2 sc then sl st to the first. Bin off and weave in ends. This is optional of course. The ch 2 makes a cleaner edge, but old habits and all… I prefer the look.
Robe arms, do this twice:
Row 1: join Walnut yarn at the middle of the ch 5 you did to create the openings. Ch 1 and sc in that st. Now sc around, placing a sc in the corner ‘gaps’ between the ch and where you skipped 10. Sl st to the first, ch 1 and do NOT turn. (17 sc)
Row 2-3: hdc around, sl st to first and ch 1
Row 4: 2 hdc in first, hdc in rest, sl st to first and ch 1 (18 hdc)
Row 5: hdc around, sl st to first and ch 1
Row 6: *hdc inc, hdc in next 8* around, change to Dark Heather, sl st and ch 1 (20hdc)
Row 7-10: hdc around, sl st to first and ch 1. On row 10 sl st and bind off, weaving in the end.
When putting the robe on, the Dark Heather part is folded up once.
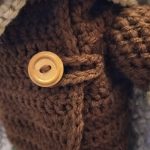
Now, you could sew the robe on the child in place and call it a day. Maybe adding a button for looks. Mind you, if a youngling is getting this, keep that in mind. Buttons are easy for kids to get off and it looks like candy. I’m including how I did the button to make it where the robe can be removed. Now, this isn’t an exact science because it depends a lot on your button size, but it is simple enough to be able to alter it to your needs.
Put the robe on the child. The child’s left side of the robe goes under the right. It should have quite a bit of room for it. So, sew the button between rows 11-12 about 3-4 stitches in. Be careful to not sew into the child. Next make a chain that is just long enough to go from under the left armpit around the button and back (for me it was 15 ch). Attach both ends under the armpit making a loop.
And that’s it!
Like all my patterns, they are posted for free. In fact this site as of right now has no ads either. If you like my work and want to pay something for the pattern, there is a donate button.
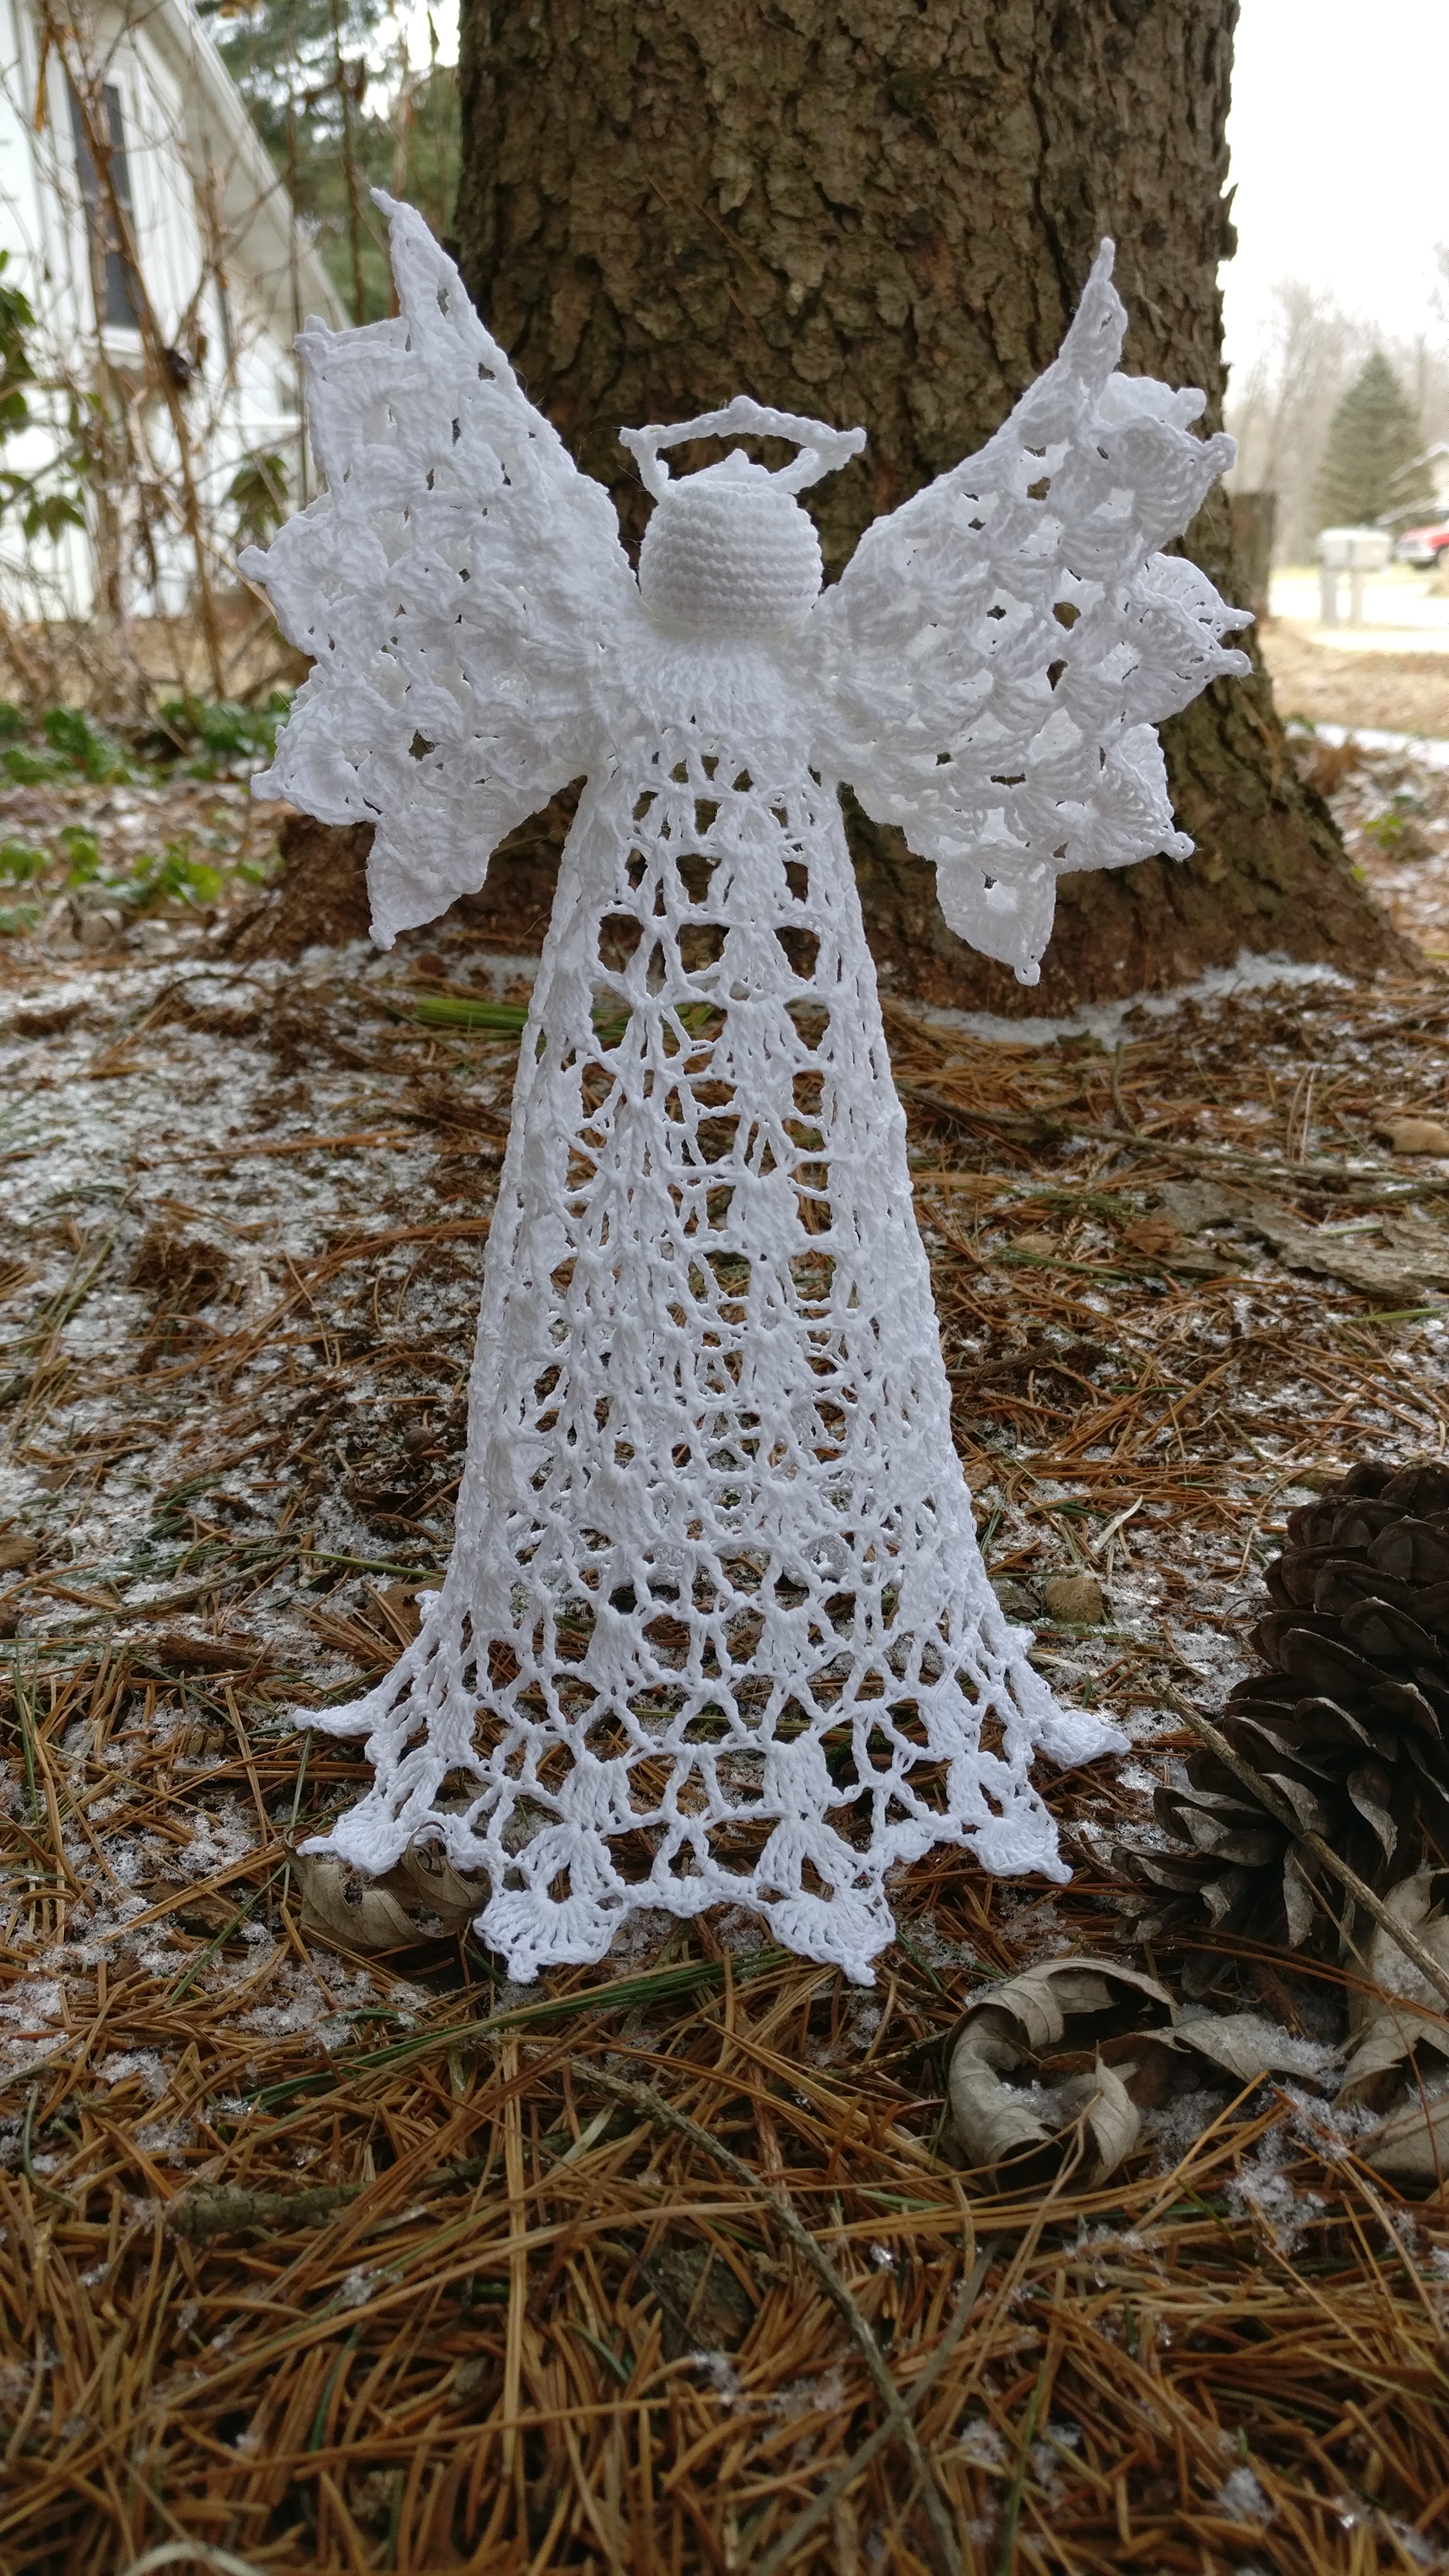
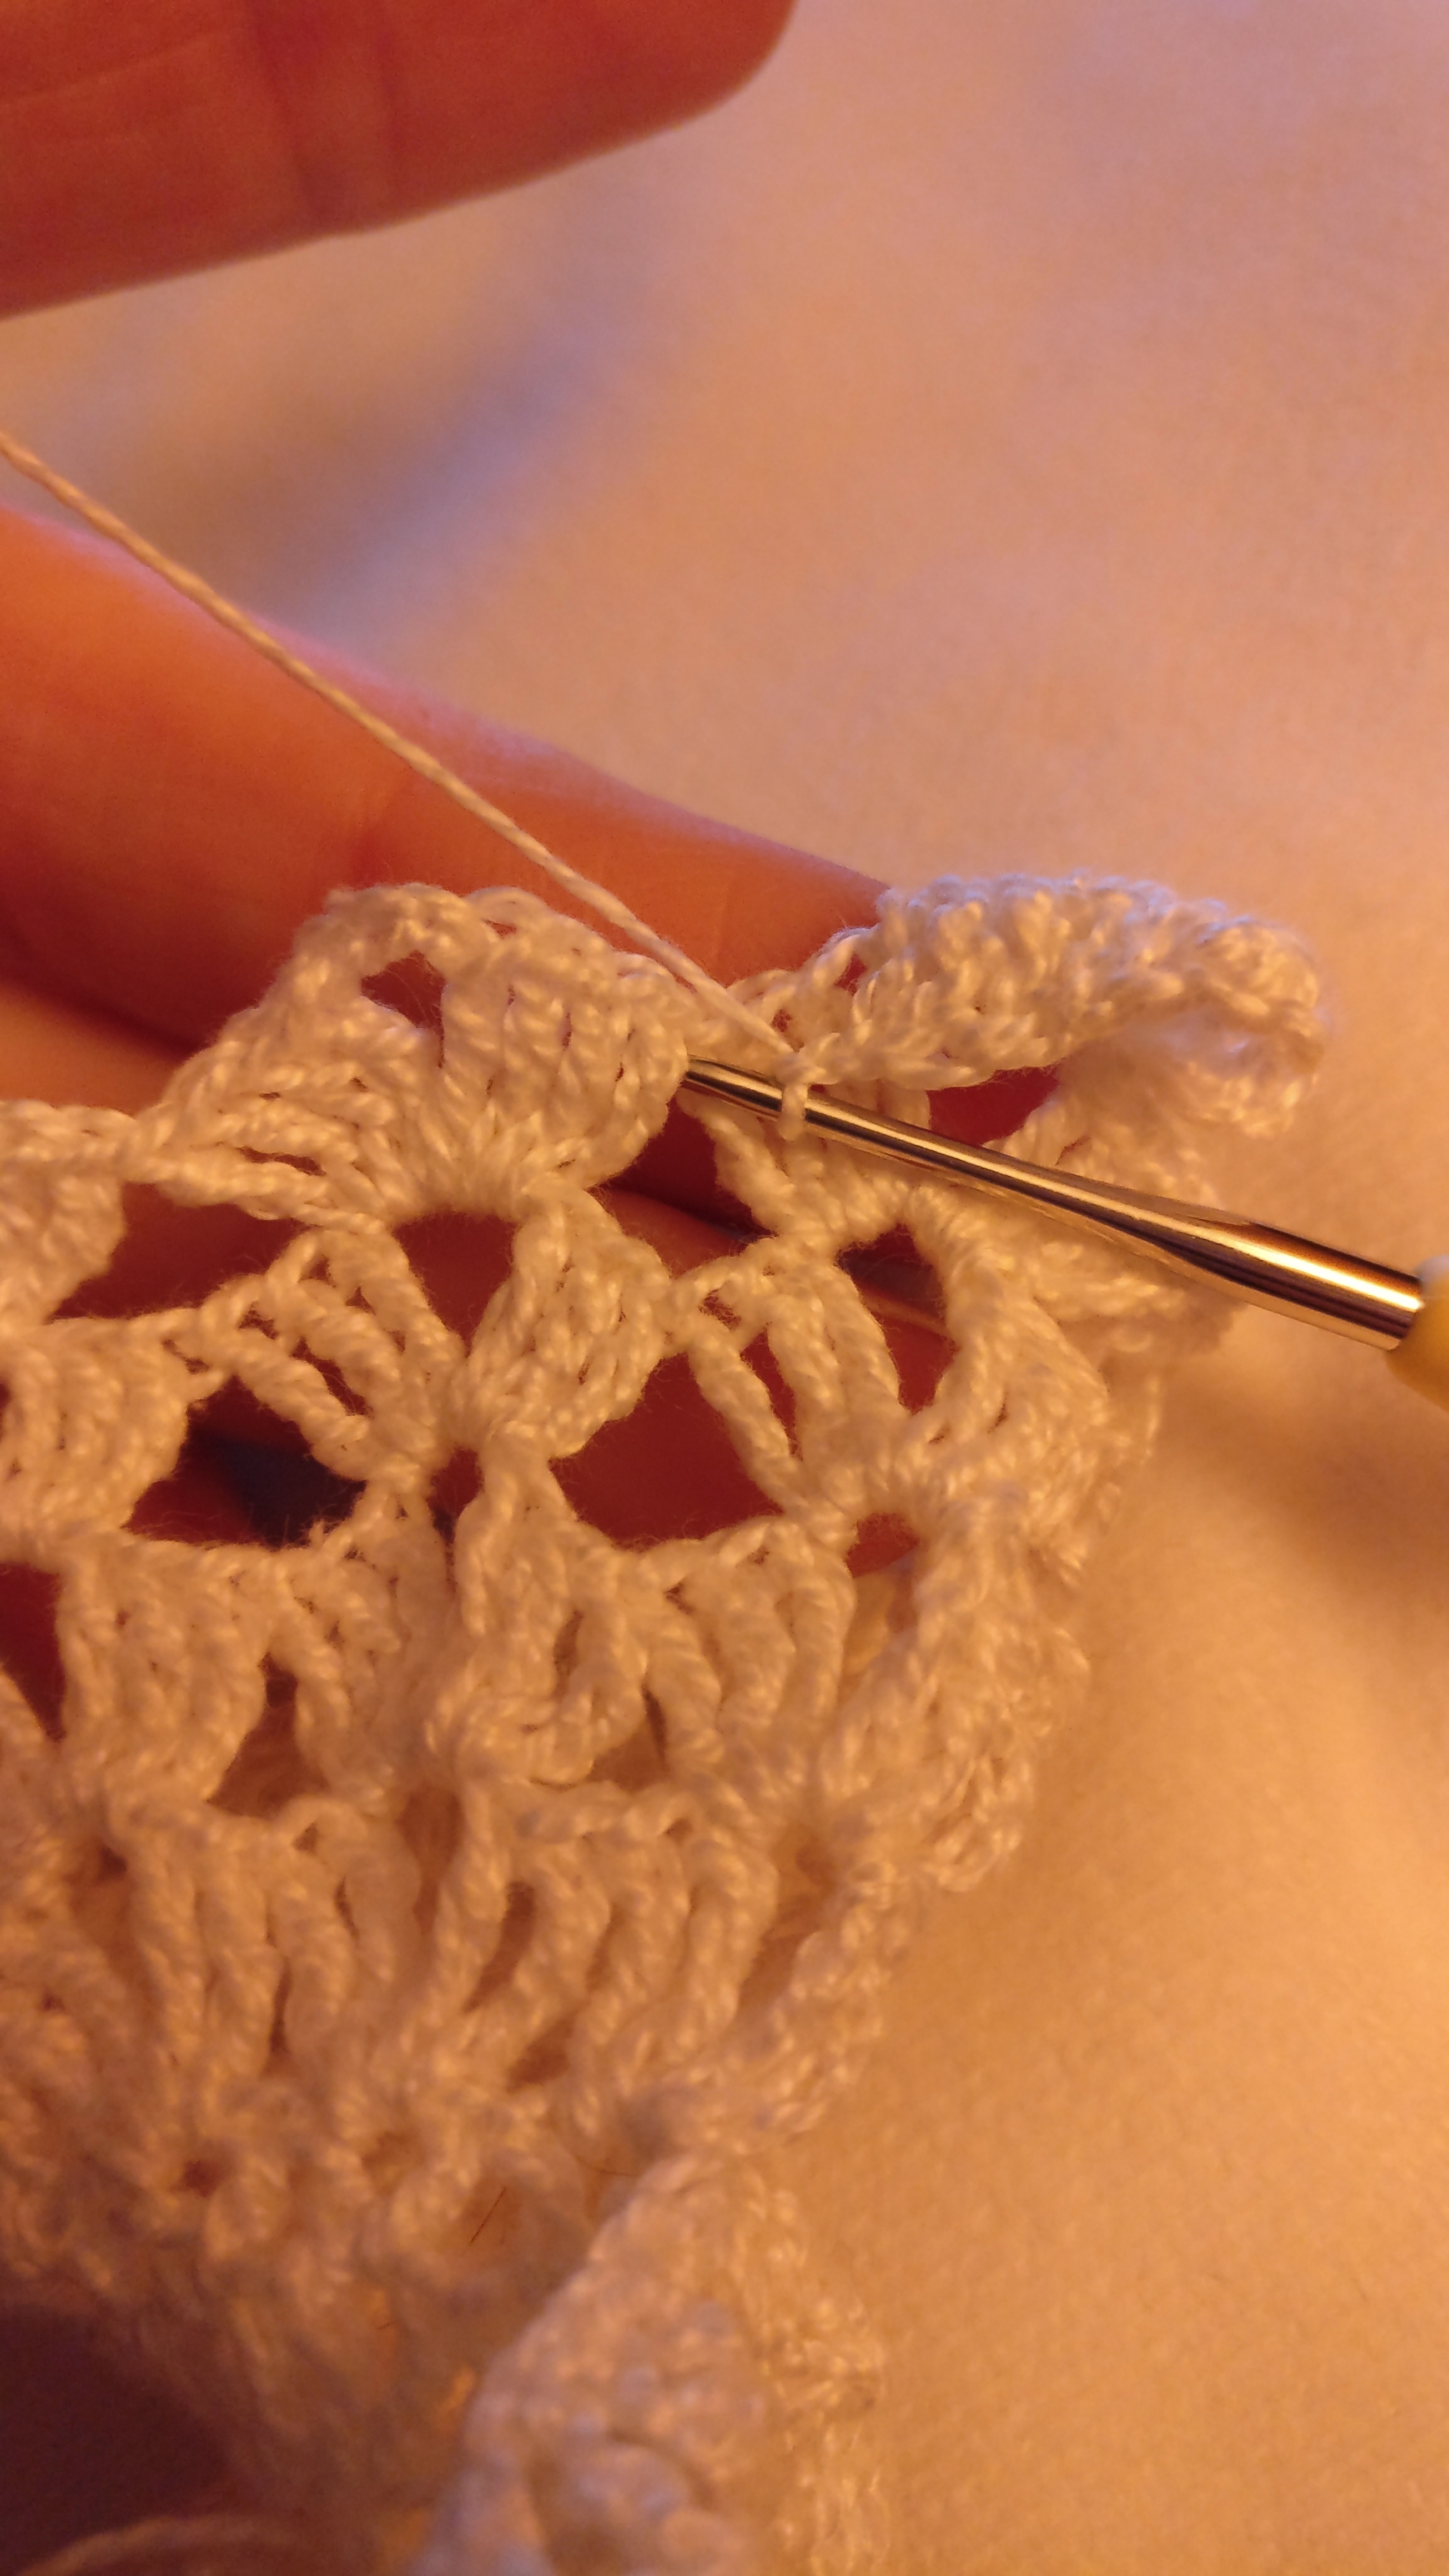
I was asked to recreate a loved angel topper… I did, but of course I couldn’t help but make another one that was better. The original was only about 7 inches tall and of course it’s go big right?! This wonderful angel comes in at 9 inches tall! So here’s my take on the angel Christmas tree topper.. Though it would look just as lovely as a centerpiece. I hope you enjoy!
size 10 cotton thread 1.50mm crochet hook small amount of poly-fil stiffening solution (I used 1 part Elmer’s glue to 2 parts water) rust proof pins pinning board foam cones and cover with saran wrap to make it easier to remove the angels
Head is worked without joining in each round. Use a stitch marker if you prefer to mark the beginning of each round.
10 sc in magic circle Inc in each around *inc, sc in next* around *inc, sc in next 9* around (33 sc) sc around for 6 rounds sc, *dec, sc in next 2* around (make sure to stuff head firmly) sc *dec x12* this time go ahead and join with a sl s to beginning sc but do NOT bind off and continue on to the body (13 sc)
Body Round 1: Ch 4, dc in same space *(dc, ch 1, dc)* in each st around, join with st st to 3rd ch of beginning ch Round 2: Ch 4, dc in same space *(dc, ch 1, dc)* in the next 8 dc. *(tr, ch 1, tr)* in next 4 dc. *(dc, ch 1, dc)* in the next 9 dc. *(tr, ch 1, tr)* in next 4 dc, join with st st to 3rd ch of beginning ch Round 3: Sl st to ch between original ch and dc. Ch 4, dc in same space *(dc, ch 1, dc)* in next 8 ch 1 space. *(tr, ch 1, tr)* in next 4 ch 1 space. *(dc, ch 1, dc)* in next 9 ch 1 space. *(tr, ch 1, tr)* in next 4 ch 1 space. join with st st to 3rd ch of beginning ch.
Wing 1 Round 1: Sl st to ch between original ch and dc. Ch 4, (tr, ch 2, 2 tr) in same space. *(2 tr, ch 2, 2 tr)* in next 8 ch 1 space. Join with sl st to top of ch 4 of original ch, leaving the rest unworked for now. Round 2: Sl st to chs between tc clusters. Ch 4, 2 tr, ch 2, 3 tr in same space. *(3 tr, ch 2, 3 tr) around. Join with sl st to top of ch 4 of original ch. Round 3: Sl st to chs between tc clusters. Ch 4, 2 tr, ch 2, 3 tr in same space. *(3 tr, ch 2, 3 tr) around. Join with sl st to top of ch 4 of original ch. Round 4: Sl st to chs between tc clusters. Ch 4, 3 tr, ch 3, 4 tr in same space. *(4 tr, ch 3, 4 tr) around. Join with sl st to top of ch 4 of original ch. Round 5: Sl st to chs between tc clusters. Ch 3, 4 tr, ch 3 picot, 4 tr in same space, dc, ch 1, sc in the space between tc clusters. *(dc, 4 tr, ch 3 picot, 4 tr, dc) in ch 2 space. Ch 1, sc inbetween tc clusters, ch 1* around. Join with sl st to top of ch 3 of original ch. Bind off and weave in end.
Wing 2 Skip 4 of the (tr, ch 1, tr) and join thread with sl st in the next space between the next (dc, ch 1, dc). Round 1: Ch 4, tr, ch 2, 2 tr in same space. *(2 tr, ch 2, 2 tr)* in next 8 ch 1 space. Join with sl st to top of ch 4 of original ch, leaving the rest unworked for now. Round 2: Sl st to chs between tc clusters. Ch 4, 2 tr, ch 2, 3 tr in same space. *(3 tr, ch 2, 3 tr) around. Join with sl st to top of ch 4 of original ch. Round 3: Sl st to chs between tc clusters. Ch 4, 2 tr, ch 2, 3 tr in same space. *(3 tr, ch 2, 3 tr) around. Join with sl st to top of ch 4 of original ch. Round 4: Sl st to chs between tc clusters. Ch 4, 3 tr, ch 3, 4 tr in same space. *(4 tr, ch 3, 4 tr) around. Join with sl st to top of ch 4 of original ch. Round 5: Sl st to chs between tc clusters. Ch 3, 4 tr, ch 3 picot, 4 tr in same space, dc, ch 1, sc in the space between tc clusters. *(dc, 4 tr, ch 3 picot, 4 tr, dc) in ch 2 space. Ch 1, sc inbetween tc clusters, ch 1* around. Join with sl st to top of ch 3 of original ch. Bind off and weave in end.
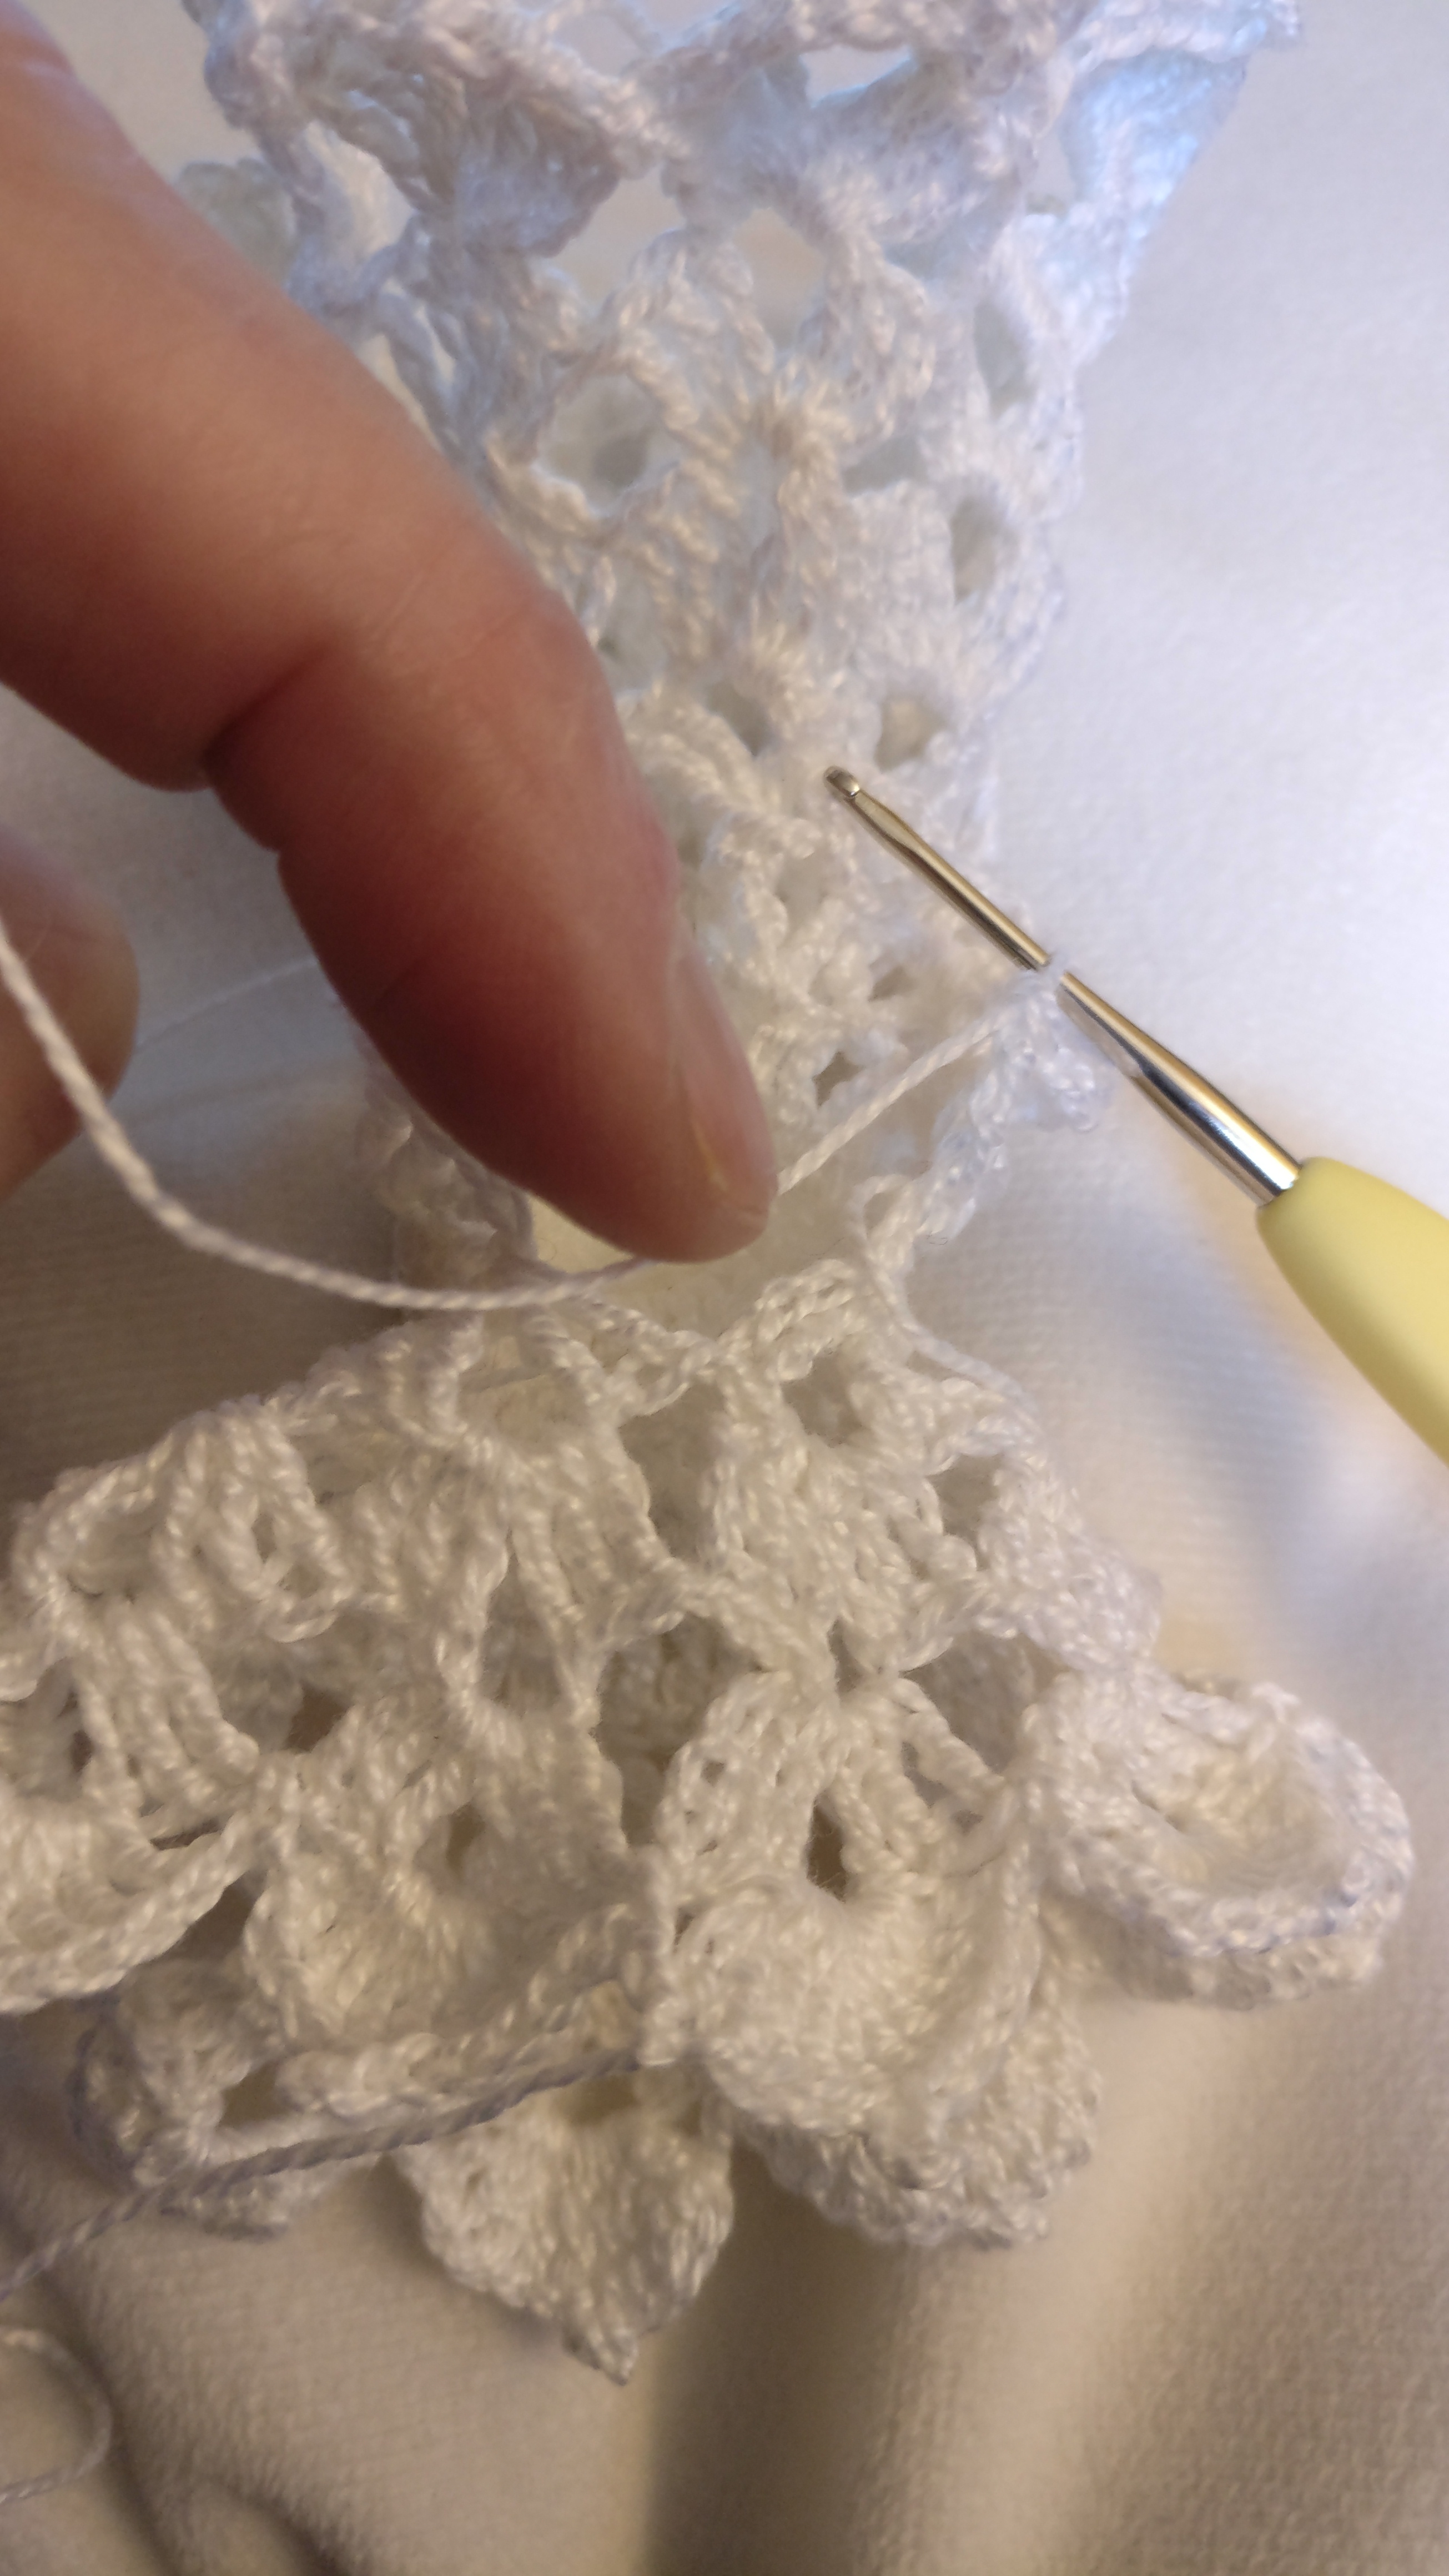
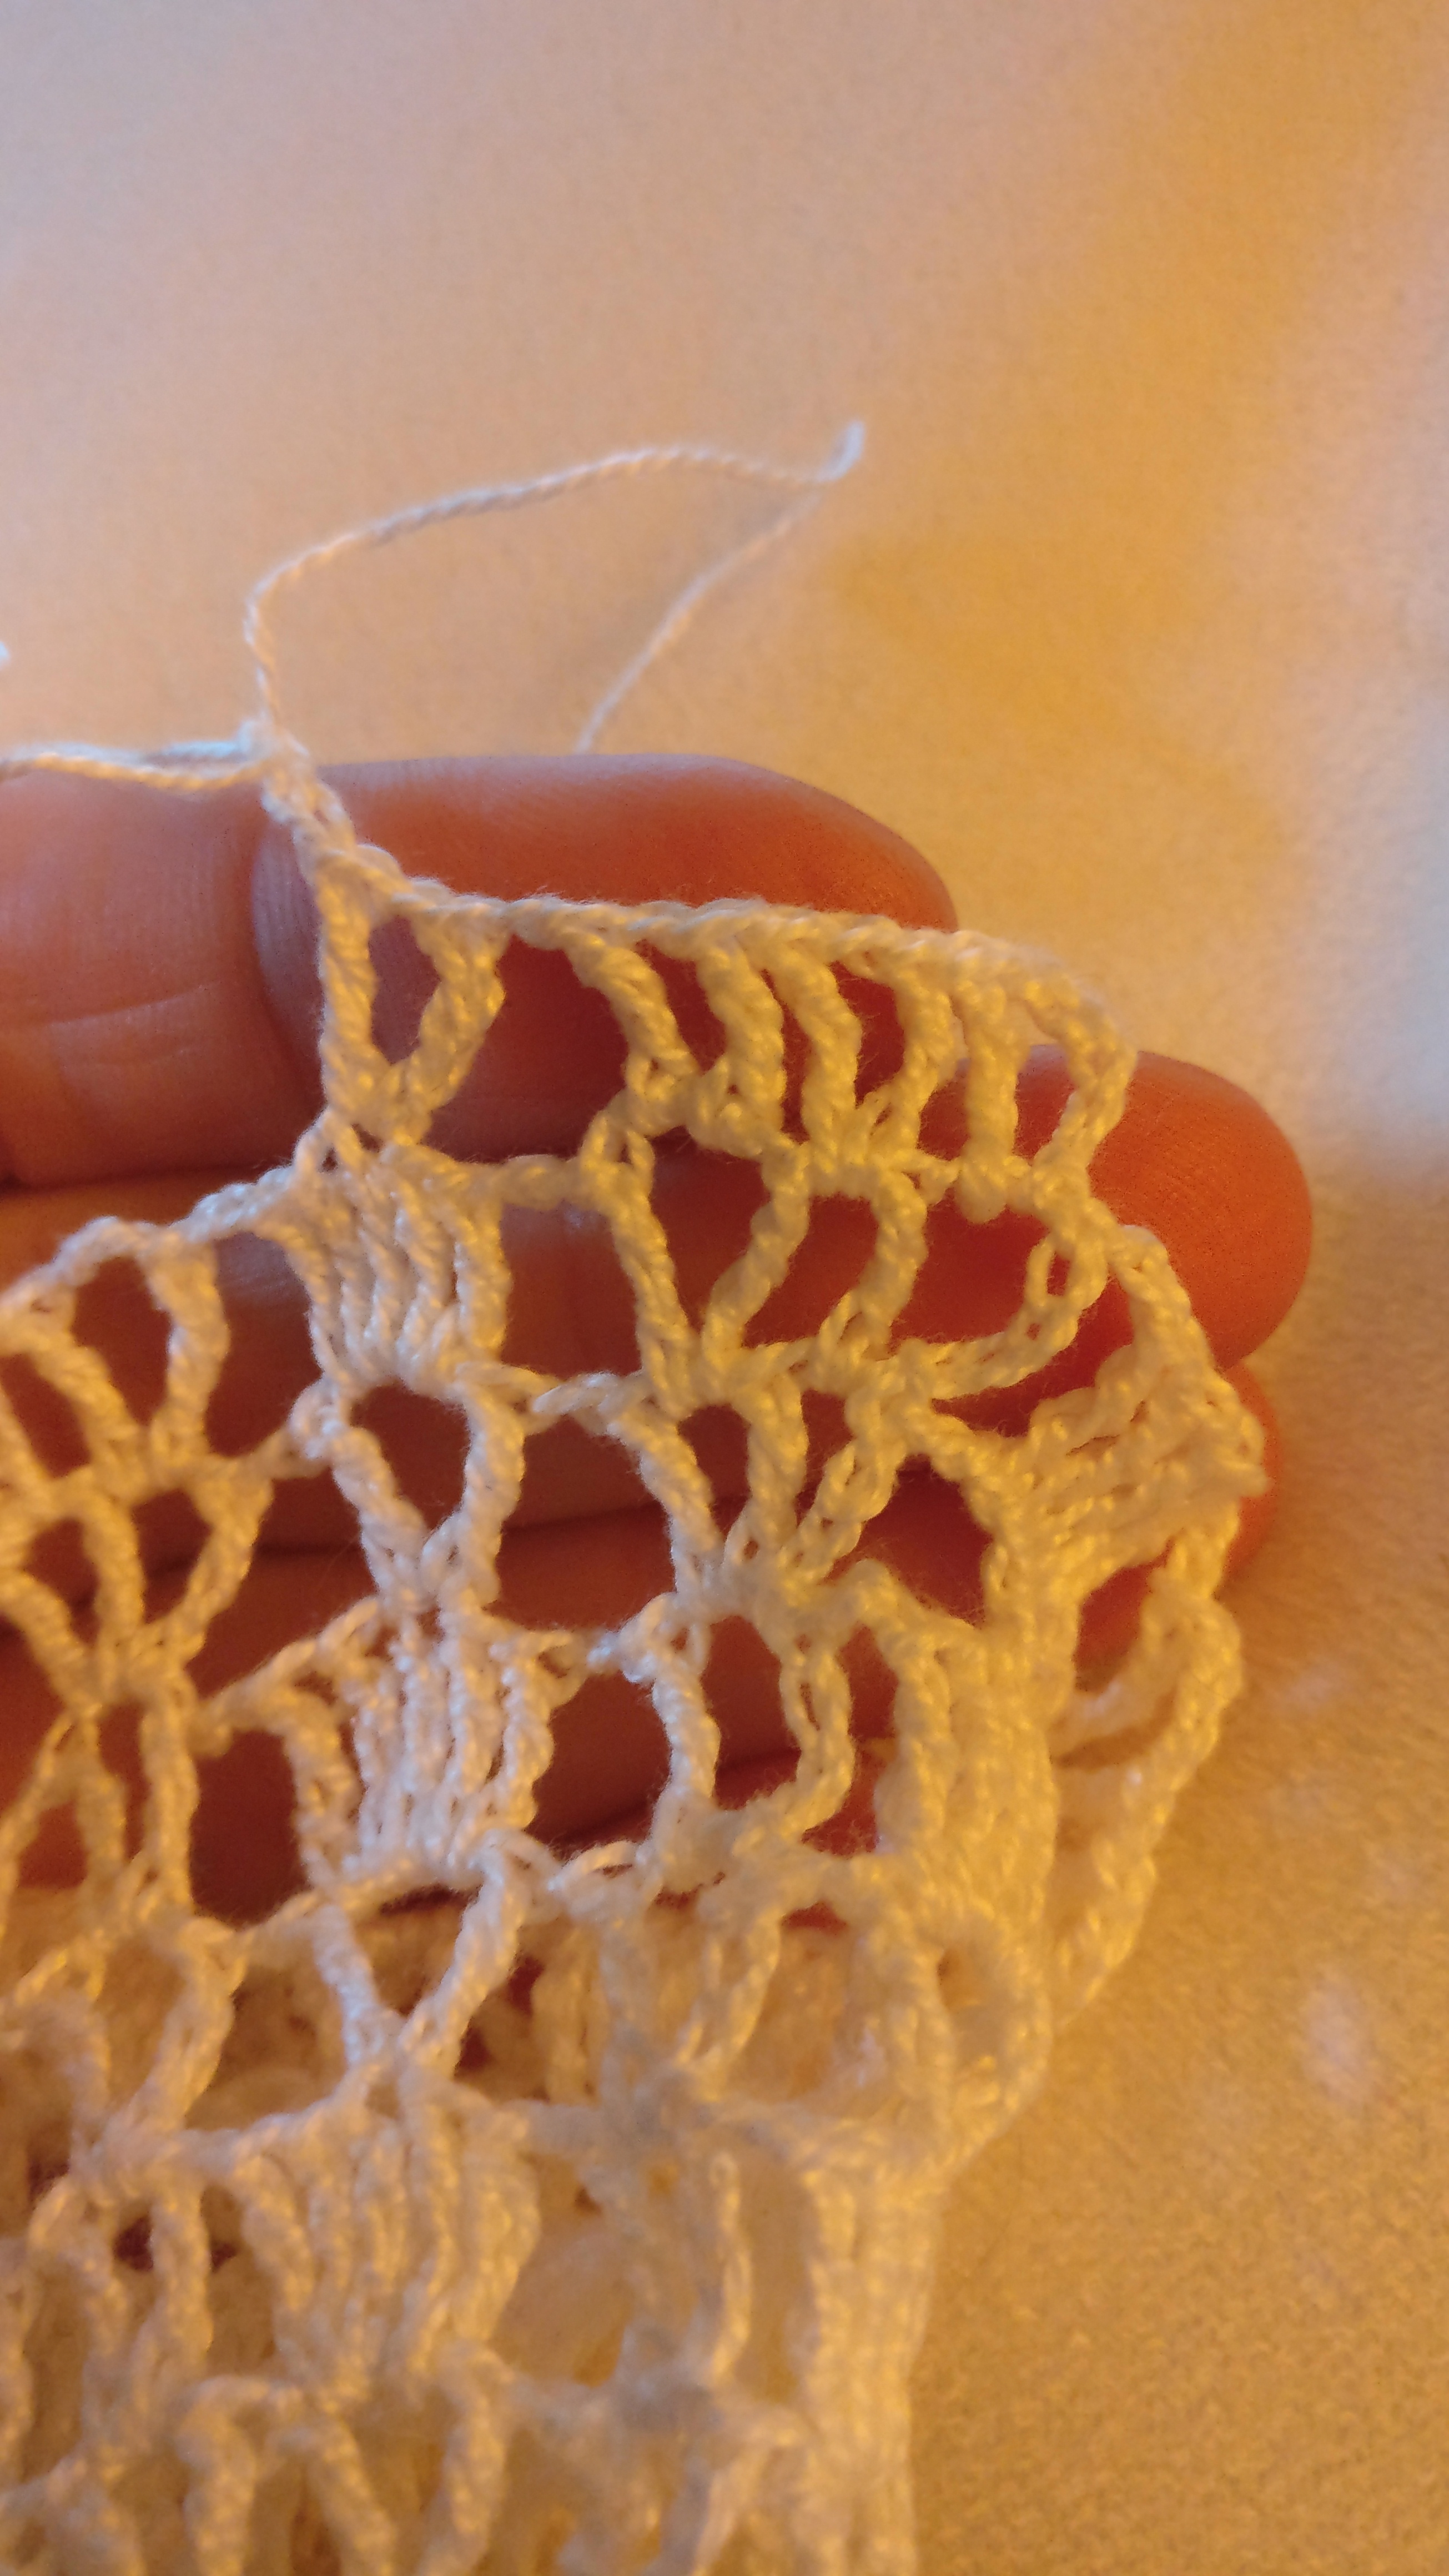
Skirt Round 1: Join thread with sl st in the first ch 1 space of the back (tr, ch 1, tr). Ch 5, tr in same space. *(tr, ch 1, tr)* in the next 3 ch 1 spaces, in the joining of the wing base, in the next 4 and in the next joining of the wing base. Sl st to the 4th ch of the beginning ch 5. Round 2: Sl st to ch between tc clusters. Ch 5, tr in same space. *ch 1, 5 tr in the next ch 1 space, ch 1, (tr, ch 1, tr) in next ch 1 space* around. Sl st to the 4th ch of the beginning ch 5. Round 3: Sl st to ch between tc clusters. Ch 6, tr in same space. Ch 1, (tr, ch 2, tr) in 3rd tr of next cluster, ch 1, *(tr, ch 2, tr) in next ch 1 space, (tr, ch 2, tr) in 3rd tr of next cluster* around. Sl st to the 4th ch of the beginning ch 6. Round 4: Sl st to ch between tc clusters. Ch 6, tr in same space. Ch 2, 5 tr in next ch 2 space, ch 2, *(tr, ch 2, tr) in next ch 2 space, ch 2, 5 tr in next ch 2 space, ch 2* around. Sl st to the 4th ch of the beginning ch 6. Round 5: Sl st to ch between tc clusters. Ch 5, (tr, ch 1, tr) in same space. Ch 1, (tr, ch 3, tr) in 3rd tr of next cluster, ch 1. *(tr, ch 1, tr, ch 1, tr) in next ch 1 space, ch 1, (tr, ch 3, tr) in 3rd tr of next cluster, ch1* around. Sl st to the 4th ch of the beginning ch 5. Round 6: Sl st to ch between tc clusters. Ch 7, tr in same space. (tr, ch 3, tr) in next ch 1 cluster *ch 2, 5tr in next ch 3 space, ch 2, (tr, ch 3, tr) in next 2 ch 1 spaces* around. Sl st to the 4th ch of the beginning ch 7. Round 7: Sl st to ch between tc clusters. Ch 5, tr in same space, (tr, ch 1, tr) in space in-between previous round, (tr, ch 1, tr) in next ch 3 space, ch 2, (tr, ch 1, tr) in in 3rd tr of next cluster, ch 2, *(tr, ch 1, tr) in next ch 3 space, (tr, ch 1, tr) in space in-between previous round , (tr, ch 1, tr) in next ch 3 space, ch 2, (tr, ch 1, tr) in next ch 3 space, ch 2* around. (tr, ch 1, tr) in last ch 3 space. Sl st to the 4th ch of the beginning ch 5. Round 8: Sl st to ch between tc clusters. Ch 5, tr in same space. *3 tr in next ch 1 space, (tr, ch 1, tr) in next ch 1 space, ch 2, 5 tr in next ch 1 space, ch 2, (tr, ch 1, tr) in next ch 1 space* around. 5 tr in last ch 1 space. Sl st to the 4th ch of the beginning ch 5. Round 9: Sl st to ch between tc clusters. Ch 6, tr in same space. *(tr, ch 2, tr) in 2nd ch of previous 3 tr cluster, (tr, ch 2, tr) in next ch 1 space, ch 2, (tr, ch 2, tr) in 3rd tr of next tr cluster, ch 2, (tr, ch 2, tr) in next ch 1 space* around. Ch 2, (tr, ch 2, tr) in 3rd tr of next tr cluster, ch 2. Sl st to the 4th ch of the beginning ch 6. Round 10: Sl st to ch between tc clusters. Ch 5, tr in same space. 5 tr in next ch 2 space. *(tr, ch 1, tr) in next ch 2 space, 5 tr in next ch 2 space* around. Sl st to the 4th ch of the beginning ch 5. Round 11: Sl st to ch between tc clusters. Ch 6, tr in same space. Ch 1, (tr, ch 2, tr) in 3rd tr of next cluster, ch 1, *(tr, ch 2, tr) in next ch 1 space, (tr, ch 2, tr) in 3rd tr of next cluster* around. Sl st to the 4th ch of the beginning ch 6. Round 12: Sl st to ch between tc clusters. Ch 5, tr in same space. *ch 1, 5 tr in the next ch 1 space, ch 1, (tr, ch 1, tr) in next ch 1 space* around. Sl st to the 4th ch of the beginning ch 5. Round 13: Sl st to ch between tc clusters. Ch 7, tr in same space. (tr, ch 3, tr) in each (tr, ch 1, tr) and each 3rd st of the 5tr clusters around. Sl st to the 4th ch of the beginning ch 7. Round 14: Sl st to ch between tc clusters. Ch 6, tr in same space. Ch 2, 5 tr in next ch 2 space, ch 2, *(tr, ch 2, tr) in next ch 2 space, ch 2, 5 tr in next ch 2 space, ch 2* around. Sl st to the 4th ch of the beginning ch 6. Round 15: Sl st to ch between tc clusters. Ch 6, tr in same space. Ch 2, *(3 tr, ch 3, 3tr) in 3rd ch of next 5 tr cluster, ch 2, (tr, ch 2, tr) in next ch 2 space, ch 2* around. (3tr, ch 3, 3tr) in last 3rd ch of next 5 tr cluster. Sl st to the 4th ch of the beginning ch 6. Round 16: Sl st to ch between tc clusters. ch 1, 2 dc, sc in same space. *2 sc over next ch 2 space, ch 1, (dc, 4tr, ch 3 picot, 4tr, dc) in next ch 3 space, ch 1, 2 sc over next ch 2 space, (sc, 2 dc, sc) in next (tr, ch 2, tr)* around. Finish with 2 sc over next ch 2 space, ch 1, (dc, 4tr, ch 3 picot, 4tr, dc) in next ch 3 space, ch 1, 2 sc over last ch 2 space. Sl st to the the beginning ch 1. Bind off and weave in end.
Halo Ch 25, join with sl st to beg ch. Ch 1, *2 sc, 2 hdc, ch 3 picot, 2 hdc, 2 sc* 5 times in the ring, join with sl st in beginning sc. Bind off and sew onto the back of the head. (Now, without fail I always have to adjust the stitches around on the ring to space out the way I want it to look.)
Now, the not so fun part. Make your stiffening solution (I used 1 part glue to 3 parts water) and pin the head and wings into place. I used one pin stabbed through and then let the top part slide up the pin. The halo I put into place held together with pins on both sides. Let dry for 24 hours. Then dip the skirt, pin and let dry for 24 hours. I was able to find a styrofoam cone to fit inside the skirt to do this part. I did wrap the cone with plastic wrap to keep it from glueing accidently to the cone.
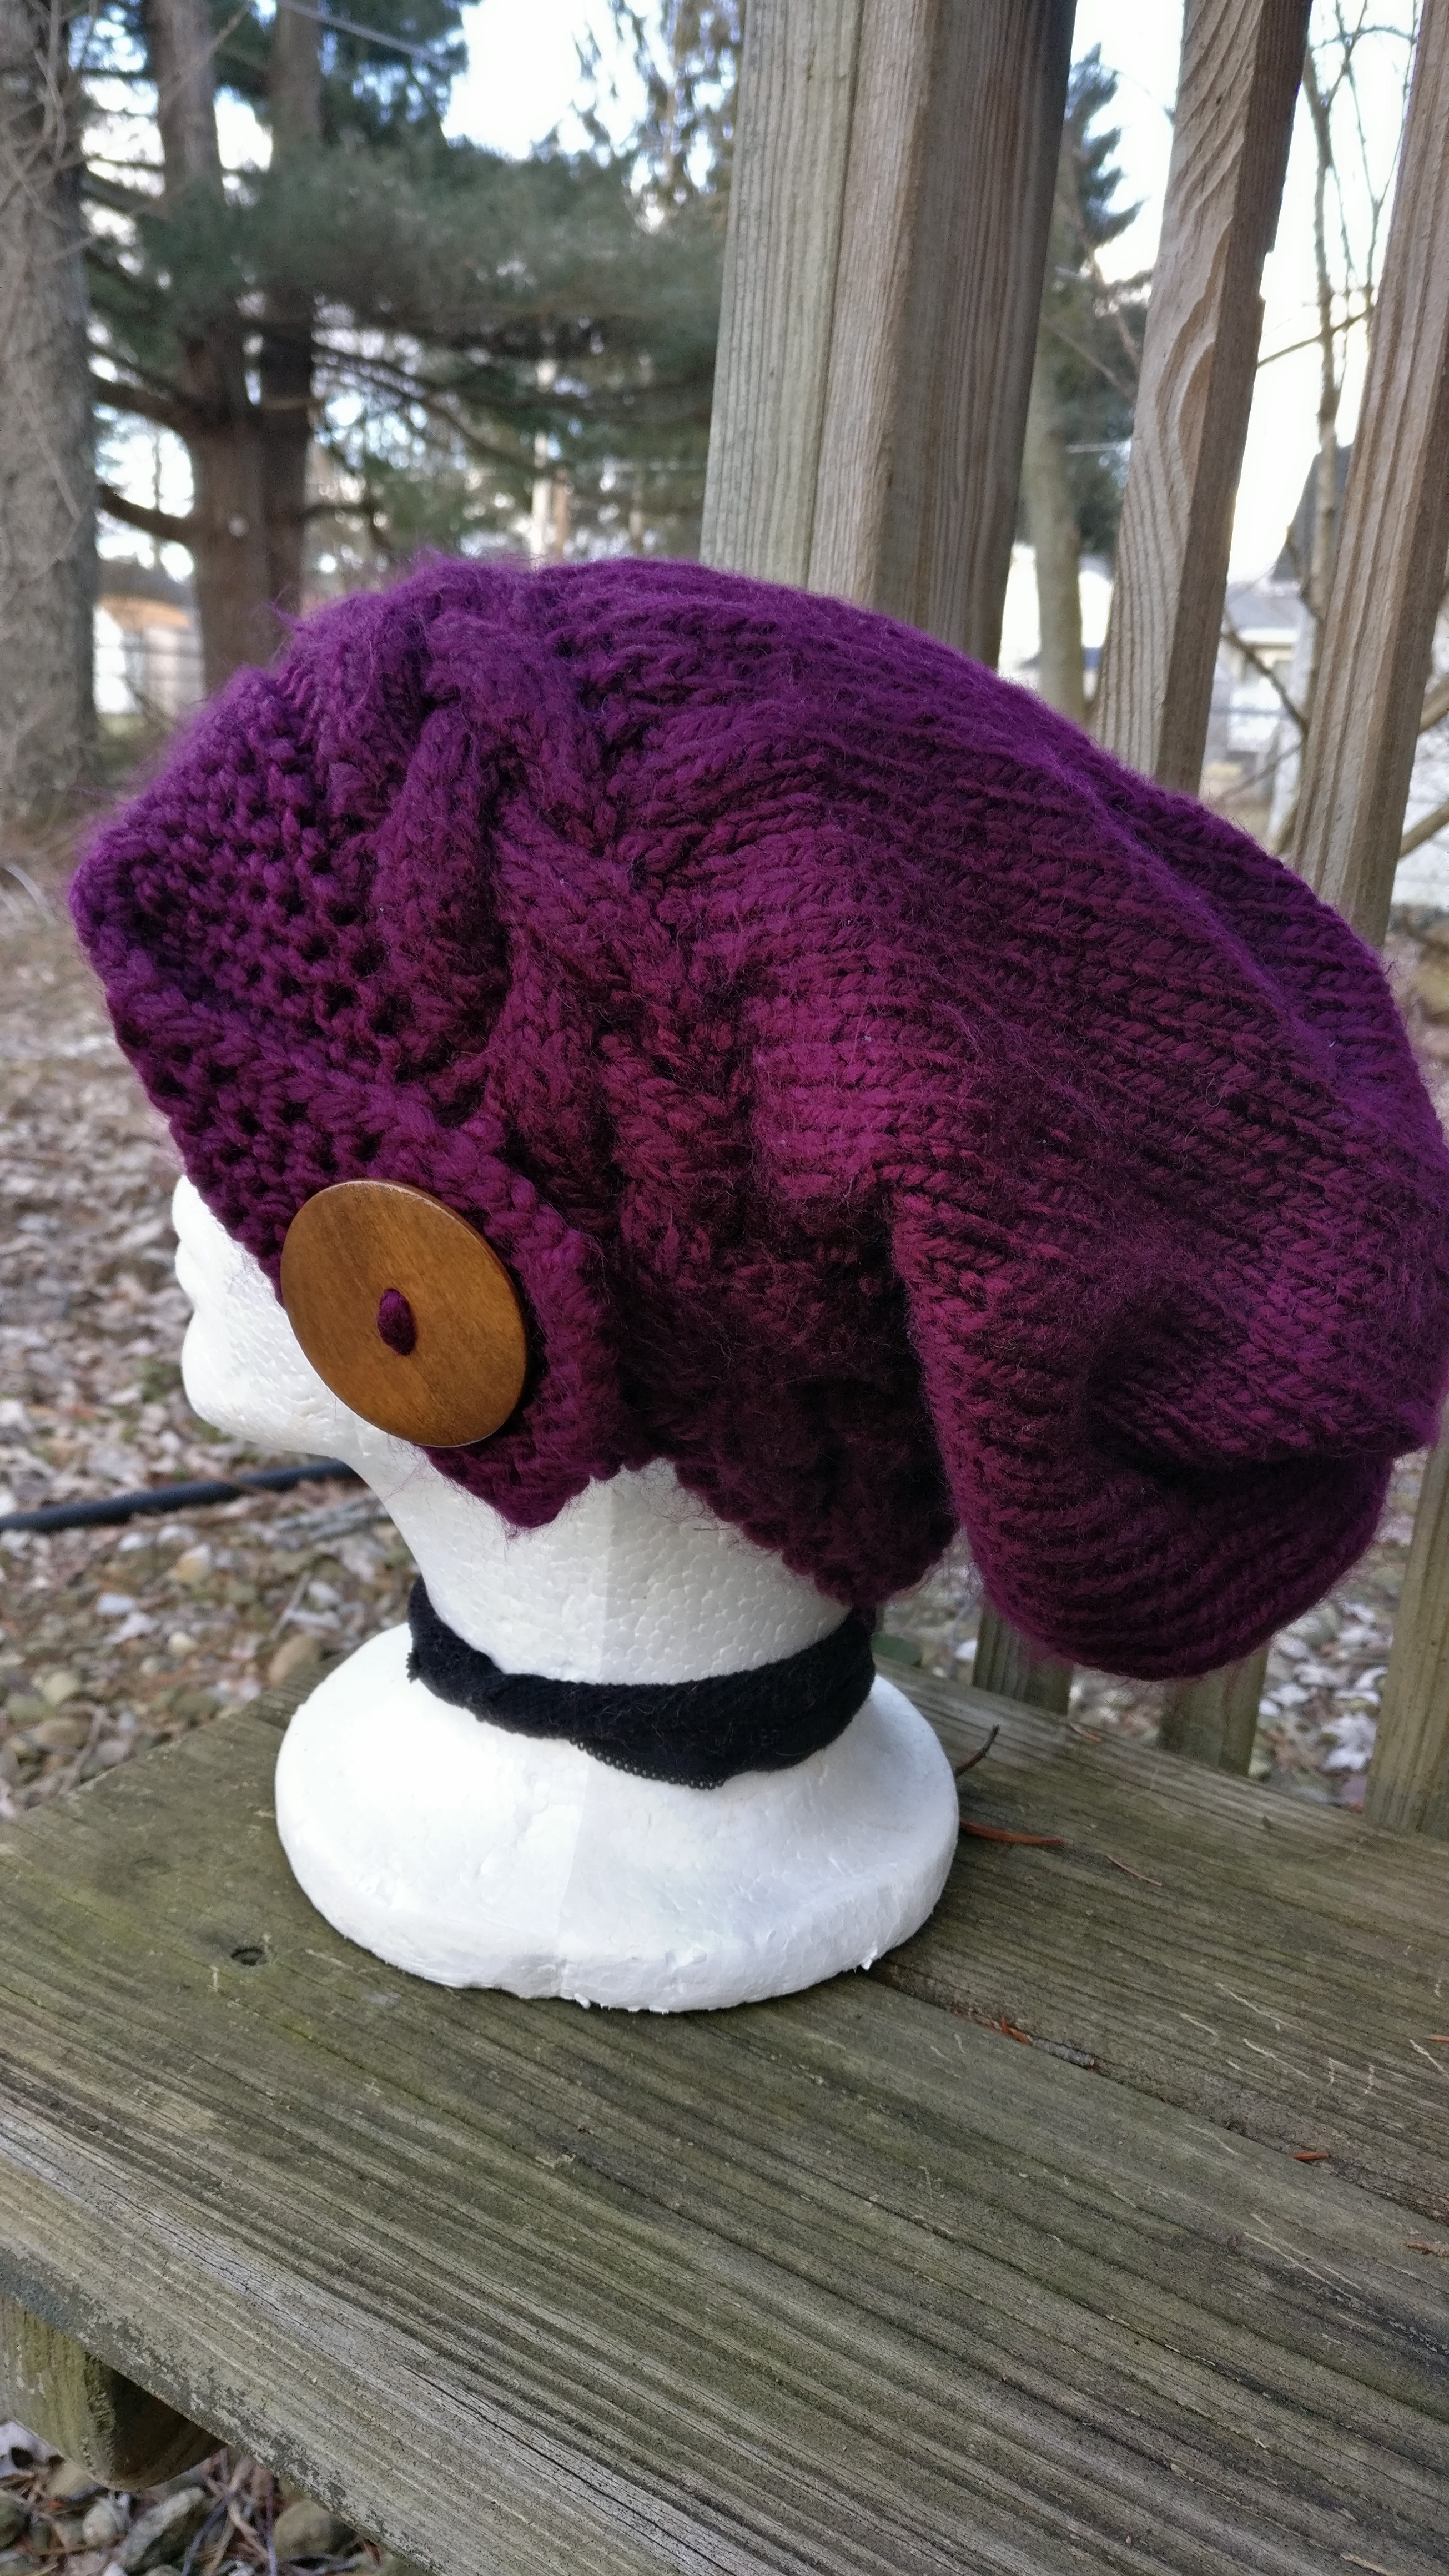
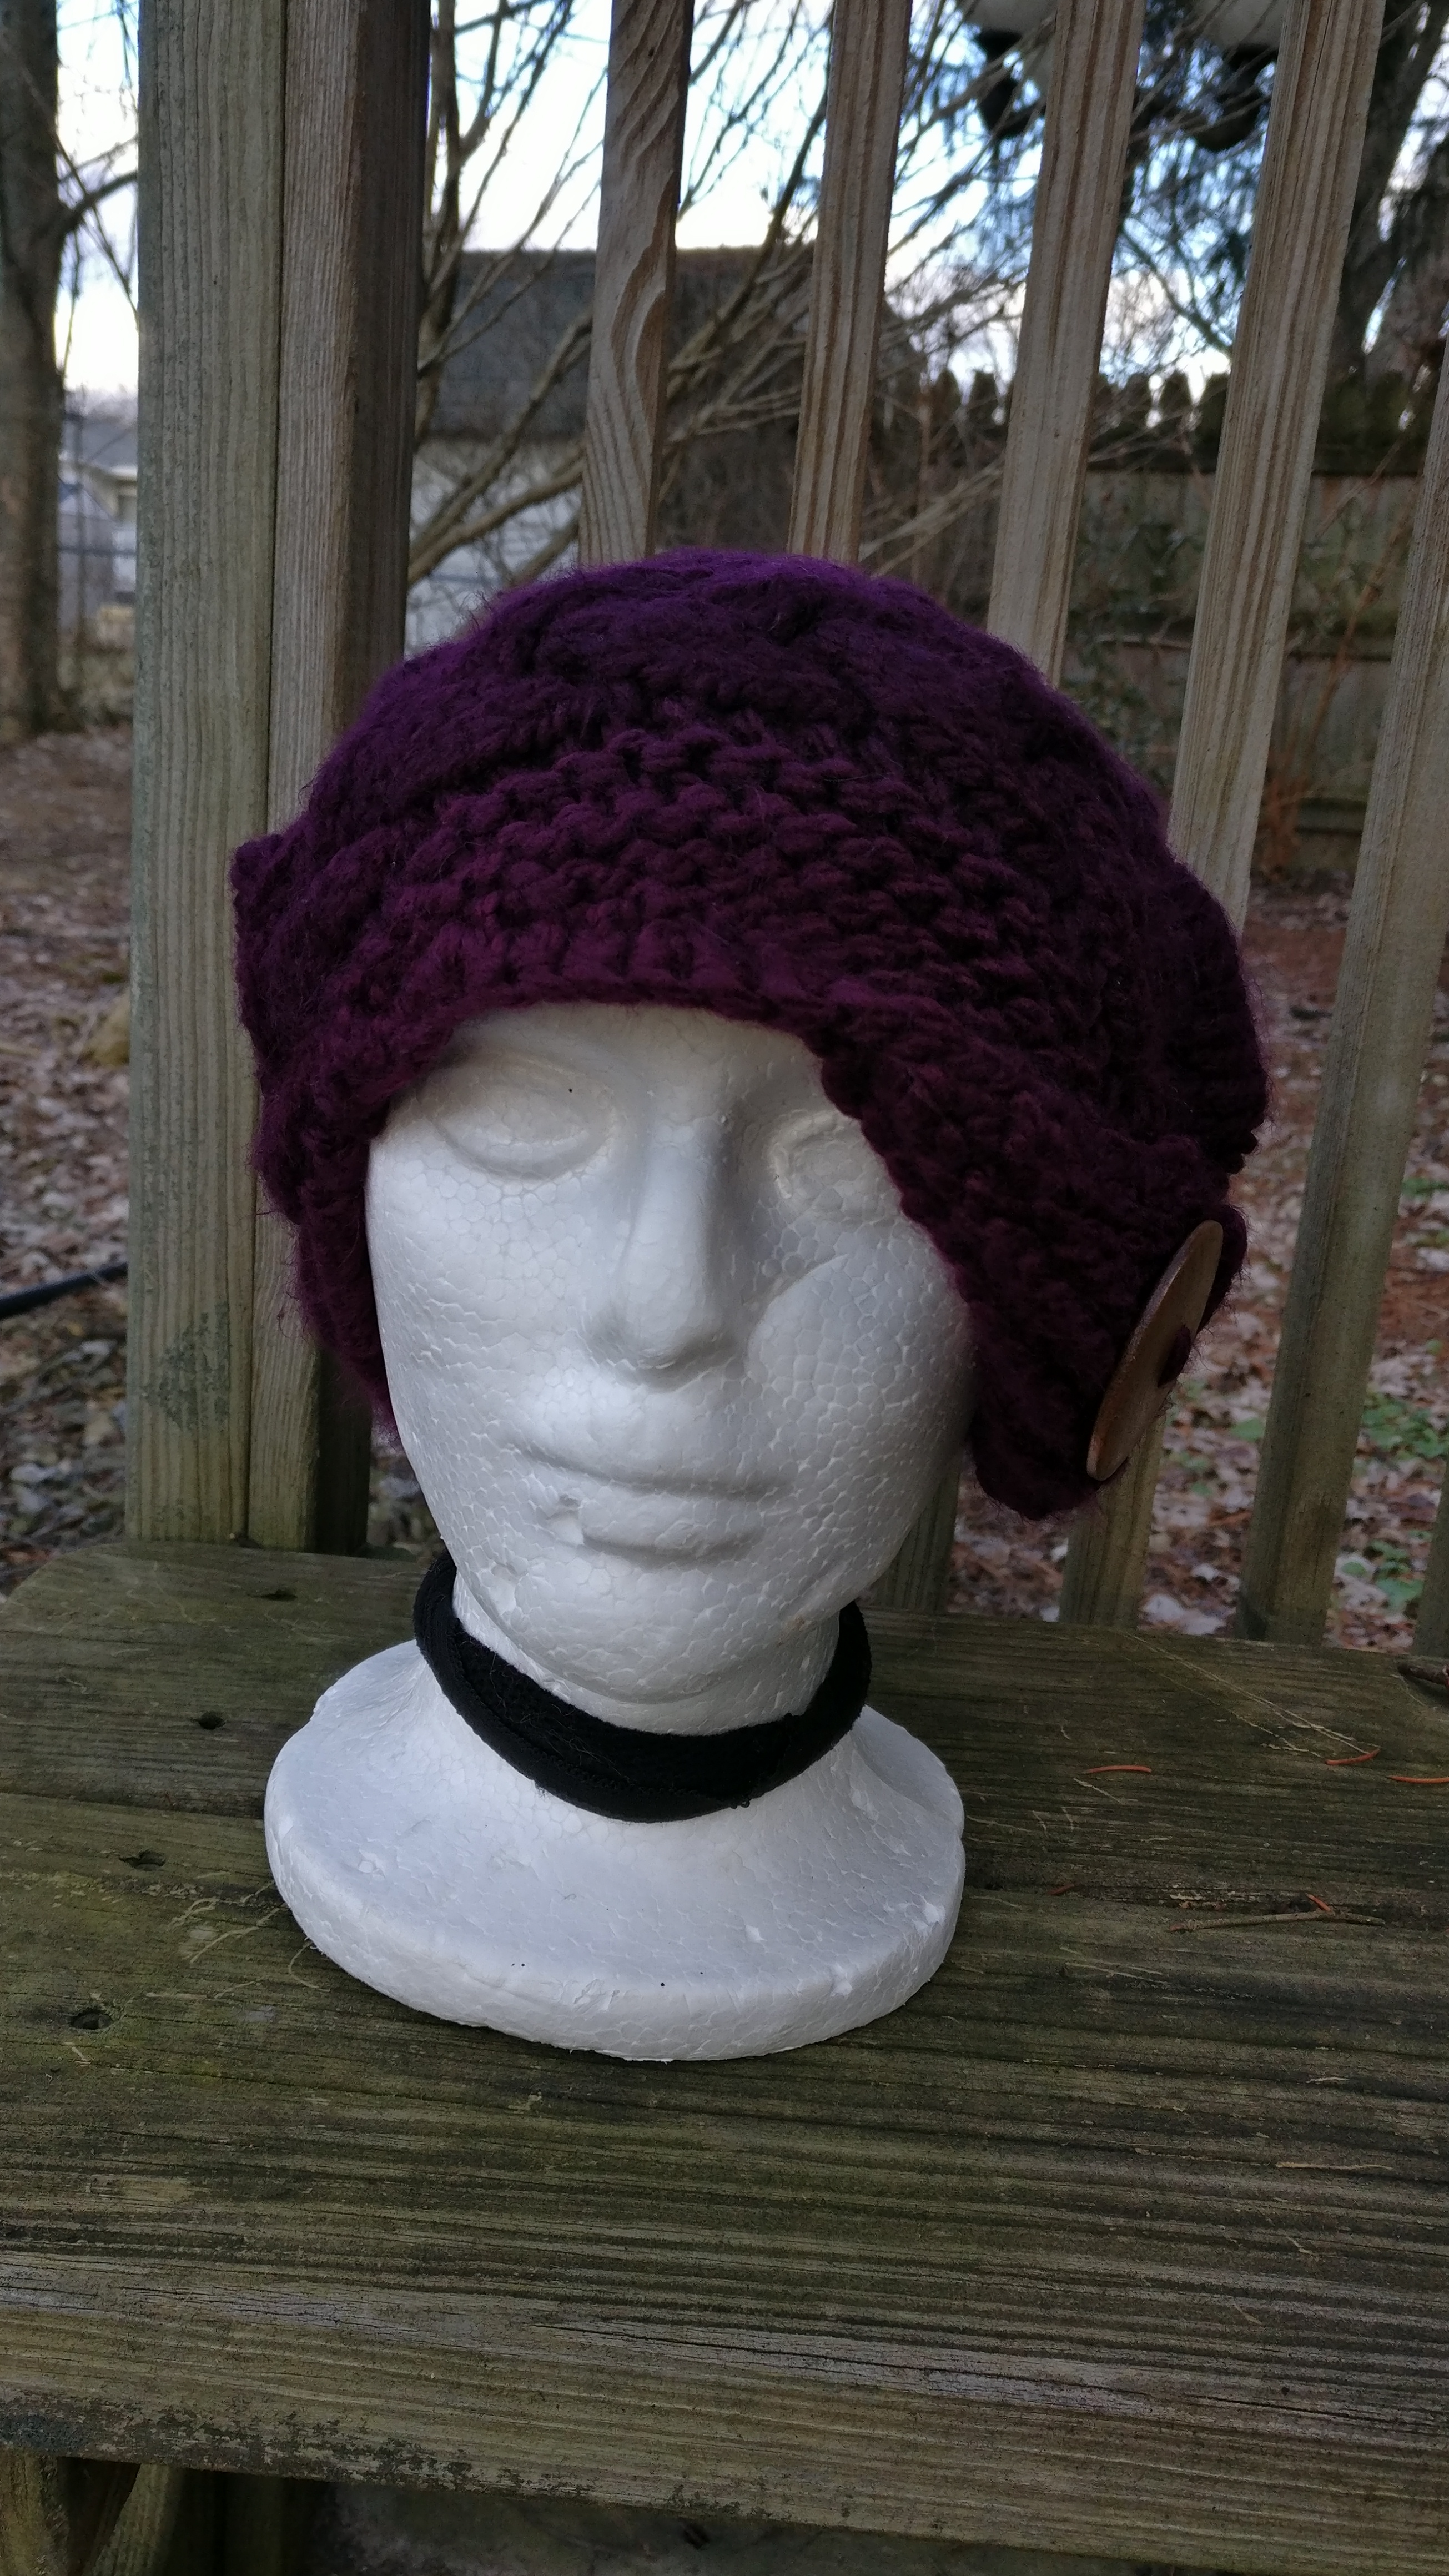
Firstly, bare with me. This is my first knitted pattern and I come to it from a primarily crocheters point of view. This pattern is more of a recipe of how I made this hat.. how to put the three pieces together. Also I should mention I usually only get to craft when I’m half awake (night shift and kids) and exact counts never seem to be my thing. This hat will work without the exact counts because goodness knows I didn’t have exact ones…
A family member found a hat and thought of me asking me to make it for them. I found the pattern for it and of course it was a paid pattern… anyone who knows me knows I don’t prefer to buy singular patterns like that. Personal preference and all… I wouldn’t have a problem with it if it was a dollar or two, but I can’t justify six dollars for one pattern. That’s just me though and my personal soapbox because I have been burned before by that.
Anywho what follows is how I made this hat in as simplest terms as I can make it. In true crocheter fashion I didn’t do a gauge swatch. My hope is that you can adjust this to fit any size yarn. Just use the corresponding straight and circular needles (or dpn I suppose) for your yarn. I will of course list what I used.
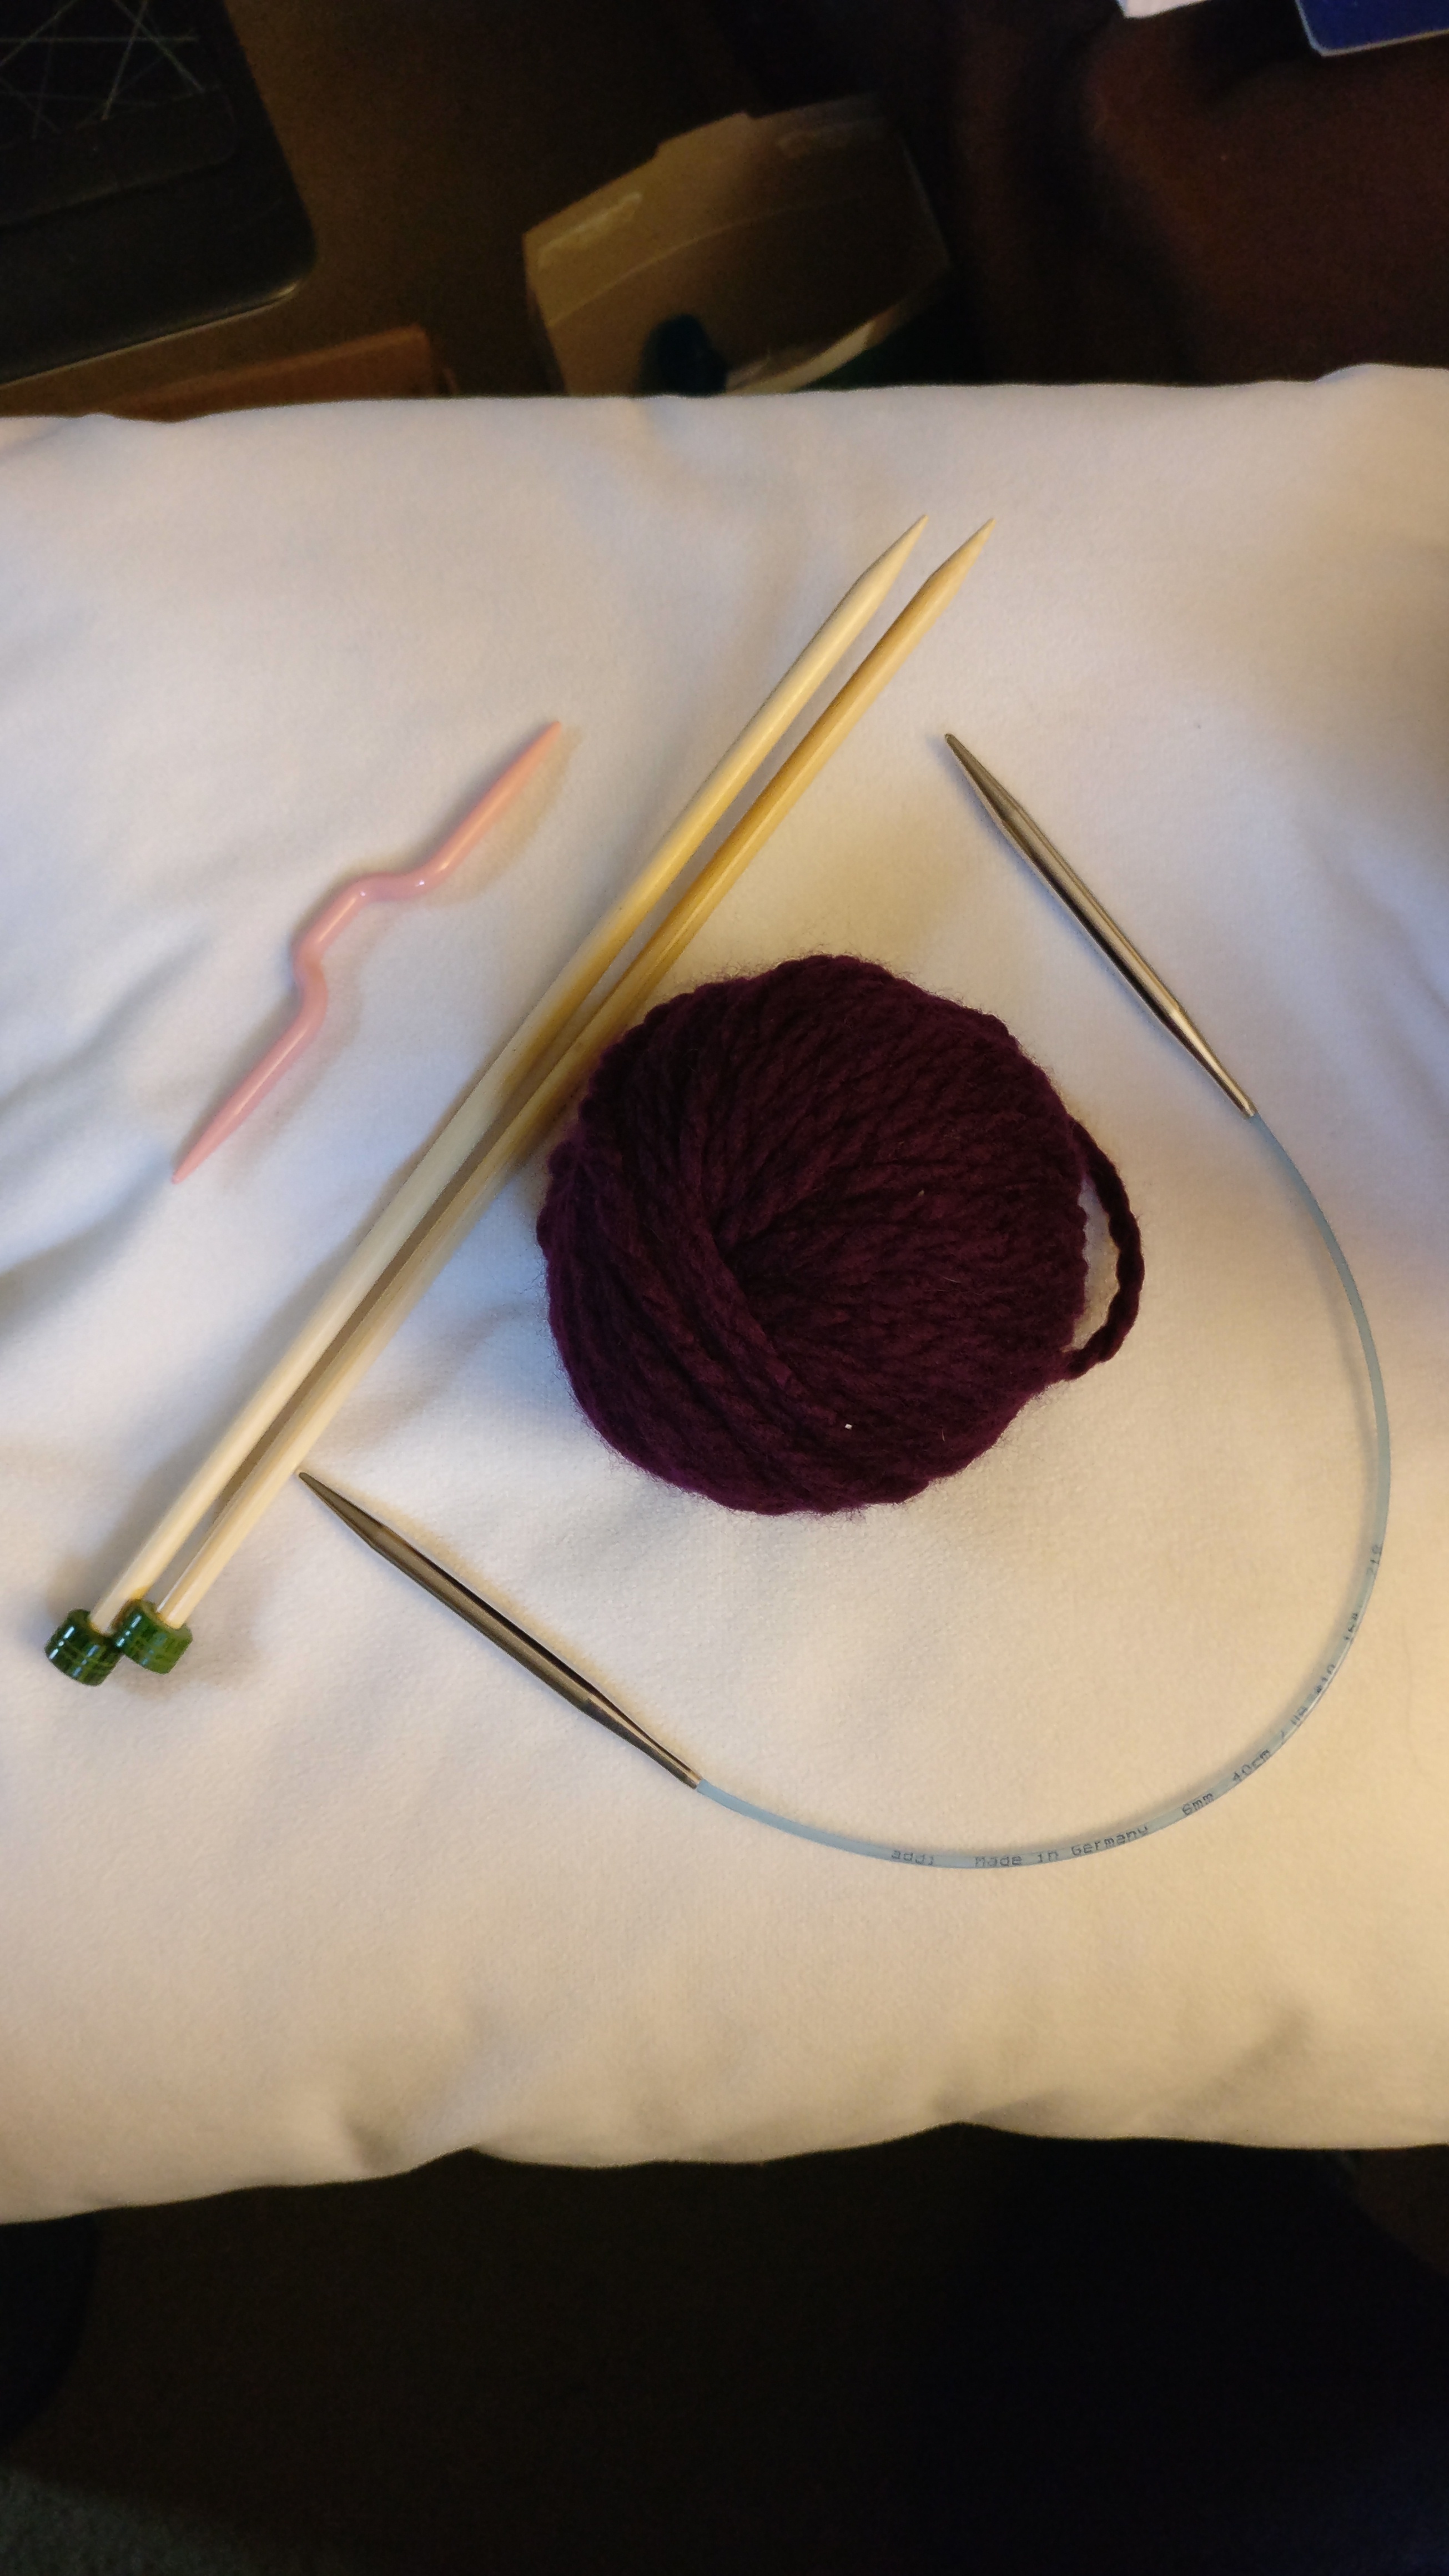
Straight needles US 10/6.00mm 16″ Circular needles US 10/6.00mm Optional crochet hook J/6.00mm Cable needle Darning needle #5 Bulky yarn (I used I Love This Chunky! yarn I found at Hobby Lobby. I bought 2 skeins and each skein has 109 yards. I had a decent amount leftover and honestly I don’t know if I would buy that again. The yarn got fuzzy just working with it and after the first wash… more than I would think appropriate. I did take a picture of the leftover amount to show.) Very cute button
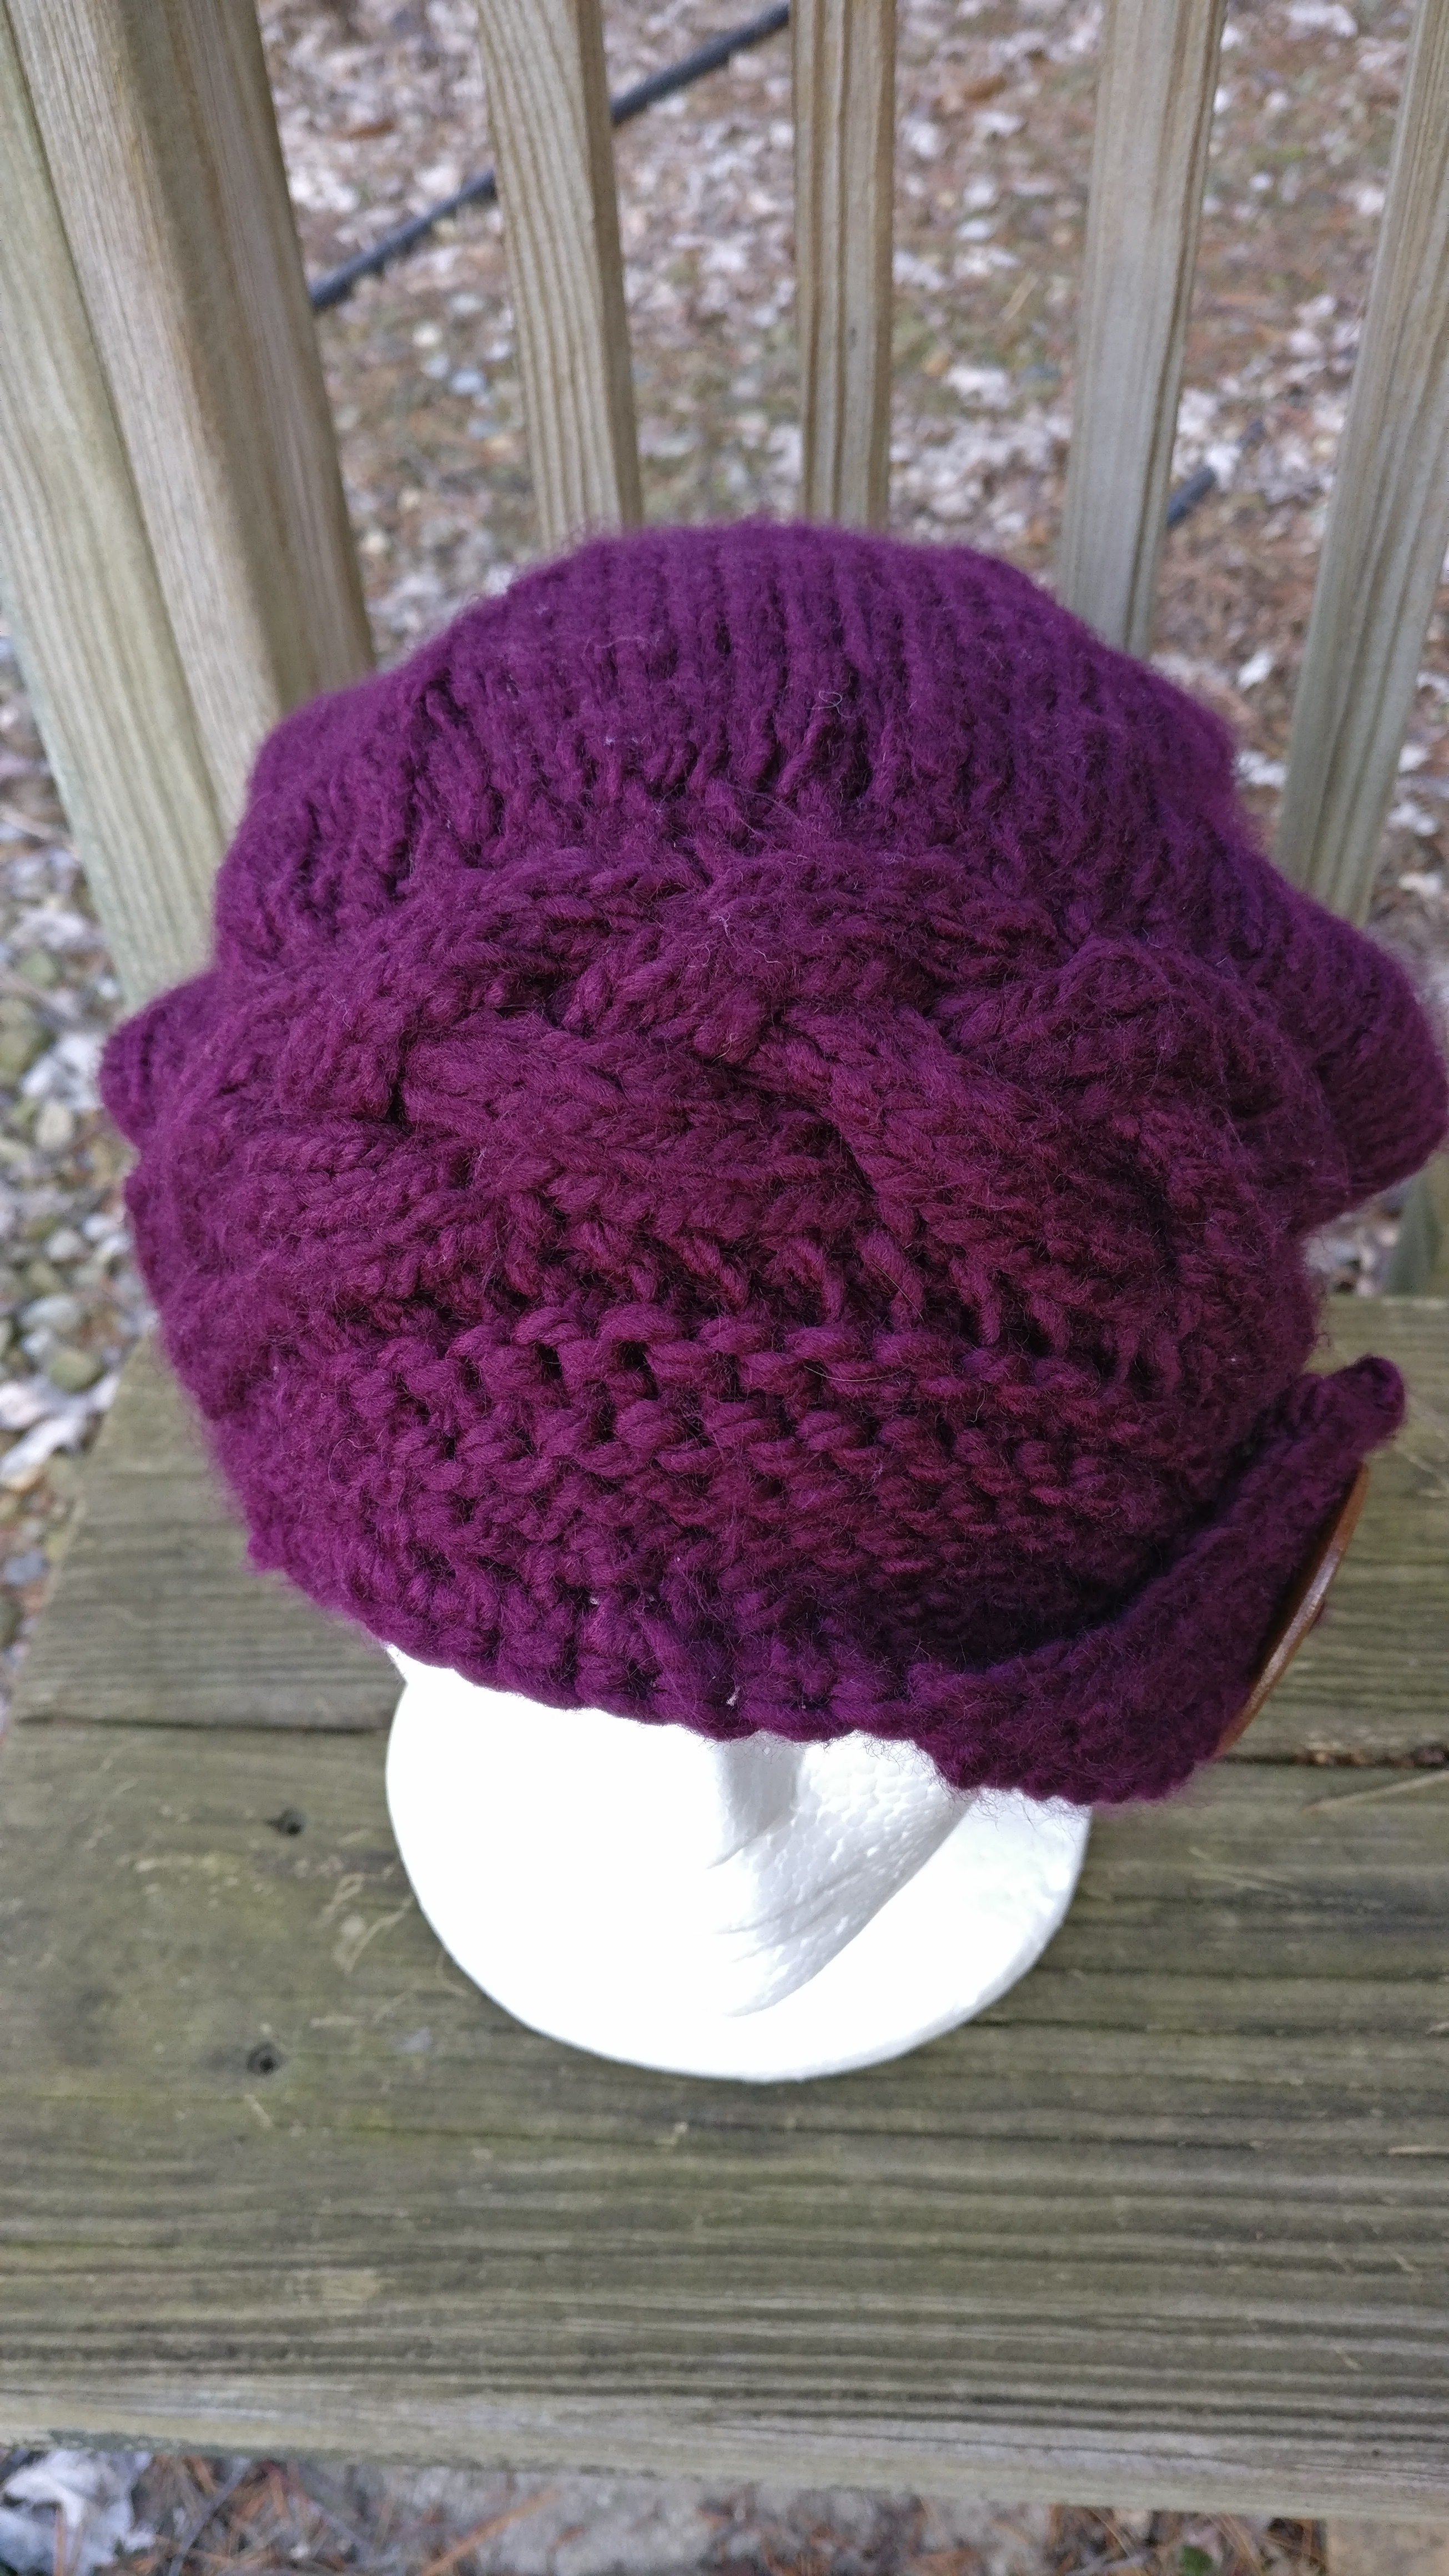
First thing is to make the cabled part. This is essentially a cabled headband. I found a lovely pattern already written up! WOOt! So use this pattern and make a headband to the size of 21″. For me this ended up being 13 repeats… she mentioned that she did 14. Bind off and seam the two ends together.
Now, with the right side facing and using circular needle pick up the stitches along the one side. Now since I had 13 repeats of 8 each that left me picking up 104, place marker if you want. It’ll be a spiral from here out so it doesn’t have to be exact.
Knit around for 2 rounds
Now, maybe it’s just me, but 104 stitches in this bulky yarn seems a bit excessive. I wanted to get it down to roughly 80 stitches. So this is how I did it, but you might have to adjust to decrease to the amount of stitches that works for you. Keep in mind I was designing this for an average size woman’s head.
*knit 7, decrease* around (this should give you roughly 93 stitches, seriously, don’t sweat the count to be exact)
Knit around for 2 rounds
*knit 12, decrease* around
Knit around and count how many stitches you have. If you have more than 80 stitches then on the next round just space out a few decreases around on the next round. I had 83 somehow so I just put 3 decreases on the next round. Seriously, don’t sweat it.
knit in stockinette stitch until the whole piece measures 11.5″ for a really slouchy hat like I made or 8.5″ for a loose beanie.
Decrease around
Knit around for 2 rounds then bind off using the drawstring method.
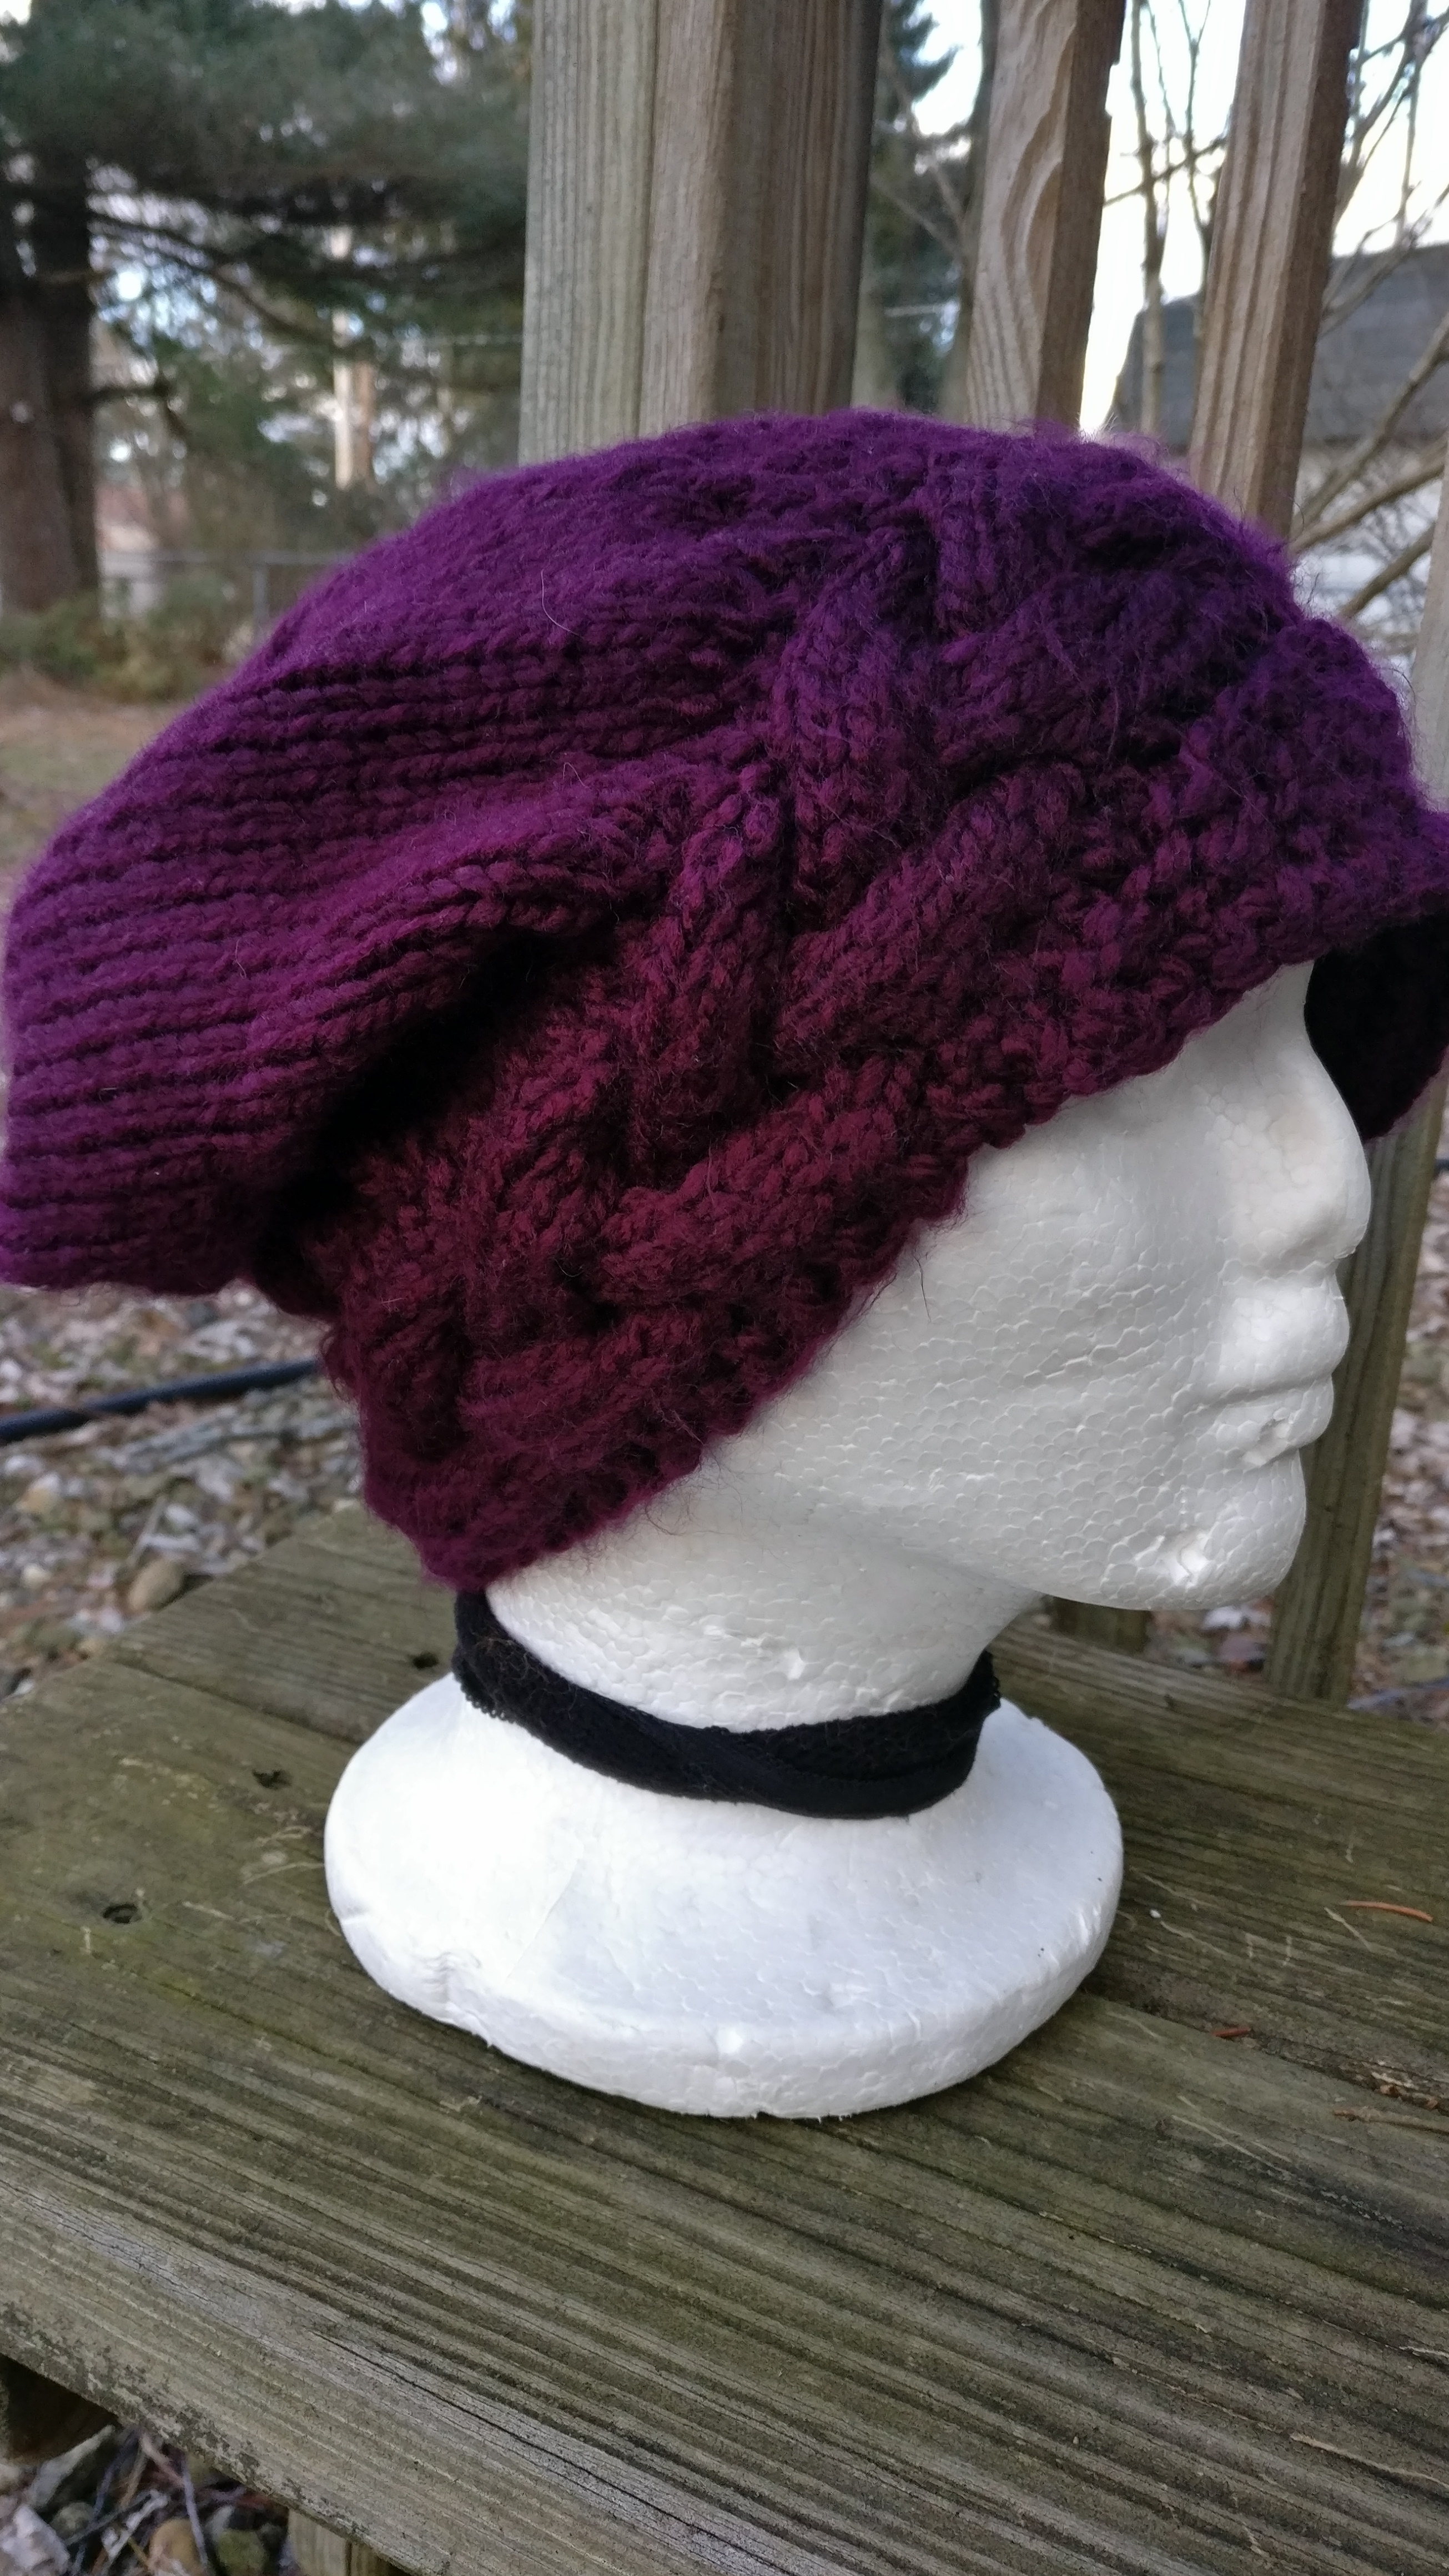
Now, you could stop now and have quite the lovely hat in my opinion or you can continue on and make the brim to make it the cloche hat.
Ok, so find the middle of the front (the seam from the headband is obviously what you want for the back), face the unworked side away from you and count 15 bumps as it were… essentially 30 stitches, but for these purposes we are only thinking of the space between the bumps. Starting here pick up 30 total stitches but only using the spaces between the bumps. You are leaving the rest unworked.
Row 1: knit across Row 2: decrease, decrease then knit across
Repeat these two rows until you have 6 stitches left on your needles, but end on a row 1 then bind off. Here I didn’t cut my yarn, but I pulled out my crochet hook to just do a quick sc border on this piece only, I didn’t go all the way around. This is completely optional, but I am a hooker at heart…
Now, after you weave in your ends, pull the long side of the piece you made over and sew on your button and that’s that!
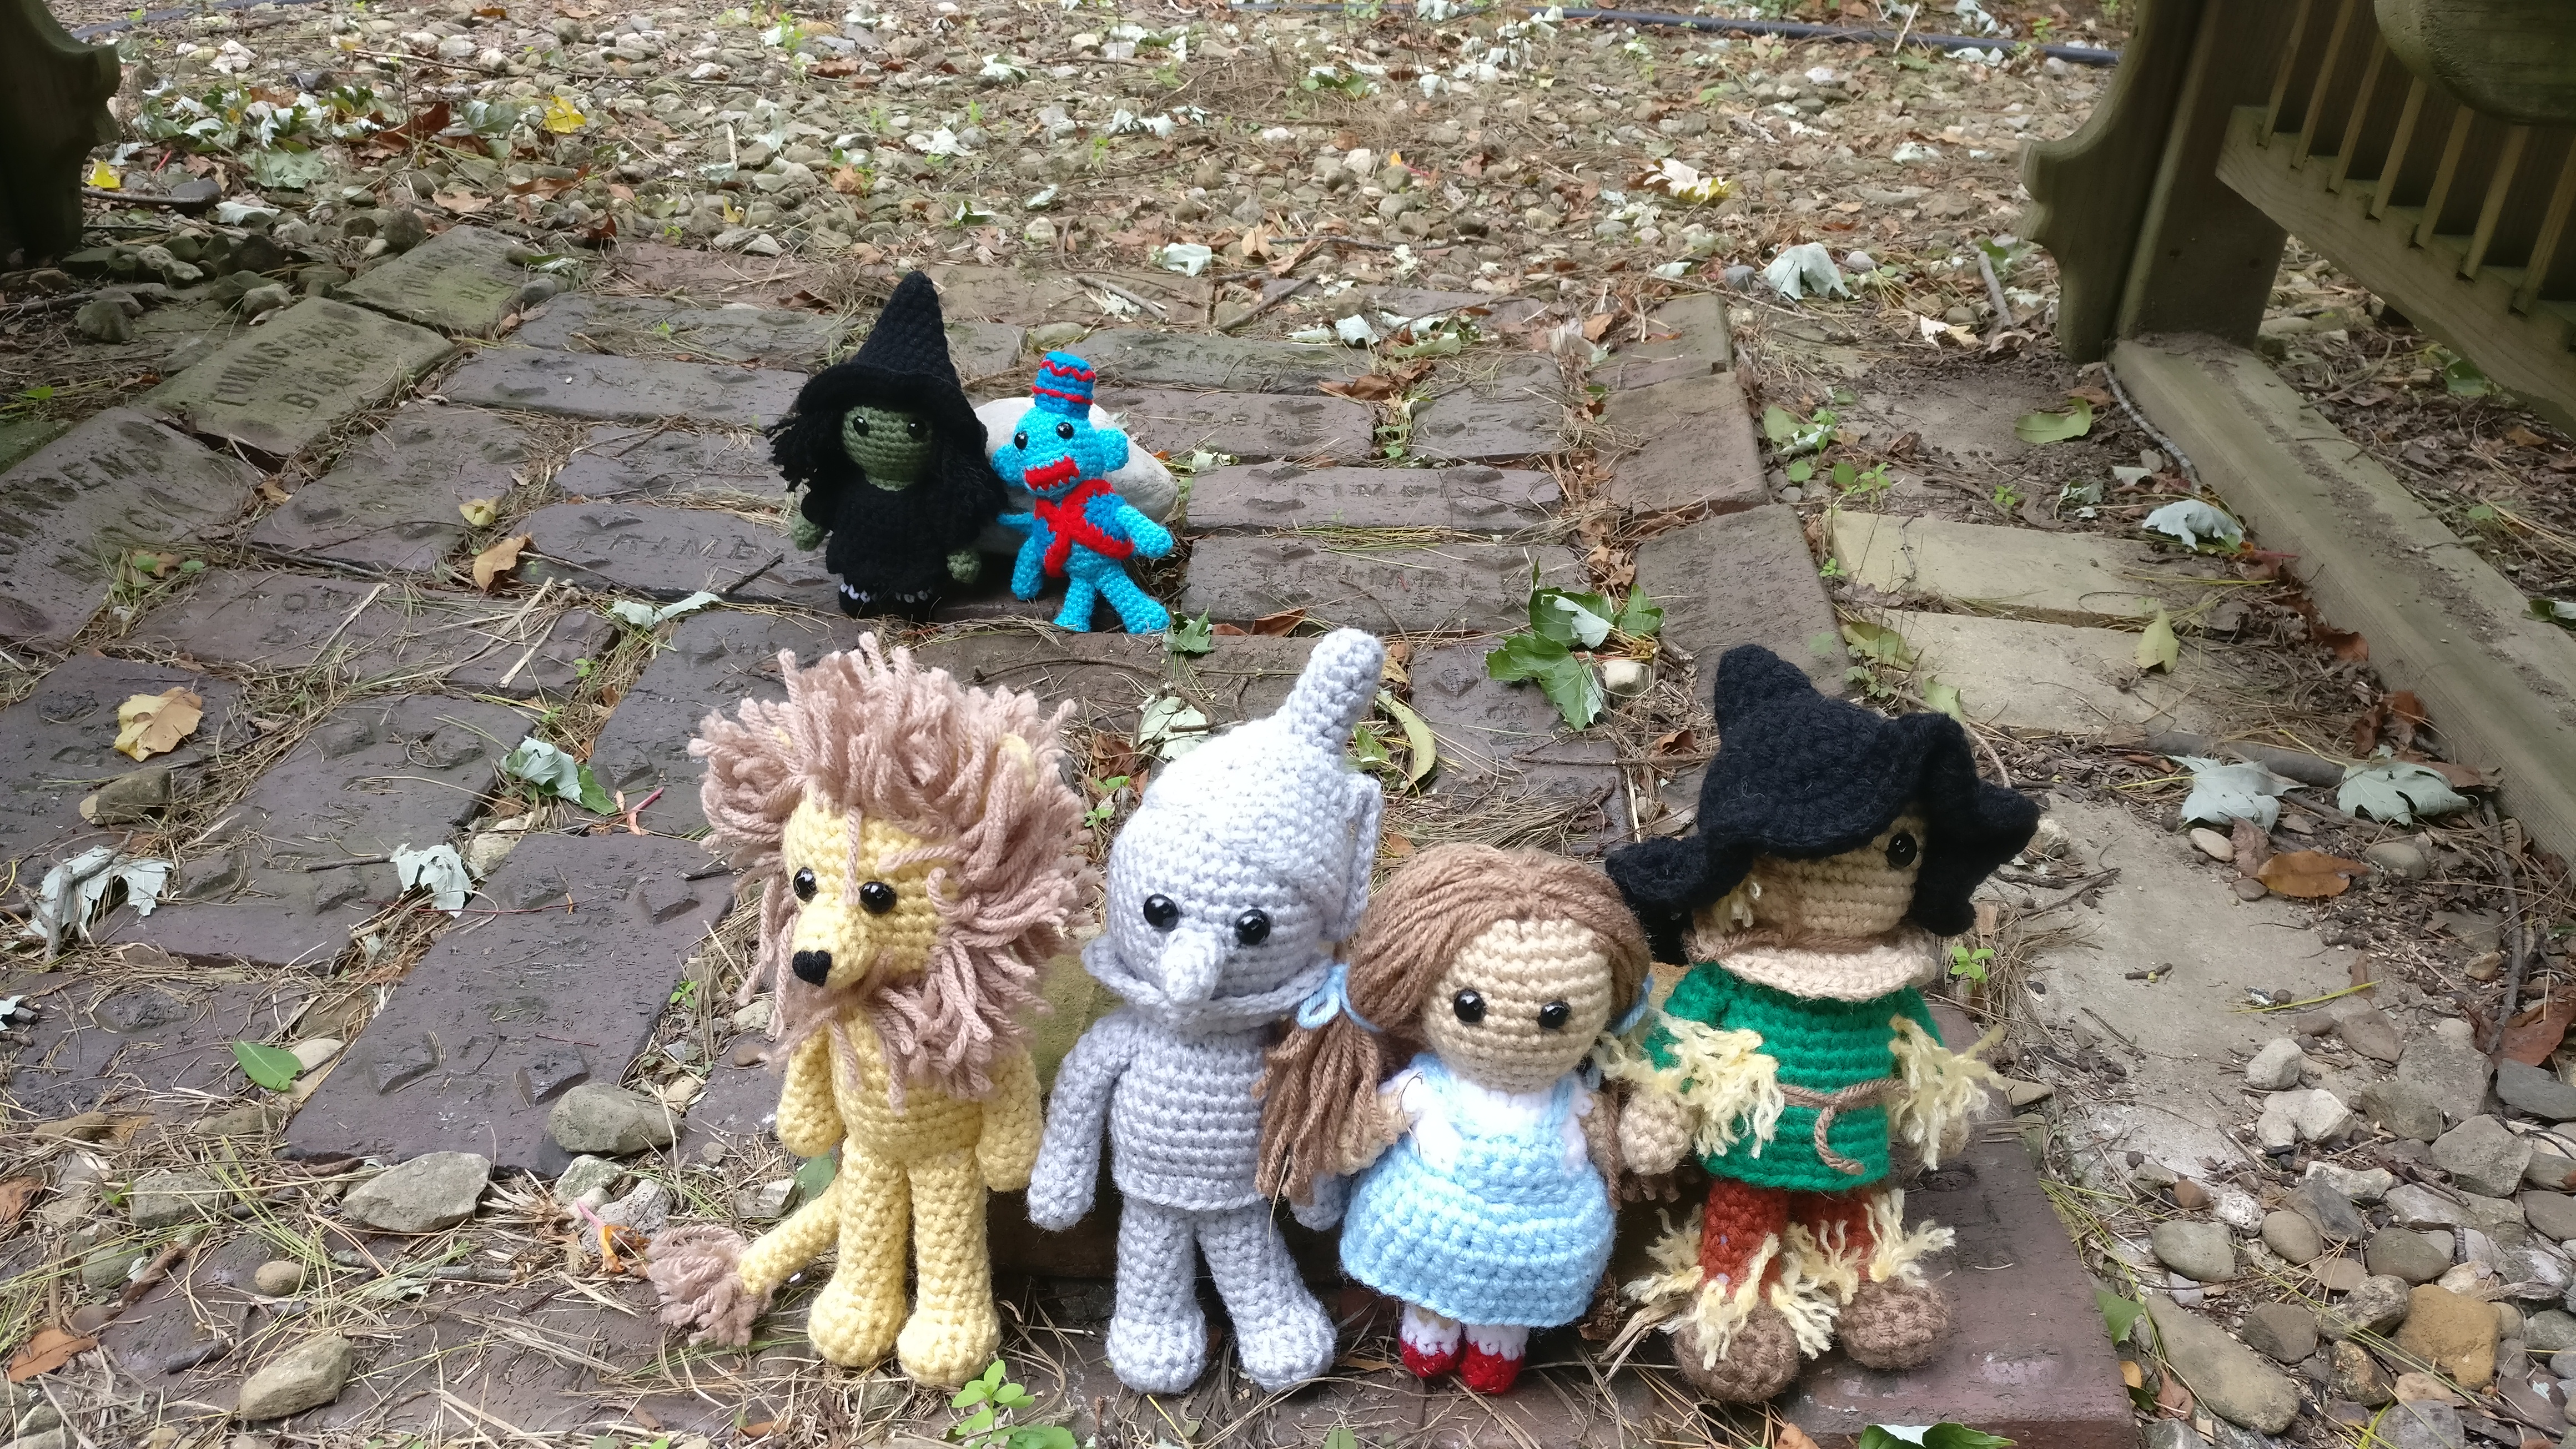
So I wanted to make a Wizard of Oz set for yet another Norbert pattern. I found this wonderful pattern for Wicked Witch(which take some time to look at her other lovely patterns! I have loved her work and never had a problem with any of the patterns.), but there wasn’t one for the Scarecrow or Lion. So I based Dorothy off of her pattern to make the set… however, I did goof and forgot to get a picture of just her. I’ll make up another and get it pictured. Other links: Scarecrow, Tin Man, Cowardly Lion and Flying Monkey
Worsted weight yarn in colors desired, G Hook and 9mm safety eyes
head and body, start with brown (hair color, not strictly necessary, but it will help with the look when her hair is parted at the top) 1. 6 sc in magic circle 2. *inc* around 3. *inc, sc in next* around, change to skin color 4. *inc, sc in next 2* around 5. *inc, sc in next 5* around 6-11. sc around, place safety eyes between rounds 8-9 12. *dec, sc in next 5* around 13. *dec, sc in next 2* around, make sure to stuff and continue to stuff as you go 14. *dec, sc in next* around, change to white 15. *inc, sc in next* around 16. *inc, sc in next 2* around 17-18. sc around, change to blue 19. sc around 20. sc around in BLO 21-22. sc around, change to white 23. *dec, sc in next 2* around 24. *dec, sc in next* around 25. *dec, sc in next 2* around, bind off and close hole
Dress in blue attach yarn in any of the round 20 FLO with the head facing down 1. *inc, sc in next 2* around, do NOT join, but continue to work in a spiral 2-5. hdc around, bind off and weave in end
legs, start with red and make sure to stuff as you go 1. 6 sc in magic circle 2-3. sc around, change to white 4. sc around 5. sc around, change to skin color 6-7. sc around
8. sc around, change to white 9. sc around 10. sc around, bind off and sew onto body
arms, start with skin color, very lightly stuff as you go, but I just needed the ends from the color changes 1. 6 sc in magic circle 2-5. sc around, switch to white 6-7. sc around, bind off and sew onto body
apron, with blue, leaving a long tail for sewing 1. ch 6, sc in 2nd ch from hook and across, ch 1 and turn 2. sc across, ch 10 and leave a long tail and bind off. connect yarn to the opposite corner of the round you just finished and ch 10, leave a long tail and bind off. sew front apron where dress begins on body, chains are to go up and over the arms to connect in the back.
hair, in brown I cut about 9″ lengths of yarn and hooked them into the head making sure to have a middle part. Then bring it forward for little low pig tails and tie with some blue yarn.
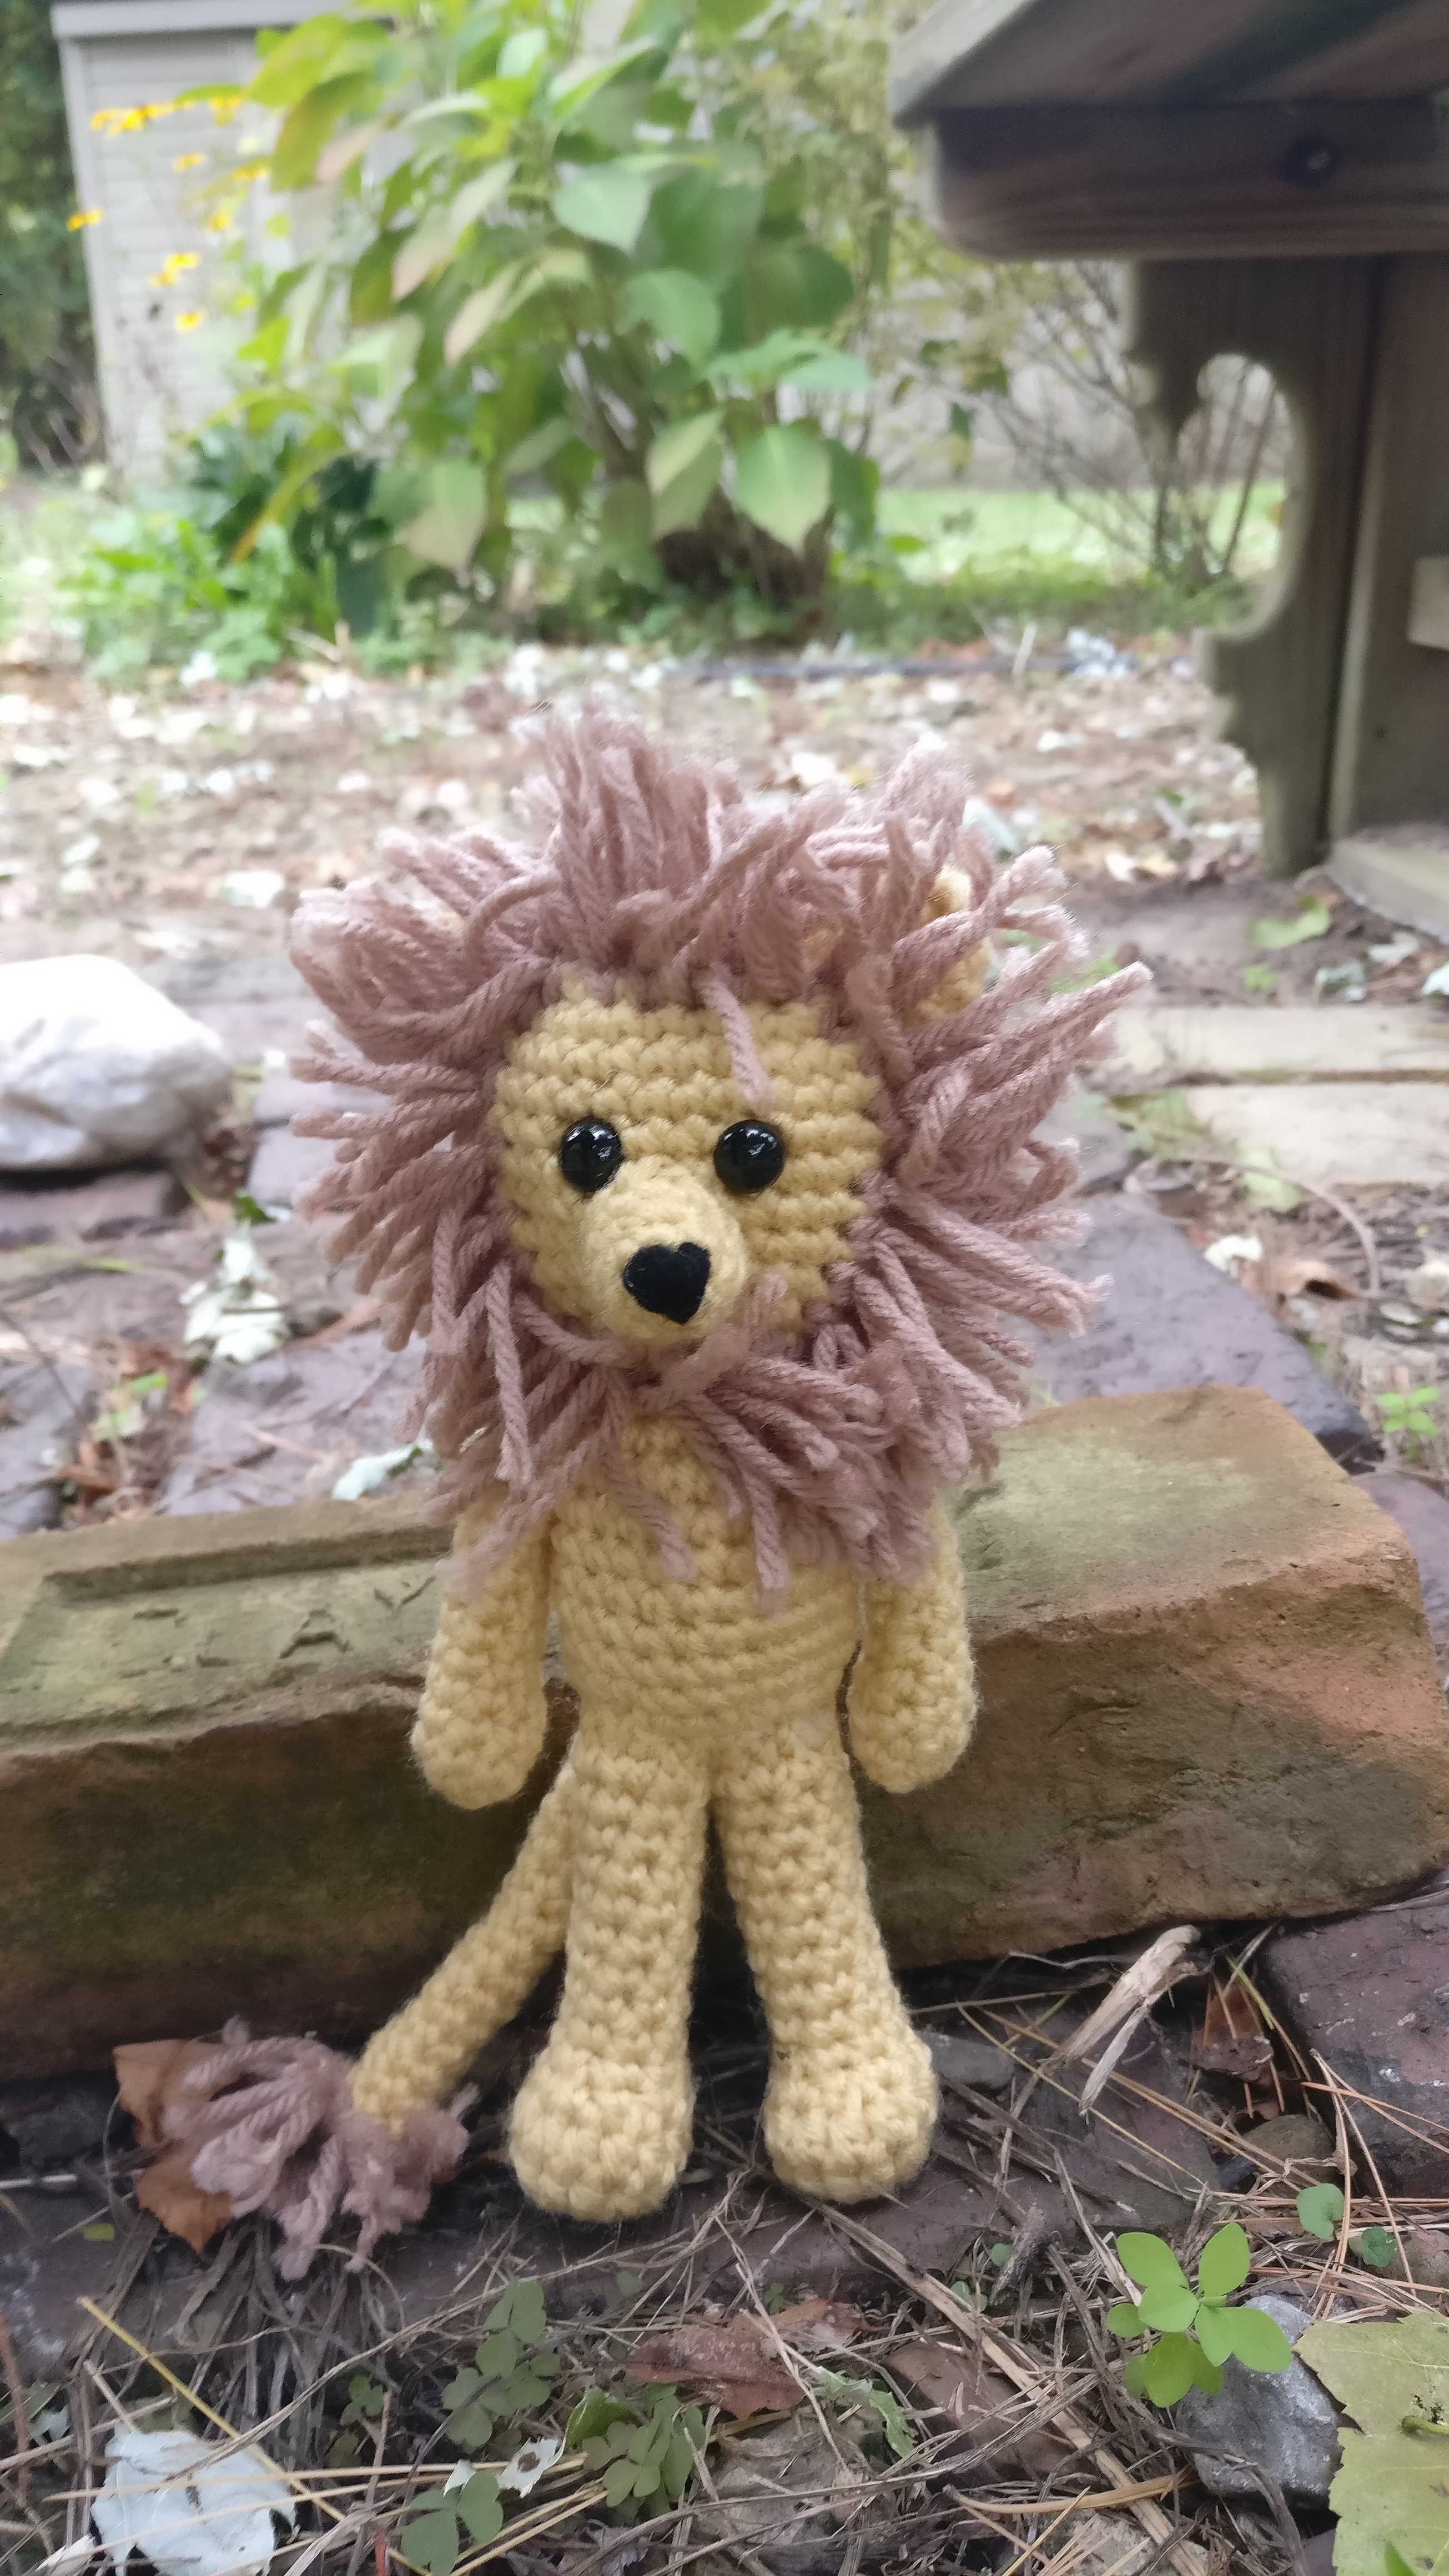
So I wanted to make a Wizard of Oz set for yet another Norbert pattern. I found this wonderful pattern for Tin Man (which take some time to look at her other lovely patterns! I have loved her work and never had a problem with any of the patterns.), but there wasn’t one for the Scarecrow or Lion. So I based Cowardly Lion off of her pattern to make the set. Other links: Scarecrow, Dorothy, Wicked Witch, and Flying Monkey
Worsted weight yarn in colors desired, G Hook and 9mm safety eyes
1. 6 sc in magic circle 2. 2sc around 3. *inc, sc in next sc* around 4. *inc, sc in next 2sc* around 5. *inc, sc in next 3sc* around 6-12. sc around Place safety eyes between rounds 9-10 13. *dec, sc in next 3* around 14. *dec, sc in next 2* around 15. *dec, sc in next sc* around, make sure to stuff head and continue to stuff as you go 16. *inc, sc in next sc* around 17. *inc, sc in next 2sc* around 18-24. sc around Stuff body 25. *dec, sc in next 2* around 26. *dec, sc in next sc* around 27. *dec around*, bind off and close up hole
Legs, make sure to stuff as you go 1. 6 sc in magic circle 2. 3sc in first st, sc in next 3sc, 3sc in next sc, sc in next sc 3. 2hdc in next 4sc then sc in next 6sc 4. hdc in next 8hdc then sc in next 2sc, dec, sc in next 2sc 5. *dec, sc in next* x3, sc in next 4sc 6. sc in next 3sc, dec, sc in next, dec, sc in next 2sc 7-14. sc around 15. sc in next 2, inc x2, sc in next 2, inc x2 (This round is optional as it should just be some inc in the front and back of the leg, but it does make sewing the legs on easier.) Bind off and sew onto body.
Arms, make sure to stuff hand, but lightly stuff arm 1. 6 sc in magic circle 2. *inc, sc in next sc* around 3-4. sc around 5. dec x2, sc in next 5sc 6-12. sc around. Bind off and sew onto body.
Muzzle 1. 6 sc in magic circle 2. sc around 3. *inc, sc in next sc* around 4. sc around. Bind off. Next using some black yarn sew on a nose by sewing through the center of the magic circle and 2 of the sc a few times. Make sure muzzle is stuffed and sew onto the face.
Ears 1. 6 sc in magic circle 2. *inc, sc in next sc* around 3. sc around 4. *dec, sc in next sc* around, bind off, do NOT stuff and sew onto head. It goes in line with the arm over rounds 4-6 of the head. Also I ran a running stitch up the middle of the ear to pinch it together in the middle a little.
Tail Now, I wanted a long tail for what I had in mind. I remember most of the Cowardly Lion holding his tail and petting it, so not to make an obnoxiously long tail just wasn’t in me. You can make the tail shorter too if you would like. Also the sc makes for a pretty poseable tail, however if you would like you can always add a pipe cleaner to the inside. If doing that I would suggest closing the end of the tail. 1. 6 sc in magic circle leaving a long tail to sew onto the body. Also, do NOT pull tightly closed. Leaving it to be able to flatten against body. 2-20. sc around, bind off and do Not close. Sew onto body. Using mane color attach a few hairs (I did 12) about 3-4″ long to the end of the tail to each of the 6 sc. Trim as necessary.
Mane This is the part that I always hate.. weaving in hair. It always seems like it takes forever. Cut a whole lot of yarn about 4″ or so long and get to weaving. Trim if you want and when you have it all into place and fluff it out a bit.
So I wanted to make a Wizard of Oz set for yet another Norbert pattern. I found this wonderful pattern for Tin Man (which take some time to look at her other lovely patterns! I have loved her work and never had a problem with any of the patterns.), but there wasn’t one for the Scarecrow or Lion. So I based Scarecrow off of her pattern to make the set. Other links: Tin Man, Cowardly Lion, Dorothy, Wicked Witch, and Flying Monkey
Worsted weight yarn in colors desired, G Hook and 9mm safety eyes
Head and Body, start with light tan for head 1. 6 sc in magic circle 2. 2sc around 3. *inc, sc in next sc* around 4. *inc, sc in next 2sc* around 5. *inc, sc in next 3sc* around 6-12. sc around Place safety eyes between rounds 8-9 13. *dec, sc in next 3* around 14. *dec, sc in next 2* around 15. *dec, sc in next sc* around, make sure to stuff head and continue to stuff as you go 16. *inc, sc in next sc* around in BLO then switch to green for shirt 17. *inc, sc in next 2sc* around 18-23. sc around 24. sc in BLO around then switch to reddish brown for pants Stuff body 25. *dec, sc in next 2* around 26. *dec, sc in next sc* around 27. *dec around*, bind off and close up hole
Neck ruffle Ok admittedly this is not in the best place so it is a bit challenging. Just take it slow and don’t get frustrated. I found it best to almost push the head and body away from each other to push the FLO out more. Make sure the head is facing down. attach head tan yarn in any of the round 16 FLO that are exposed. 1. Ch 1, *inc* around, do NOT sl st to the first, but continue on in a spiral 2. *inc, sc in next* around 3. *inc, sc in next 2* around, bind off and weave in end
Shirt ruffle Attach shirt green color in any of the round 24 FLO that are exposed, making sure the head in facing down. 1. ch 1, sc around, do NOT sl st to the first, but continue on in a spiral 2-4. sc around, bind off and weave in end
Legs, make sure to stuff as you go, start with medium brown for the shoes 1. 6 sc in magic circle 2. 3sc in first st, sc in next 3sc, 3sc in next sc, sc in next sc 3. 2hdc in next 4sc then sc in next 6sc 4. hdc in next 8hdc then sc in next 2sc, dec, sc in next 2sc 5. *dec, sc in next* x3, sc in next 4sc 6. sc in next 3sc, dec, sc in next, dec, sc in next 2sc and switch to pants color 7-14. sc around 15. sc in next 2, inc x2, sc in next 2, inc x2 (This round is optional as it should just be some inc in the front and back of the leg, but it does make sewing the legs on easier.) Bind off and sew onto body. It helps to flip up the shirt ruffle until the legs are sewn on then flip back down.
Arms, make sure to stuff hand, but lightly stuff arm, starting with light tan 1. 6 sc in magic circle 2. *inc, sc in next sc* around 3-4. sc around 5. dec x2, sc in next 5sc, switch to green shirt color 6-12. sc around. Bind off and sew onto body.
Hat 1. 6 sc in magic circle 2. sc around 3. *hdc inc, hdc in next 2* around 4. *hdc inc, hdc in next 3* around 5. *hdc inc, hdc in next 4* around 6. *hdc inc, hdc in next 3* around 7. *hdc inc, hdc in next 4* around 8. *hdc inc, hdc in next 2* around 9. *hdc inc, hdc in next 3* around 10. *hdc inc, hdc in next 4* around 11. *hdc inc, hdc in next 11* around 12. FLO sc around 13. *hdc inc* around 14. hdc around, bind off and leave a tail for sewing. Weave end up to round 11 and then sew this round loosely to the head.
Ties Using brown yarn tie a length of yarn around the neck above the ruffle leaving the ends hanging. Tie another around the waist above the shirt ruffle.
Straw Using straw colored yarn attach in various places like you would hair. I used 3-4″ yarn then just trimmed as necessary. You actually need small pieces, but those are really hard to weave in to me. I then split the yarn into strands with a needle to fluff it up a little.
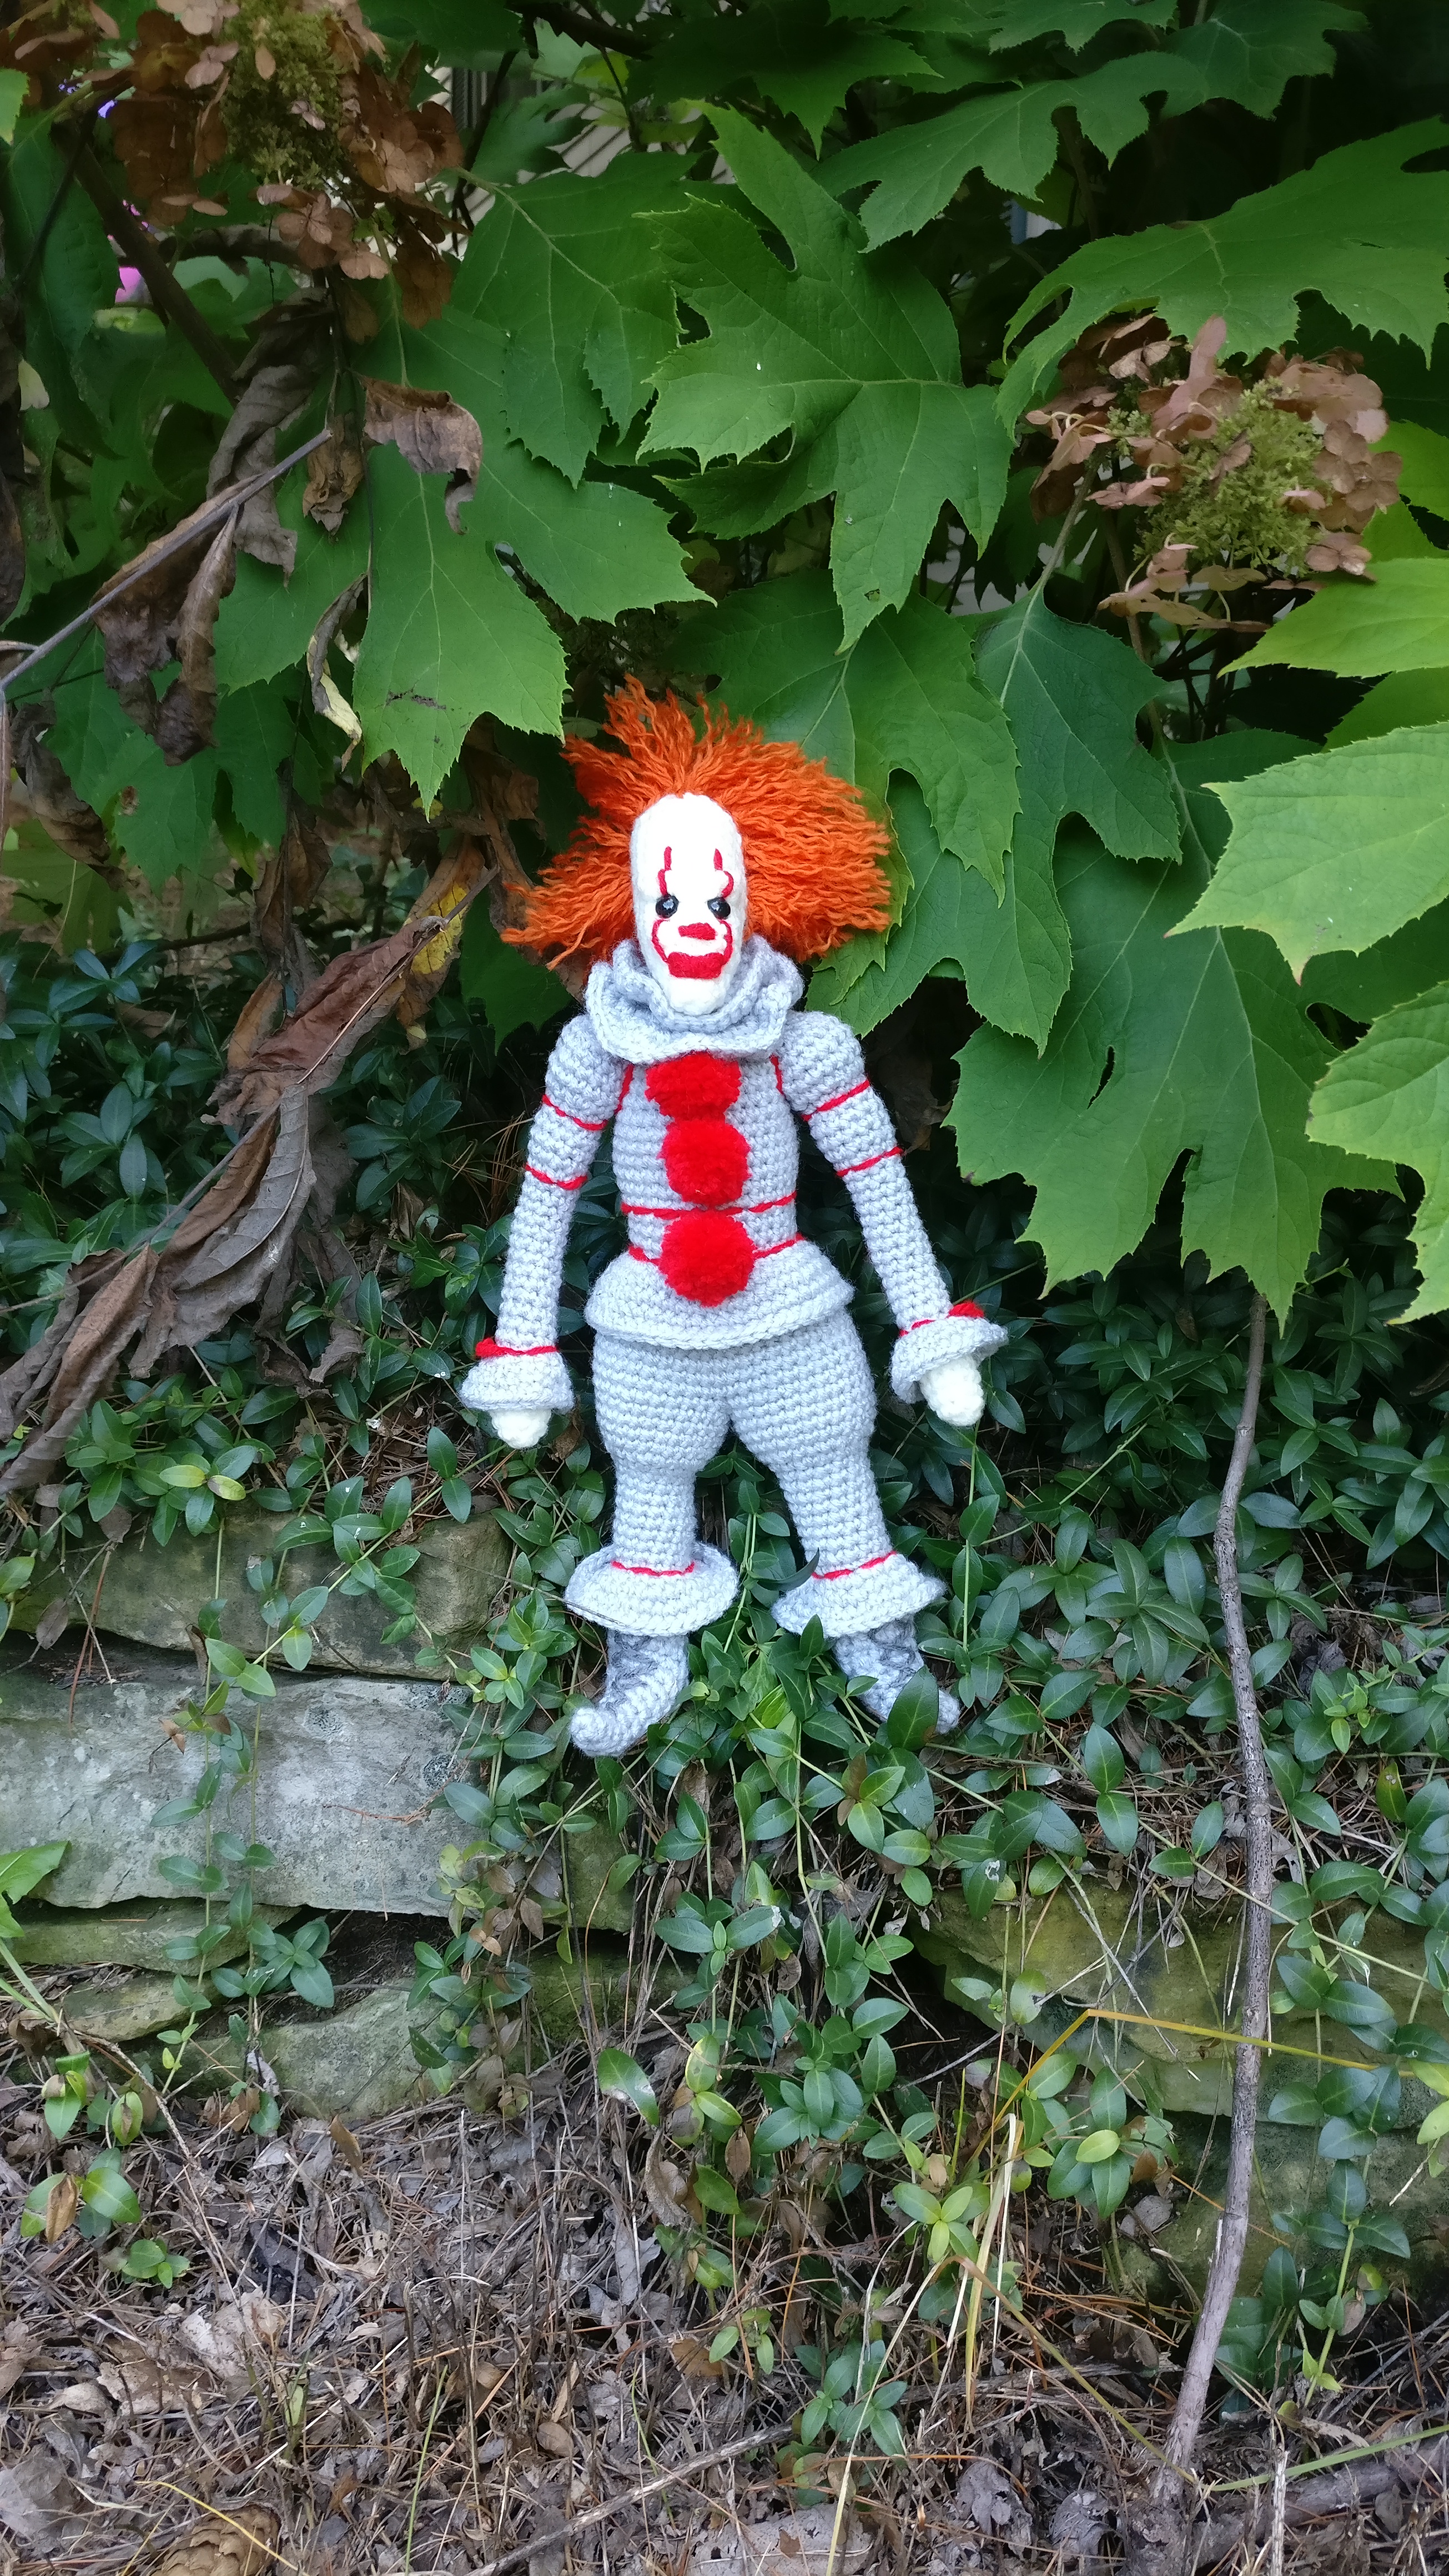
It is probably one of my favorite books. I do love the Gunslinger series, but I have read It a couple times now. Of course I had to make the updated Pennywise for my next Norbert calendar. I tried to keep him mostly basic without losing too much detail, but he is still a bit more complicated than some of my others. I choose not to use more than yarn and basic safety eyes on purpose… though that has a lot to do with my promise not to buy more yarn or supplies for a bit until I use up with I have with my husband.
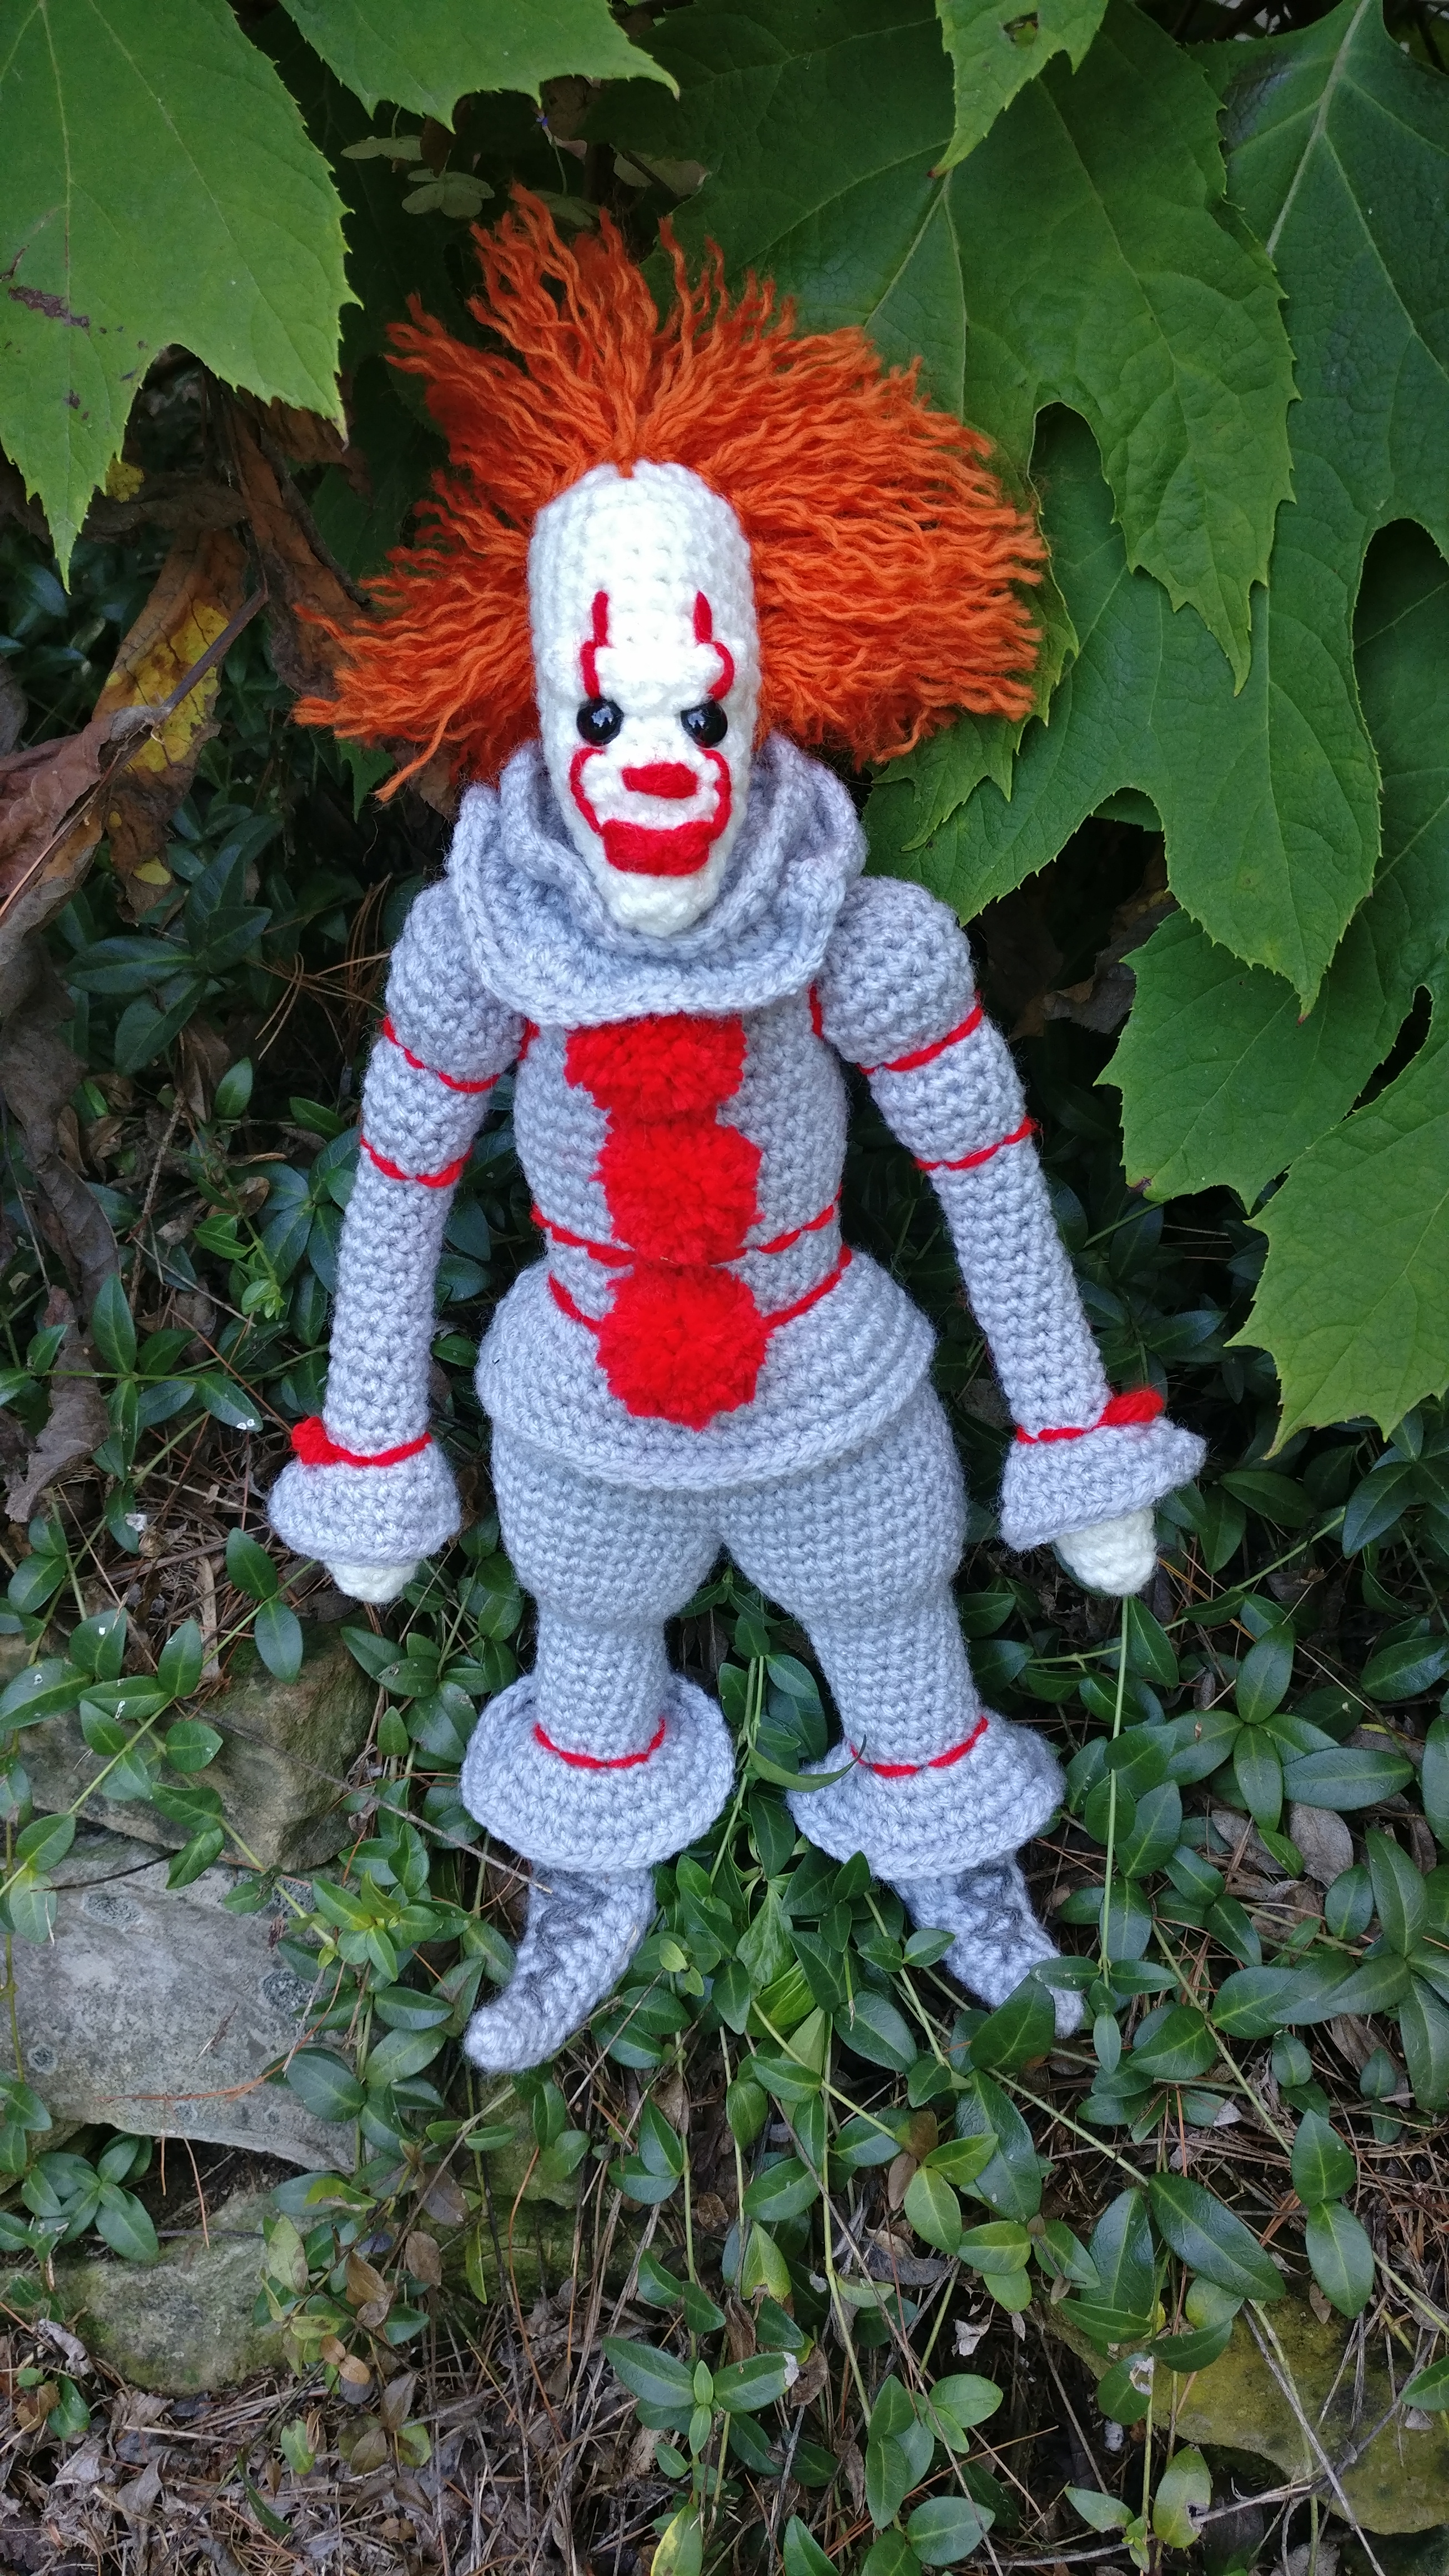
Also keep in mind he ended up being about 14 inches tall without including his hair. I used a light gray for the suit because I didn’t have a closer silver color. Looking back, I wish I would have used an off white for the neck ruffles.
Worsted weight yarn in colors of choice G size hook 9mm Safety eyes Poly-fil
Legs(make two) with light gray 4 sc in magic circle *inc, sc, dec* around
SC around for 2 rounds *inc, sc* around
SC around for 5 rounds
inc, sc in next 2, hdc in rest inc, sc in next 3, hdc in rest sc in next 2, inc, sc in next 2, hdc in rest sc in next 3, inc, sc in next 2, hdc in rest sc around for 5 rounds sc in BLO around Stuff foot and continue to stuff as you go. sc around for 8 rounds *inc, sc in next* around *inc, sc in next 2* around sc around for 4 rounds Bind off, but no need to leave a long tail for sewing.
Now turn the leg with the shoe side up and attach to the FLO that you left unworked on the leg. Do NOT join each round, work in a spiral. *inc, sc in next* around *inc, sc in next 2* around *inc, sc in next 3* around sc around, bind off and weave in end. Now about joining the legs, what you need to do is hold the legs together and sl st through both the legs five times in the middle where they meet, from the front of the legs to the back (I made sure mine were facing slightly different directions because that’s the picture I was duplicating). Then continue around the legs. You should end with 5 sl st and 46 sc. Moving on to the body you will forgo the sl st and only work in the sc.
Body continuing with light gray sc around for 5 rounds sc in next 8, dec x2, sc in next 22, dec x2, sc in next 8 *dec, sc in next 4* around *dec, sc in next 3* around sc around sc in BLO around (waist BLO) sc around for 3 rounds sc in next 5, inc x2, sc in next 14, inc x 2, sc in next 5 sc around for 10 rounds *dec, sc in next 2* around *dec, sc in next* around sc in BLO around (shoulder BLO) *dec, sc in next 2* around sc in BLO around (neck BLO) sc around (make sure to finish stuffing) dec around and bind off, leave a long end to sew head on
Now turn the leg with the shoes up and attach your yarn to the FLO of the waist BLO. Do NOT join after each round, work in a spiral. *inc, sc in next 2* around, inc in last st *inc, sc in next 3* around, in the last 2 st do inc, sc sc around for 3 rounds, bind off and weave in end. Now turn the leg with the shoes up and attach your yarn to the FLO of the shoulder BLO. Do NOT join after each round, work in a spiral. inc around *inc, sc in next* around *inc, sc in next 2* around sc around, bind off and weave in end. Now turn the leg with the shoes up and attach your yarn to the FLO of the neck BLO. Do NOT join after each round, work in a spiral. inc around *inc, sc in next* around *inc, sc in next 2* around sc around, bind off and weave in end.
Head in white 6 sc in magic circle *inc, sc in next* around sc around *inc, sc in next 2* around *inc, sc in next 3* around *inc, sc in next 4* around sc around for 3 rounds inc, sc, inc, sc, inc, then sc in remaining sc around for 5 rounds Insert the safety eyes between rounds 8-9 (6sc in mc counts as round 1) and 2 sc in between. Make sure the last inc are facing out as the forehead. Go ahead and start to stuff the head, continuing as you close up. *dec, sc in next 5* around *dec, sc in next* around dec around, bind off and close up hole. Go ahead and sew the head on the body holding the chin down against the ruffles.
Eyebrow in white ch 9, using the back ridges (if you feel comfortable doing so if not, just sc normally) sc in 2nd ch from hook and across. Bind off, leave a tail to sew onto the head above the eyes.
Nose, mouth and face detail are stitched onto the head directly though you could make the mouth out of felt if you wanted. Felt and me are not typically good bedfellows, so I avoid it. The nose was made by 3 horizontal stitches 2 rounds below the eyes 2 stitches apart. The mouth was 2 rounds below that, 3 stitches apart with 5 horizontal stitches with oe vertical in the middle to bring the lips together. The lines up the face were just running stitch.
It will be easier to go ahead and make a running stitch in red right on top of the waist ruffle and both the leg ruffles.
Arms (make two) start with white 6 sc in magic circle sc around inc around sc around for 3 rounds *dec, sc in next 2* switch to gray sc around in BLO, make sure to stuff lightly as you go for the arm part. sc around for 13 rounds *inc, sc in next 2* around, when stuffing these next parts, stuff a bit firmer than the arm. sc around for 3 rounds *dec, sc in next 2* around *inc, sc in next 2* around *inc, sc in next* around sc around for 3 rounds *dec, sc in next* around *dec, sc in next 2* around sc then dec around, bind off, leaving a long tail for sewing. Finish ruffle as flows, then sew onto the sides of the body immediately under the shoulder ruffle.
Now turn arm hand side up and attach gray yarn the the FLO of the BLO round. Do NOT join after each round, work in a spiral. *inc, sc in next 2* around *inc, sc in next* around *inc, sc in next 2* around sc around, bind off and sew in end. Sew onto the sides of the body immediately under the shoulder ruffle. Then take more red yarn and stitch lines above the ruffle, twice on the arms and around the shoulders. I also made little bows above the ruffles as well.
Now make 3 small pom poms in red (gah! I know, in the book he has orange, but to match the updated Pennywise I went with the red ones) to attach to the front or if you have those small already made felt type pom pom (like they use for making the candy cane Rudolph the Red Nose Reindeer) you can sew those on.
For the hair I used orange strands of yarn and hooked them directly on to the head. I then split the yarn and lightly finger brushed out the yarn to get the desired effect.
I have to say, I so enjoy these little challenges I get to see if I can create something and the pattern for it! Please, keep them coming! This one works up pretty quickly and both my kids and their friends instantly knew what it was! I was kinda worried for a moment there because my husband didn’t, but then again he doesn’t care for sweets…
G Hook
164 yds worsted weight yarn (I had a new skein of Caron Simply Soft Party yarn on hand that has some glitter aspect to it and used that since that made me think of the sugar on the candies. I used almost all of it with just a little scrap ball left over)
Body Panel, make 2
Row 1: ch 6, sc in 2nd chain from hook and across, ch 1 and turn (5 sts)
Row 2: inc, sc3, inc, ch 1 and turn (7 sts)
Row 3-9: sc across, ch 1 and turn (7 sts)
Row 10: inc, sc 5, inc (9 sts)
Row 11: sc across (9 sts)
Tie off.
Repeat the rows 1-11 but do not tie off, ch 1 and turn
Row 12: inc, sc 8 across of 1st leg, now continue on the 2nd leg and make sc 8 , inc in last st, ch 1 and turn (20 sts)
Row 13-25: sc across, ch 1 and turn (20 sts)
Row 26: dec, sc 16, dec , ch 1 and turn (18 sts)
Row 27: sc across , ch 1 and turn (18 sts)
Row 28: dec, sc 14, dec , ch 1 and turn (16 sts)
Row 29: dec, sc 12, dec , ch 1 and turn (14 sts)
Row 30: dec, sc 10, dec , ch 1 and turn (12 sts)
Row 31: sc across , ch 1 and turn (12 sts)
Now we will start the head..
Row 32: Ch 2, inc in 2nd ch from hook, sc 12 along prev row , ch 2 and turn (14 sts)
Row 33: inc in 2nd ch from hook, inc, sc 10, inc, inc in last st , ch 1 and turn (18 sts)
Row 1: ch 6, sc in 2nd chain from hook and across, ch 1 and turn (5 sts)
Row 2: inc, sc 3, inc, ch 1 and turn (7 sts)
Row 3-15: sc across, ch 1 and bind off for the first panel only, second panel continue (7 sts)
Do NOT bind off second panel.
Simple (and what I did for the left arm): Pair up with first and sc around through both, placing 2 sc in the corners, making sure to stuff before closing up and leave a tail for sewing. Make sure to keep row 1 lined up since this is the “finger” side.
Optional (for the right arm): I wanted mine to have a wave going and not just flat. Now, above works and you can have a bit of movement due to the stuffing, but I wanted a more pronounced bend in the arm. This is what I did, making sure to keep the row 1 lined up. Pair up the second panel with the first and make sure to crochet down the long side. Place sc then dec until the corner of the “finger”. Place 2 sc in corner, sc down the short finger end, 2 sc in the corner. Now down this long side inc the whole way to the corner, making sure to stuff as you go. Place 2 sc in corner, sc down the short finger end, sl st to the first then bind off leaving a tail for sewing. Now I did help this along a little bit to accentuate the curve with the stuffing.
Attach your yarn with a sc at the top side of its head and crochet through both thickness going down, but stop before you get to the spot where the arm goes. Sew the arm into place going through panel, arm, panel then bind off. Continue to crochet, but only crochet through the first panel across the arm. Continue around the body, making sure to stuff as you go. Make sure to put 2 sc in the corners of the feet and alson 2 sc in the head’s dcs. When you get to the next arm stop duplicate what you did for the other. When you get back to the start, sl st and bind off, weaving in your end.
Eyes (make 2)
Rnd 1: ch 15, sc in first ch and around (15 sts)
Rnd 2-3: sc around, at the end of round 3 sl st in next then bind off, leave a long chain for sewing (15 sts) Whip stitch round one and three together then sew onto head whip stitch side down.
Mouth
Row 1: ch 13, sc in 2nd ch from hook and across (12 sts)
Row 2-3: sc across, at the end of round 3, bind off, leave a long chain for sewing (12 sts) Whip stitch round one and three together then sew onto head whip stitch side down.
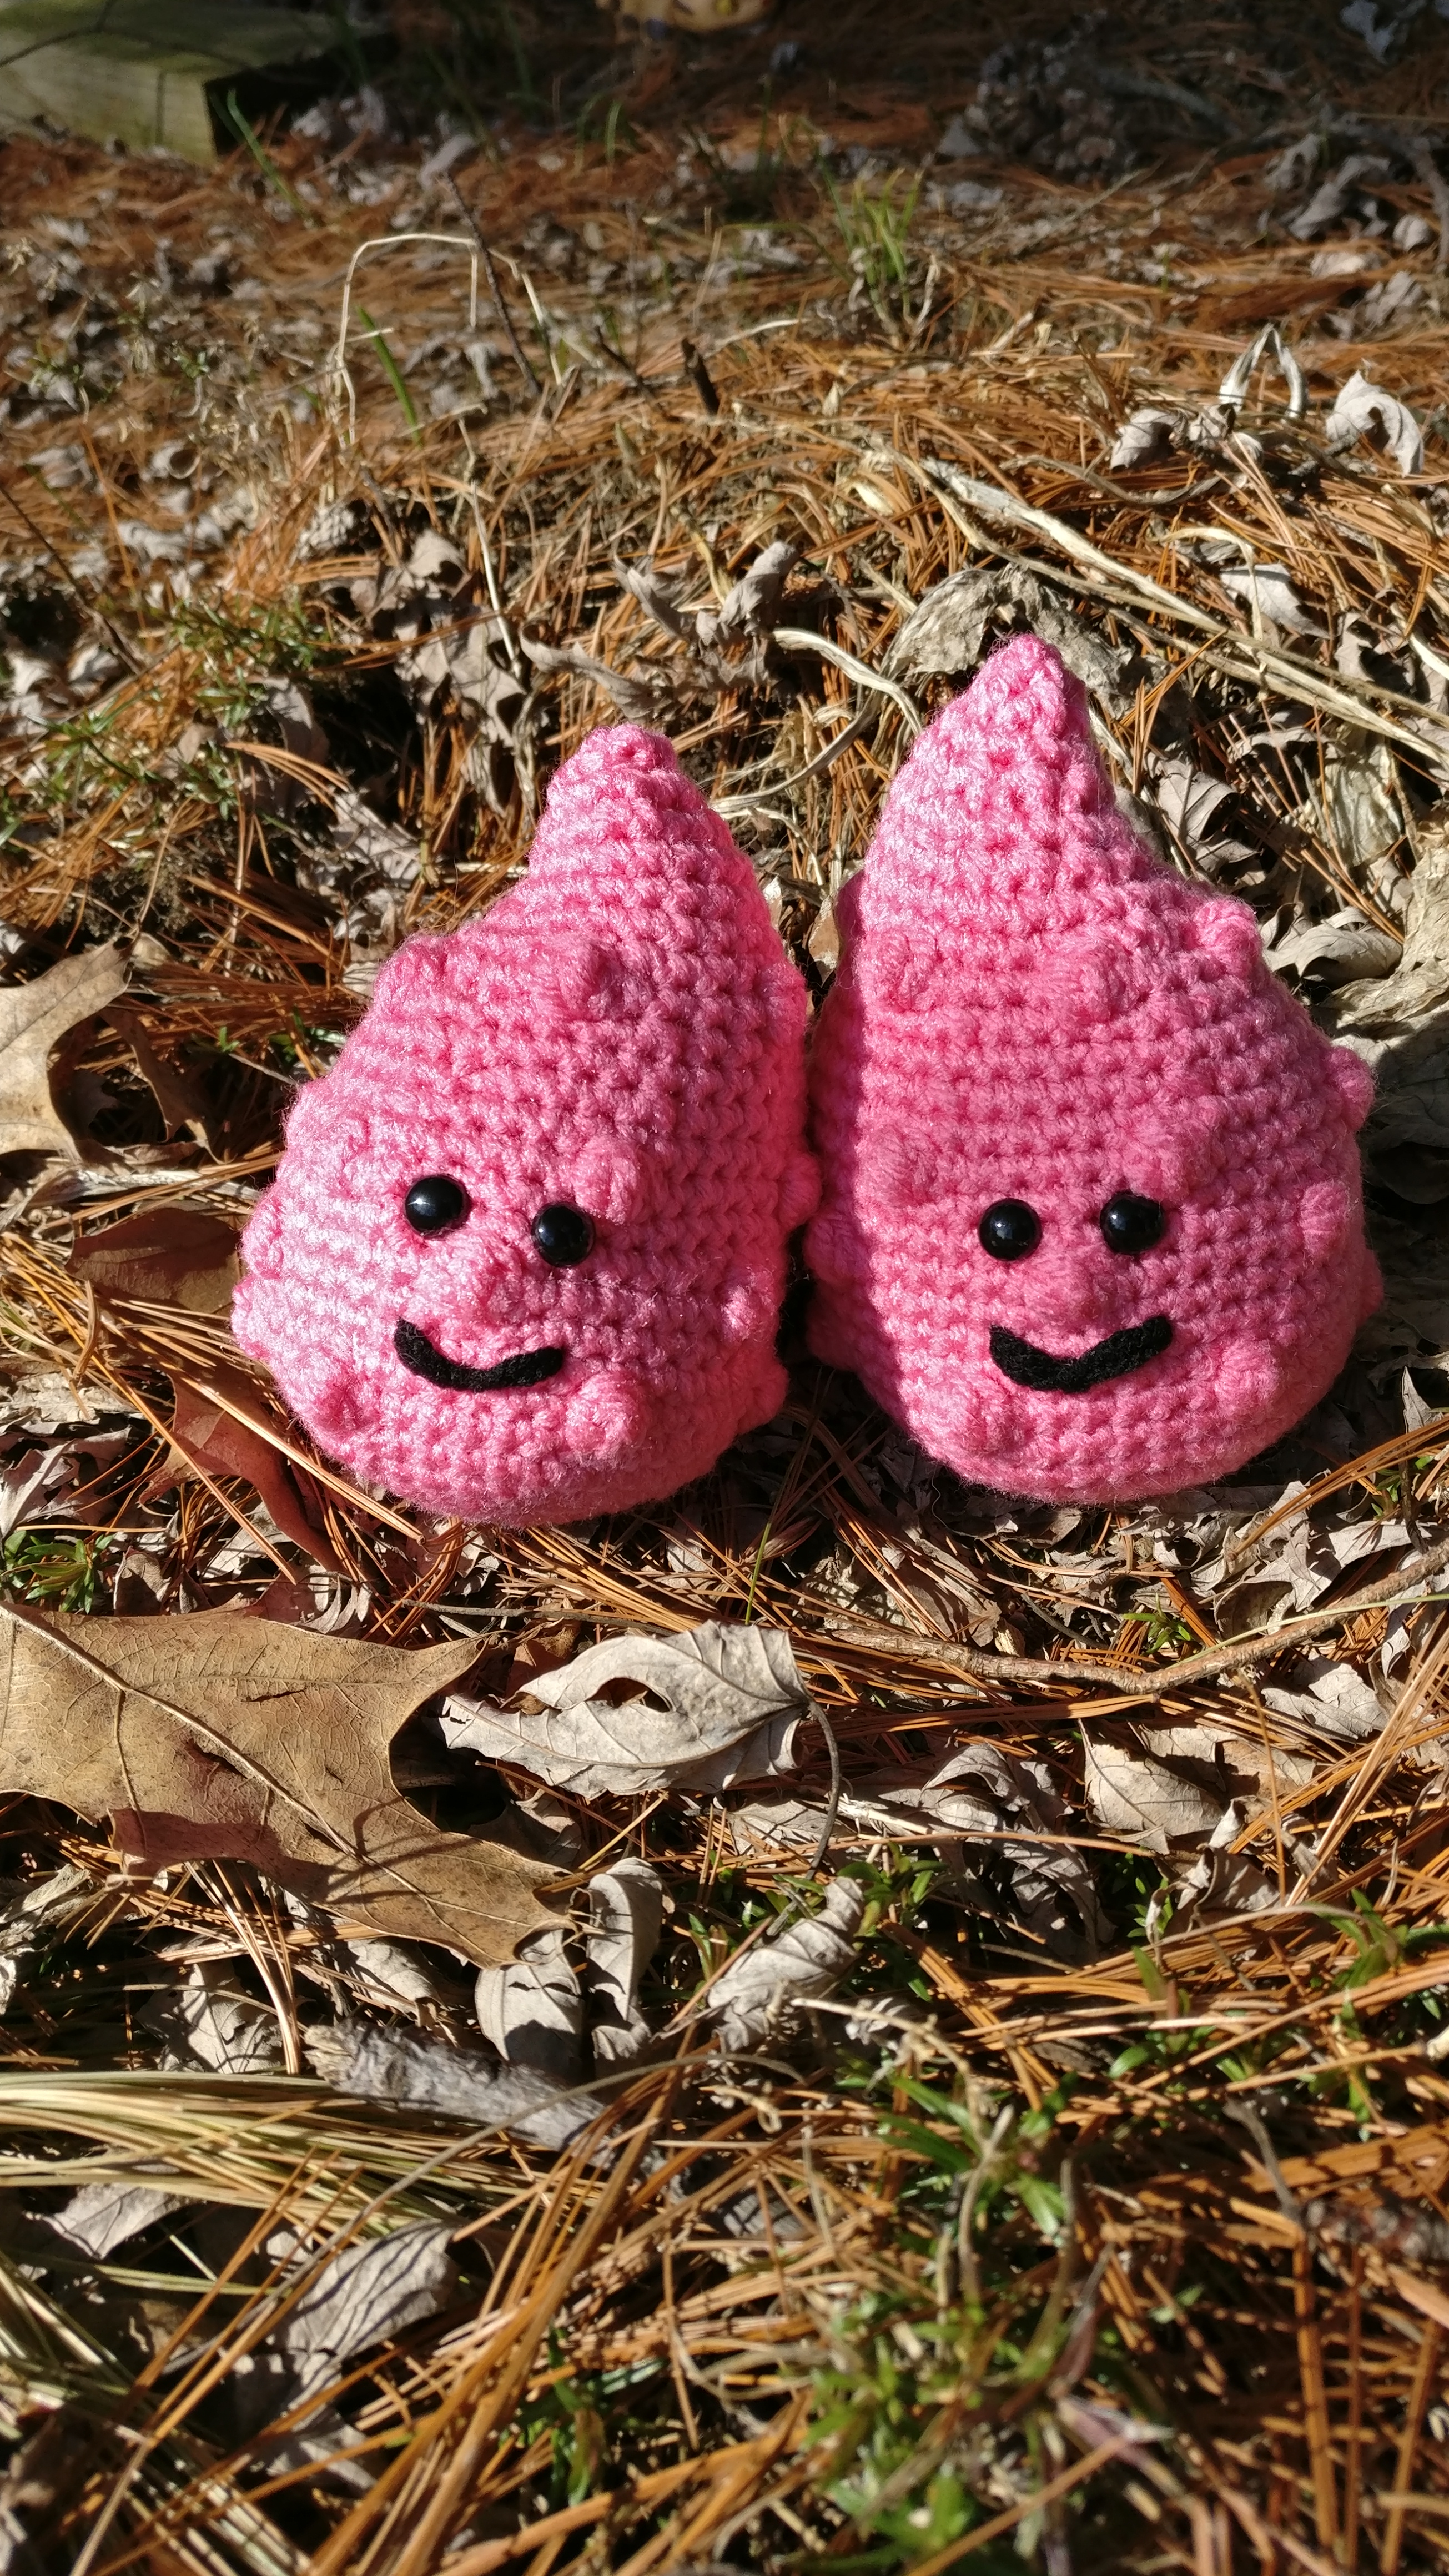
Admittedly this seems a bit odd, I know. However, I was contacted again by Kaila (the wonderful lady who gave me the challenge to make the flasher banana) to make a pattern for tonsils because her son was having his removed. I still remember having mine removed and I can only imagine how cute it will be to give these to him since he is losing his. Truthfully, it just makes my day that I was asked to come up with something else… that people enjoy my work and believe that I can do it…
This pattern should be quick and easy to make up. I decided to make these a little bigger because I imagine giving them to younglings and I didn’t want to make them too small. I’m also making two, since when you get them removed it is both…
Worsted weight yarn in colors of choice G size hook 9mm safety eyes Poly-fil
Make two for the pair 6 sc in magic circle *inc* around *inc, sc in next* around *inc, sc in next2* around *inc, sc in next 3* around *inc, sc in next 4* around *inc, sc in next 5* around sc around *bobble (3dc tog in same st making sure to push the bundle of st to the front as you work), sc in next 6* around sc around for 2 rounds *sc in next 3, bobble, sc in next 3* around sc around for 2 rounds *sc, bobble, sc in next 5* around sc around *dec, sc in next 5* around sc around, go ahead and attach the safety eyes. I placed them on the row between the 2nd row of bobbles and the sc above with about 2 st in between. It amused me to put them above a bobble making the bobble look like a nose. The top of the tonsils will lean toward the side so for the first I put the eyes over the 3rd bobble over and for the other on the 6th bobble over. *dec, sc in next 4* around *sc in next 2, bobble, sc in next 2* around dec x6, sc in the rest (this makes the top lean toward the side a bit) sc around dec x6, sc in rest, make sure to stuff and continue to stuff as you go sc around dec x6, sc in rest sc around dec around, bind off and close up hole.
To finish up sew on a cute little mouth and you’re done!
Operating this blog takes money and with thousands of hits a day it's not an insubstantial cost. This site will always remain ad-free but if you are able we appreciate any support you can offer!!


Recent Comments