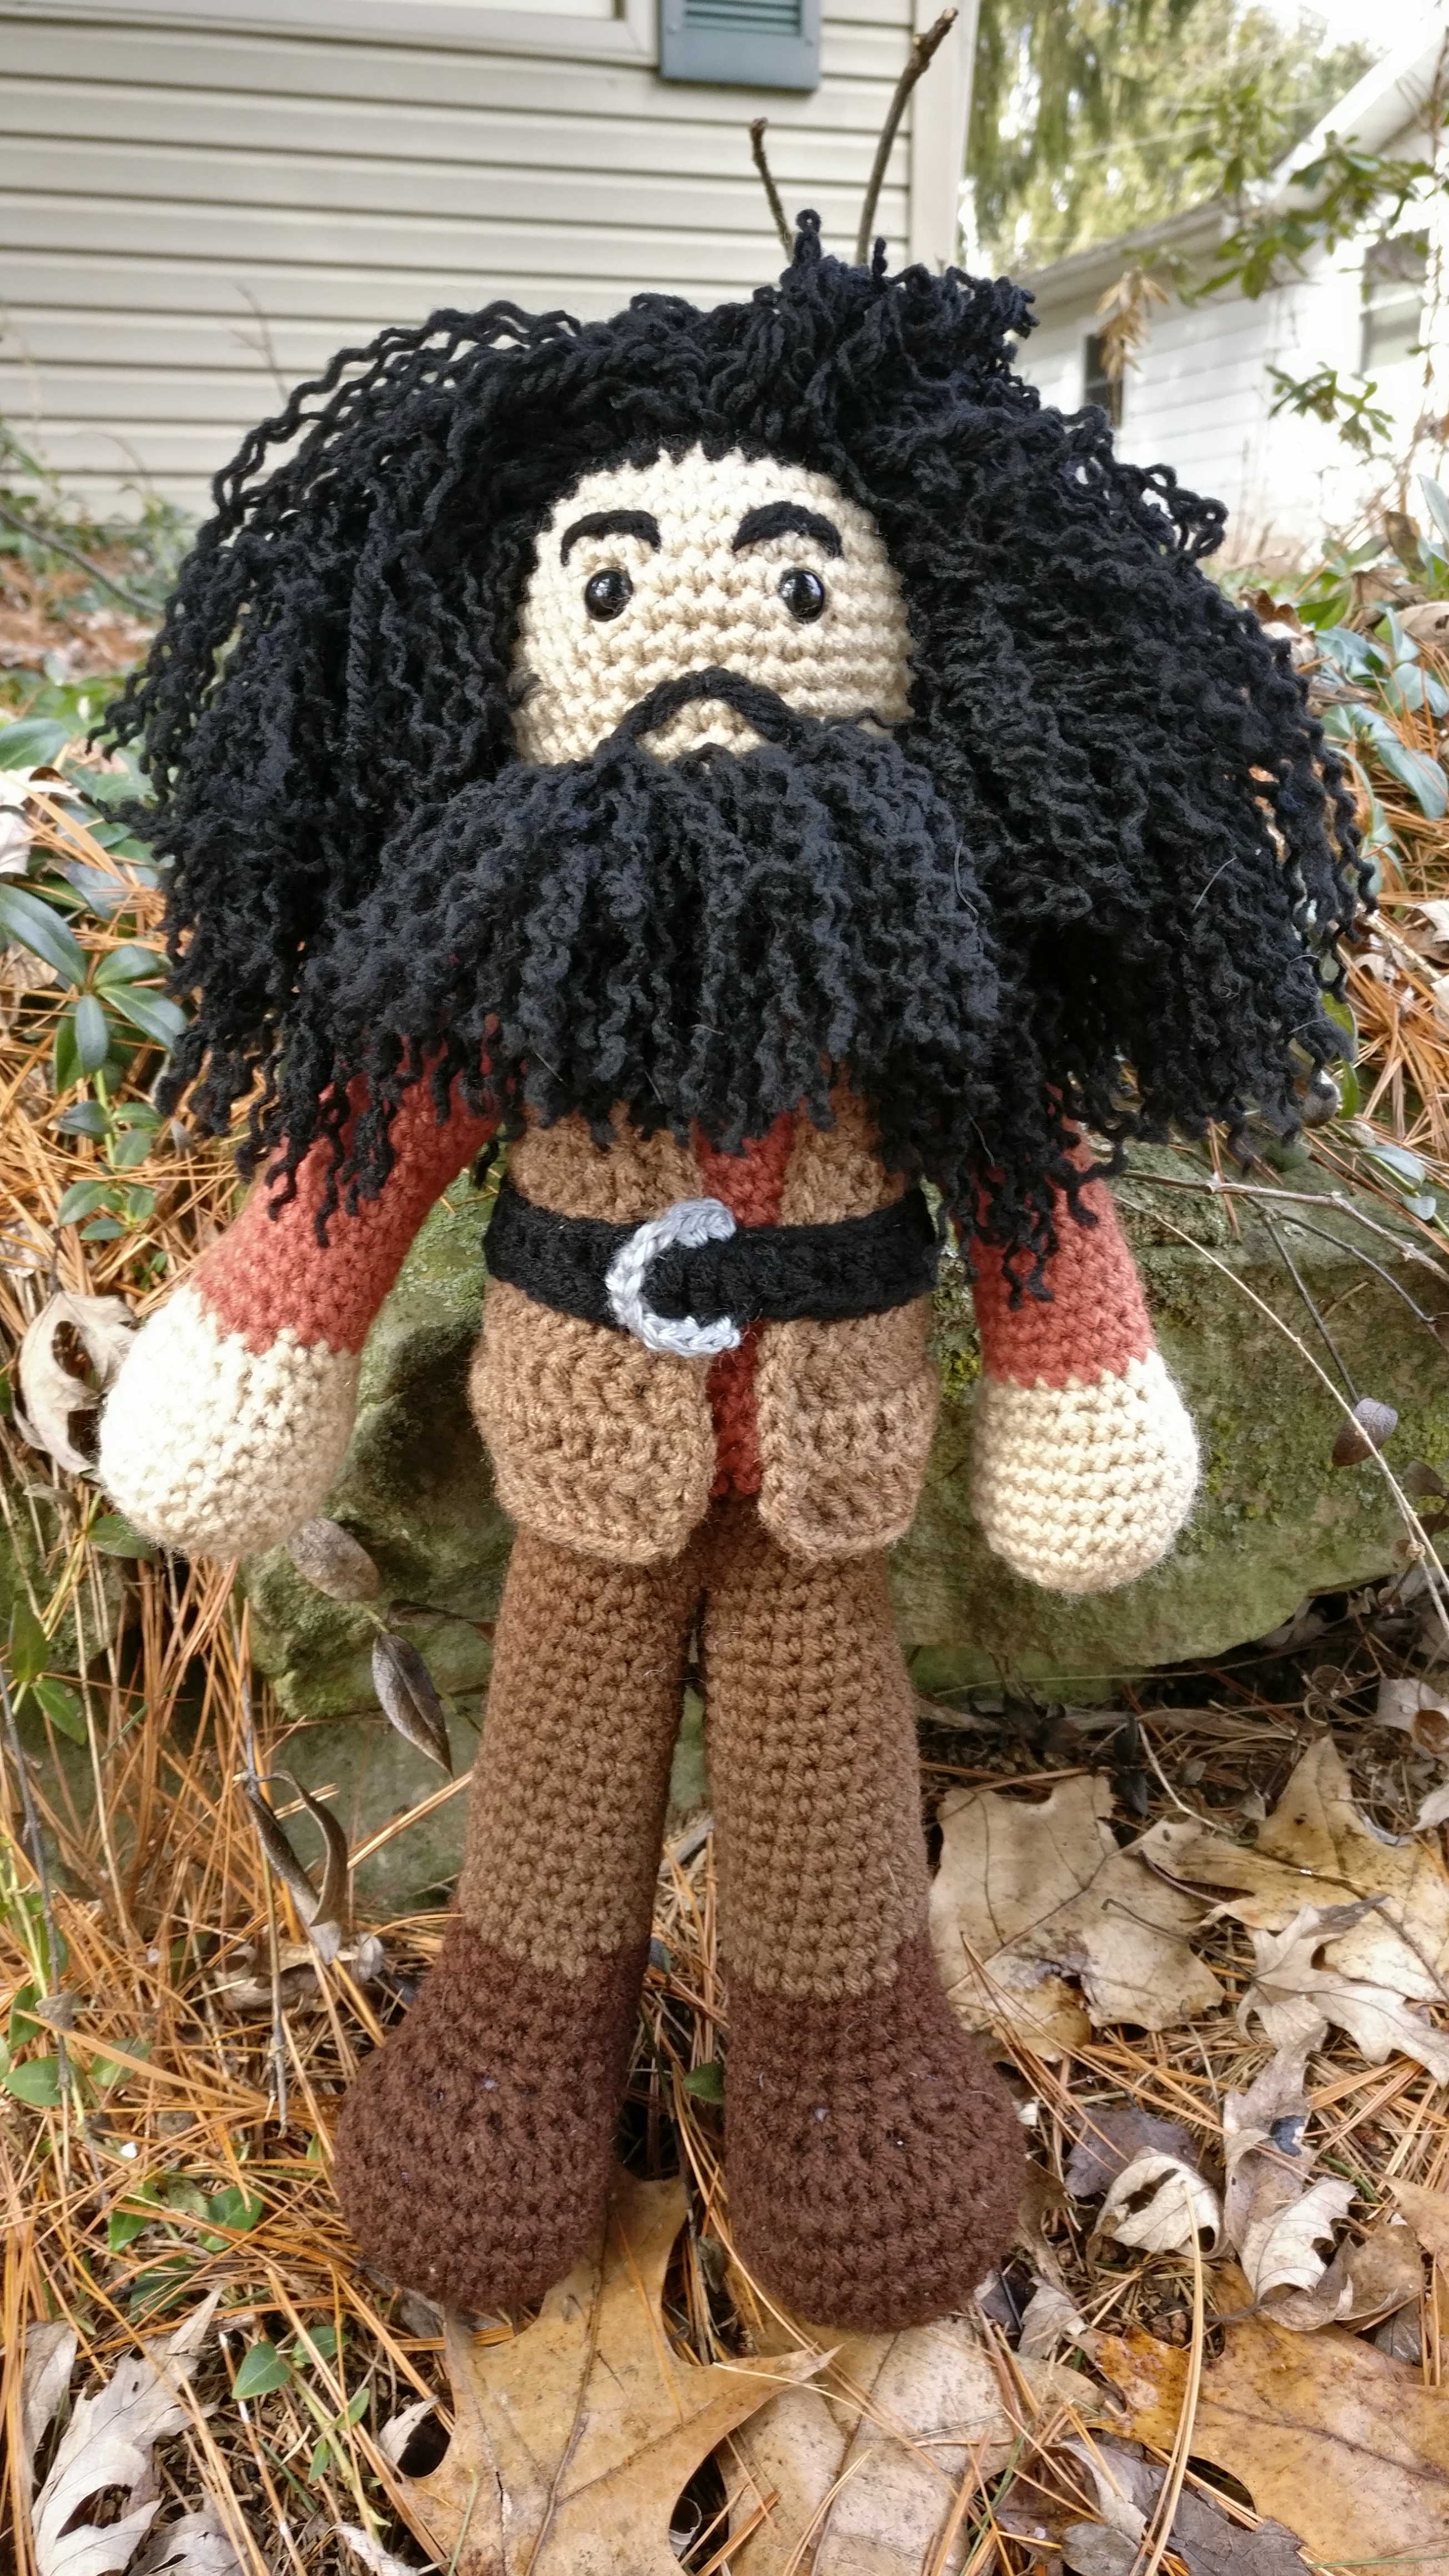
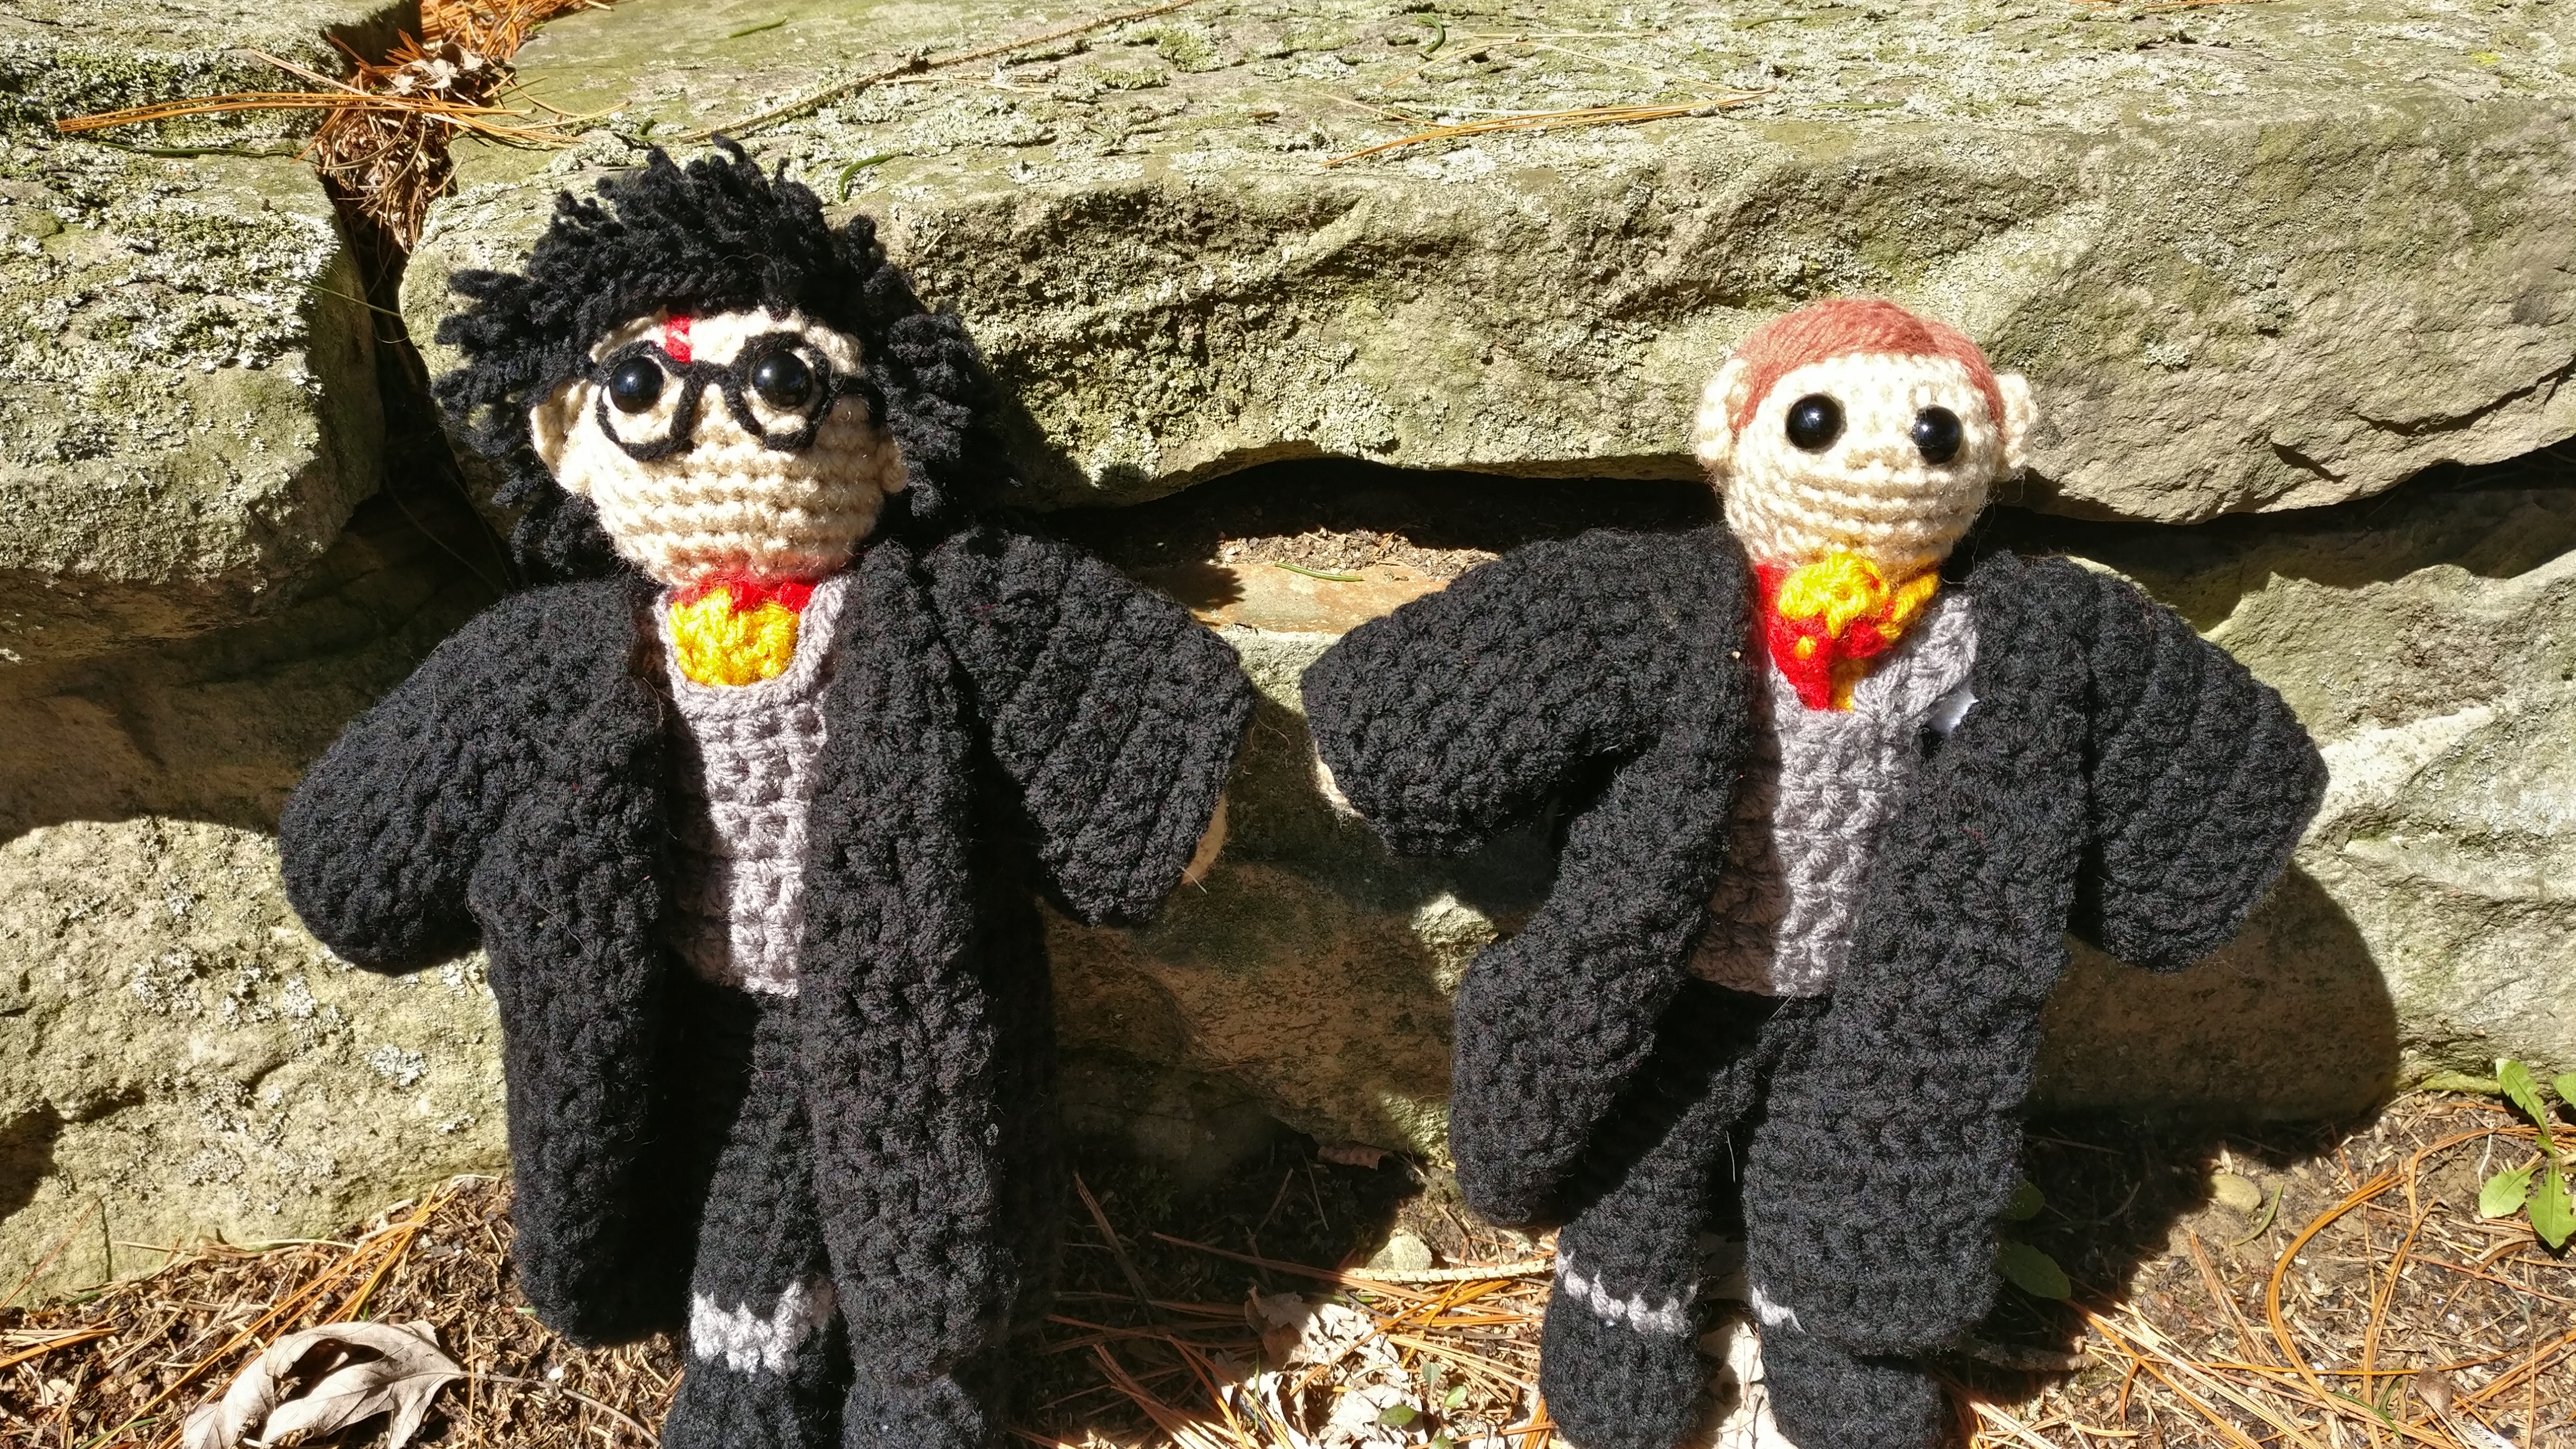
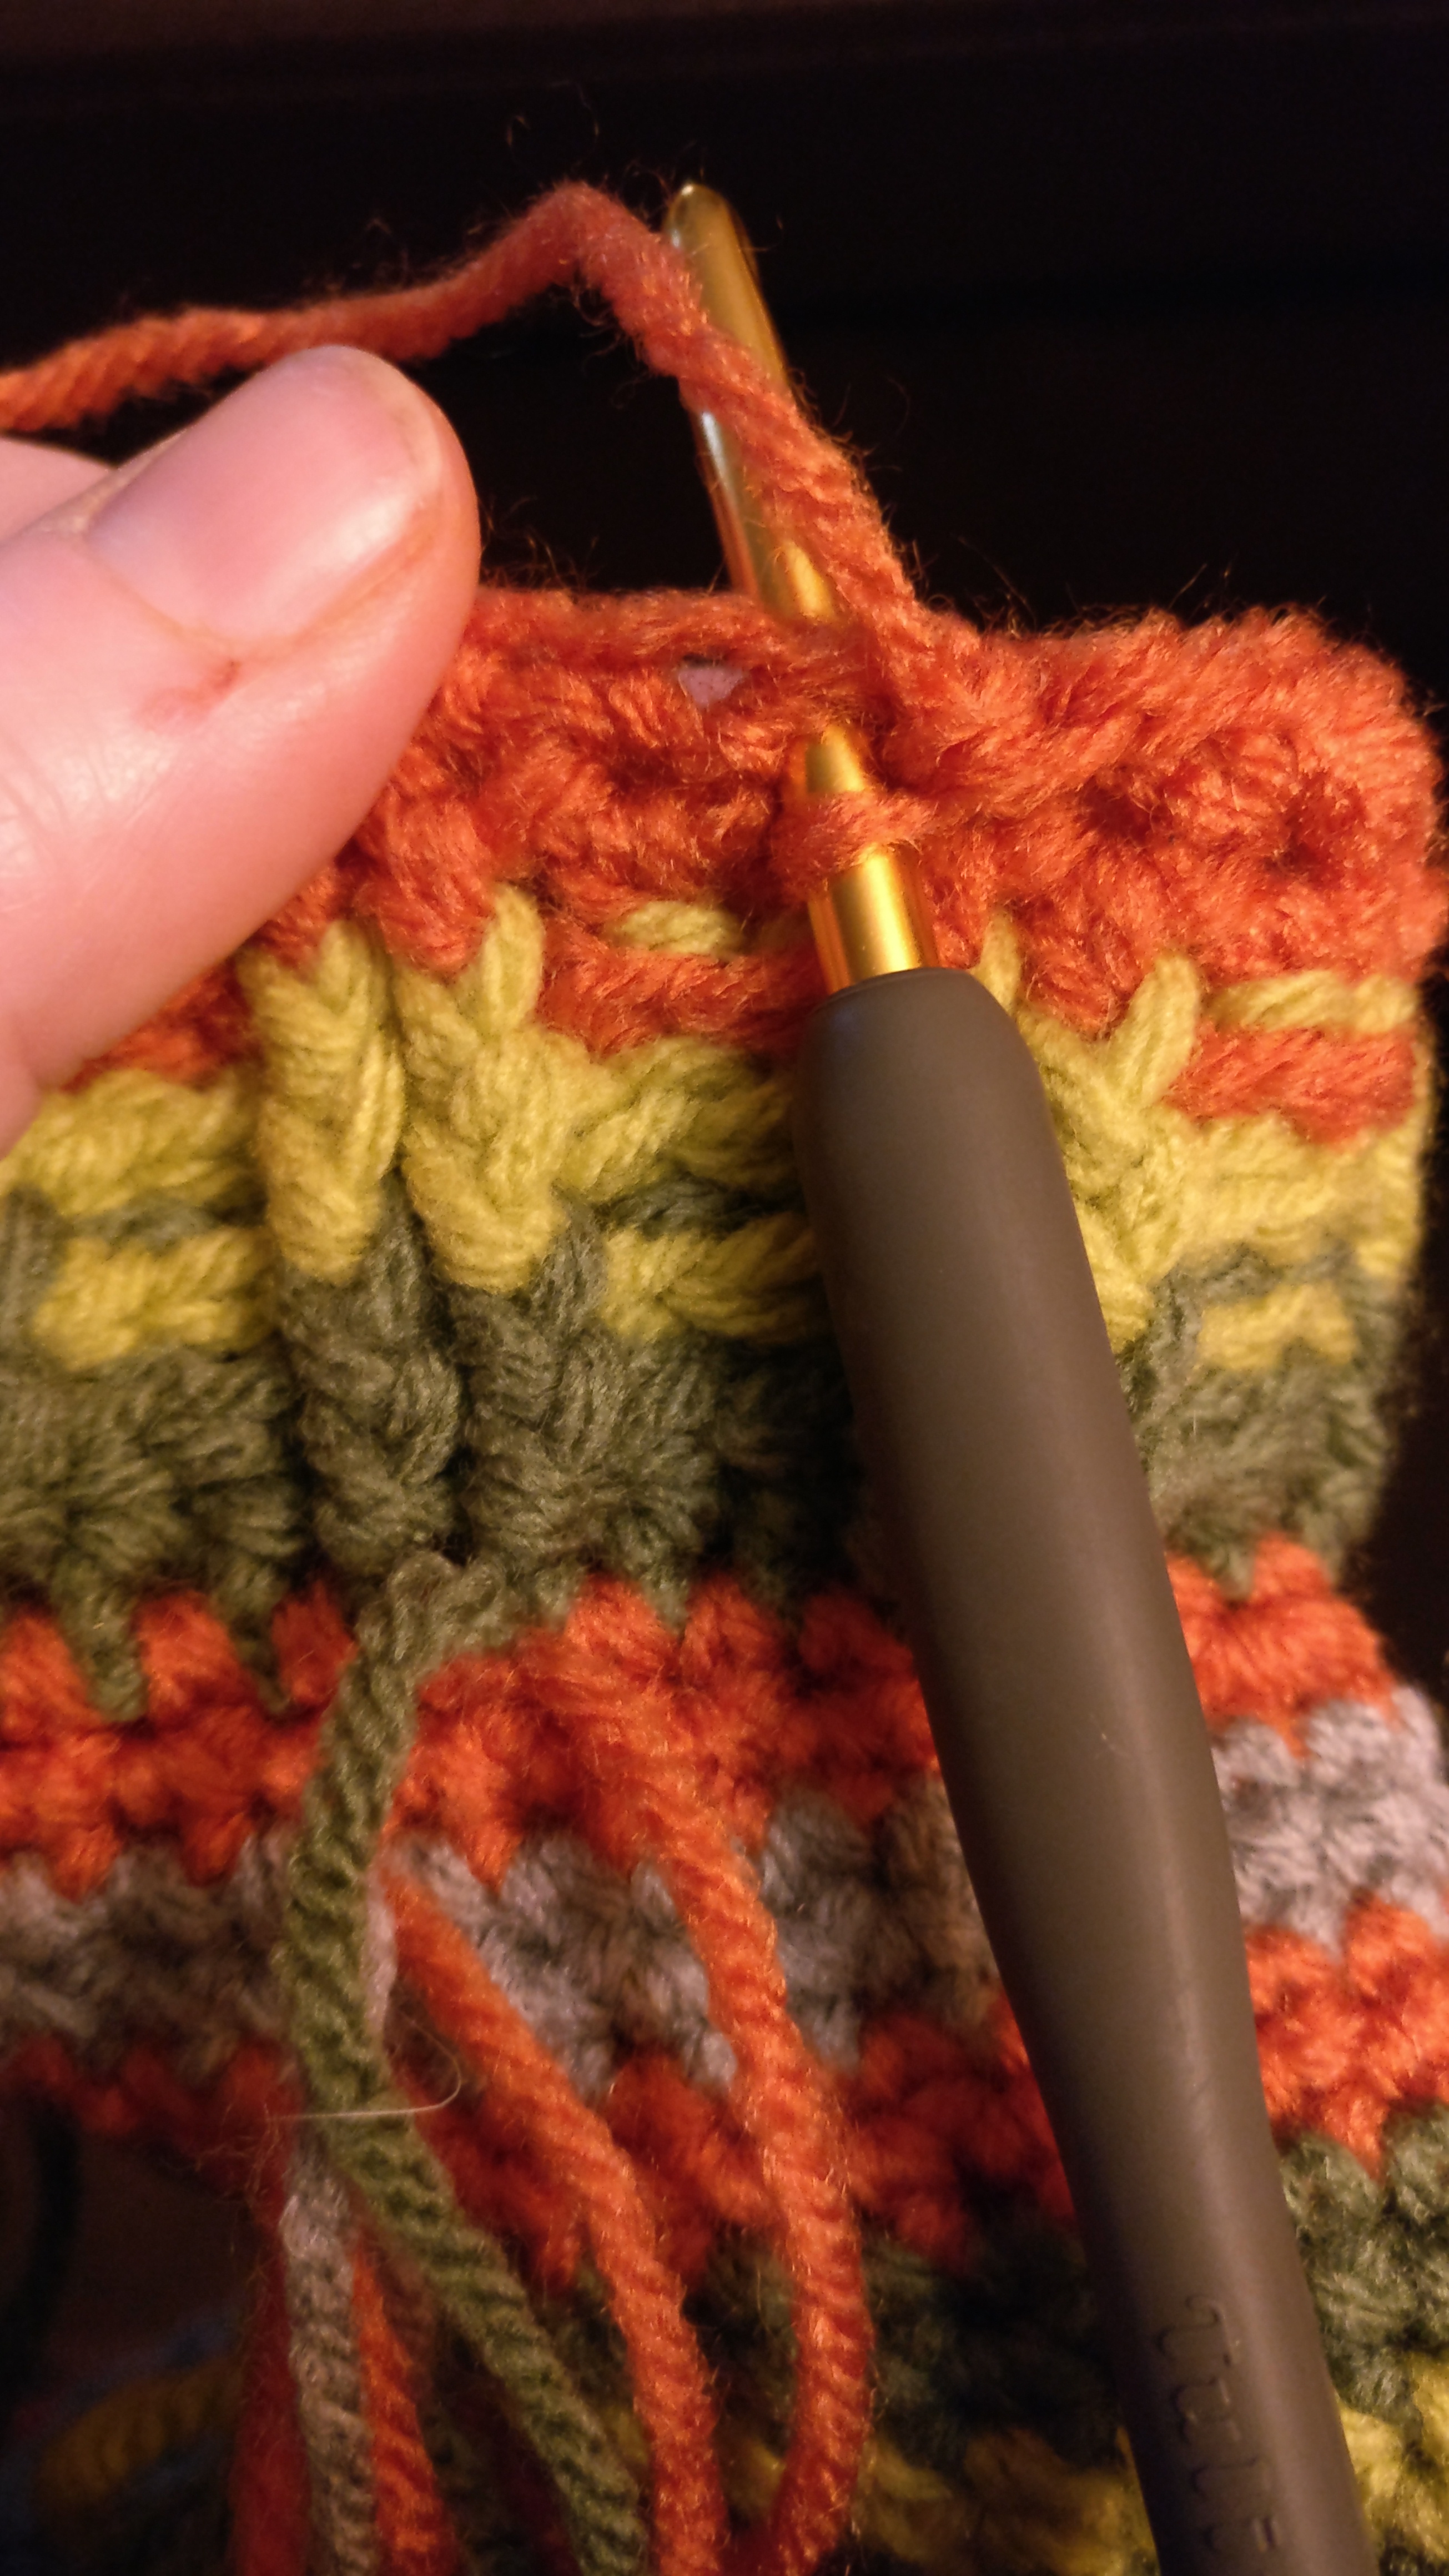
After making the trio I of course had to make Rubeus Hagrid for Norbert’s picture! Since Hagrid is half giant, he is going to be basically double the height and width of the kids. So the kids end up being about 8.5″, Hagrid is 13.5 making him a loveable, huggable giant!
Harry and Ron pattern can be found here: https://www.madhooker.com/harry-potter-and-ron-weasley/ Hermione pattern can be found here: https://www.madhooker.com/hermione-granger/
Worsted weight yarn in colors of choice G size hook Safety eyes Poly-fil
Legs(make two) start with dark brown 8 sc in magic circle inc around *inc, sc* around *inc, sc in next 2* around sc around for 4 rounds dec x8, sc x16 dec x4, sc x16 sc around for 4 rounds, switch to medium brown. Stuff foot and continue to stuff as you go. sc around for 16 rounds. Bind off, but no need to leave a long tail for sewing. Now about joining the legs, what you need to do is hold the legs together and sl st through both the legs four times in the middle where they meet, from the front of the legs to the back. Then continue around the legs. You should end with 4 sl st and 32 sc (16 sc around each leg). Moving on to the body you will forgo the sl st and only work in the sc.
Body continuing with medium brown sc around for 3 rounds and switch to reddish brown sc around for 20 rounds *dec, sc in next 3* around *dec, sc in next 2* around *dec, sc* around dec around, Bind off both, but no need to leave a long tail for sewing.
Arms (make two) start with skin color 6 sc in magic circle inc around *inc, sc in next* around *inc, sc in next 2* around sc around for 4 rounds *dec, sc in next 2* *dec, sc in next 7* around, make sure to stuff lightly as you go and switch to reddish brown/shirt color sc around for 20 rounds. Bind off, leaving a tail to go ahead and sew onto the sides of the body.
Head in skin color 6 sc in magic circle inc around *inc, sc* around *inc, sc in next 2* around *inc, sc in next 3* around *inc, sc in next 4* around sc around for 10 rounds, insert safety eyes between rounds 8 and 9 (not counting the magic circle as a round), leaving about 6 sc in between *dec, sc in next 4* around *dec, sc in next 3* around *dec, sc in next 2* around *dec, sc* around, be sure to stuff dec around, bind off, leaving a tail to go ahead and sew on
Vest in light brown ch 26, turn and sc in each across *inc, sc in next 4* across, ch 1 and turn *inc, sc in next 5* across, ch 1 and turn sc in next 3, ch 6 and skip the next 10, sc in next 7, ch 6 and skip the next 10, sc in next 3, ch 1 and turn working in the sc and ch, *inc, sc in next 4* across, ch1 and turn *inc, sc in next 5* across, ch 2 and turn dc across, ch 2 and turn for 6 rows then sc around, bind off and weave in ends Also be sure to sc around each arm opening, bind off and weave in ends. Then go ahead and put the vest on Hagrid.
Belt in black ch 42, dc in 3rd ch from hook and across, bind off and weave in end. Attach grey/silver yarn in the back loop of the 38th ch, ch 1 and sc in same ch. Sc in next 2 ch then place 3 sc along the side of the belt then 3 more sc in the dcs. Bind off and weave in ends. Taking a black piece of yarn sew belt into place, a little higher than middle, making sure to leave the vest open a little in the front.
Lastly is just the fine touches. I embroidered some eyebrows and a moustache. Then cut some roughly 8″ pieces of yarn and hook into place where the beard would be. I only did 3 rows on the face. For the hair I cut roughly 10-12″ pieces and hooked those onto the head. Lastly, I took my needle and split the yarn completely to give him a very frizzy hair. Trim as needed to shape it up.
Worsted weight yarn (or any weight of your choosing) Size G hook (or whatever hook to make a tight crochet with your yarn) Safety eyes, 9mm Poly-fil for stuffing
Legs(make two) start with black 8 sc in magic circle inc around sc around for 2 rounds dec x4, sc x8 dec x2, sc x8 (by this round it should be 10sc) Stuff foot and continue to stuff as you go and then change to gray sc around for 10 rounds. Bind off, but no need to leave a long tail for sewing.
Now about joining the legs, what you need to do is hold the legs together and sl st through both the legs twice in the middle where they meet, from the front of the legs to the back. Then continue around the legs. You should end with 2 sl st and 16 sc (8 sc around each leg). Moving on to the body you will forgo the sl st and only work in the sc.
Body continuing with gray sc around for 3 rounds *dec, 3* x3, sc, make sure to continue to stuff as you go and switch to white sc around in back loop only just for this round sc around for 7 rounds sc, dec, dec, 2 sec, dec, dec dec around, Bind off both, but no need to leave a long tail for sewing.
Skirt in black Attach yarn in the front loops of the back loop only row with the legs facing up sc around and do not sl st to join, just keep going to start a spiral sc around for 3 rounds *inc, sc* around sc around for 6 rounds, bind off and weave in end
Arms (make two) start with skin color 6 sc in magic circle inc around sc around for 2 rounds *dec, sc in next 2* around, make sure to stuff lightly as you go and switch to white sc around for 10 rounds. Bind off, leaving a tail to go ahead and sew onto the sides of the body.
Head 6 sc in magic circle inc around *inc, sc* around *inc, sc in next 2* around sc around for 6 rounds, insert safety eyes between rounds 5 and 6 (not counting the magic circle as a round), leaving about 3 sc in between. *dec, sc in next 2* around *dec, sc* around, be sure to stuff dec around, bind off, leaving a tail to go ahead and sew on
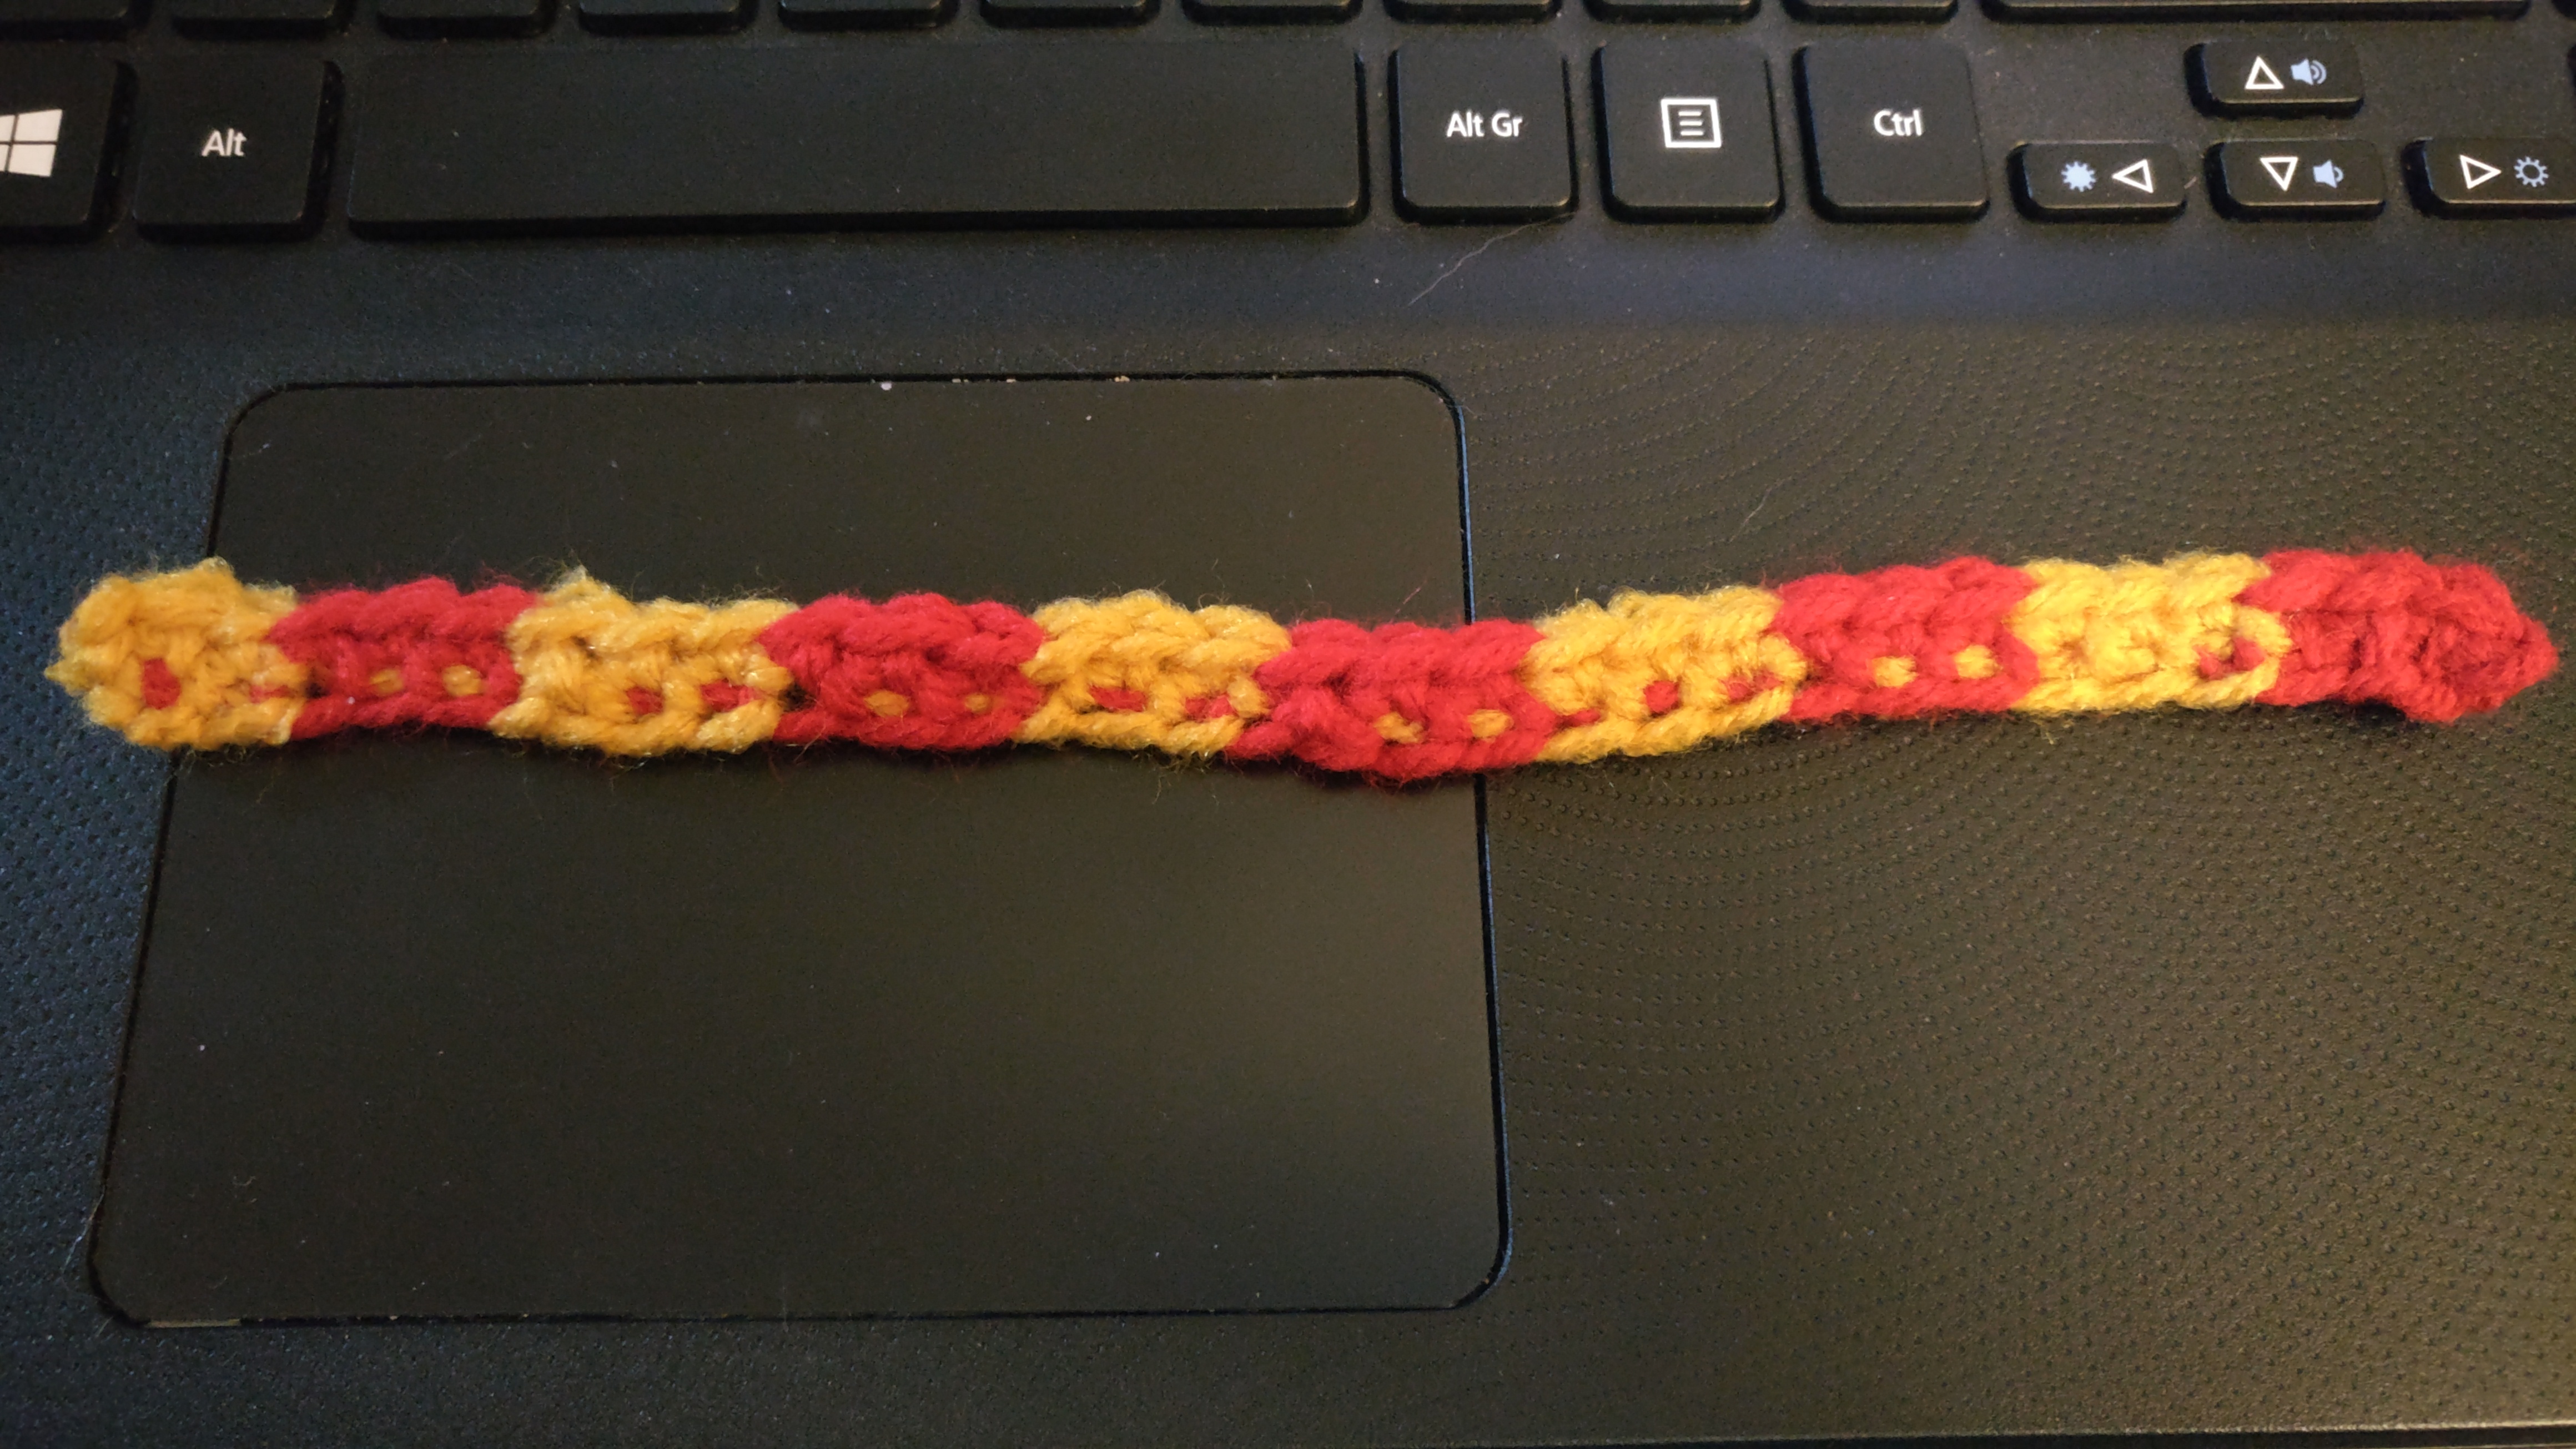
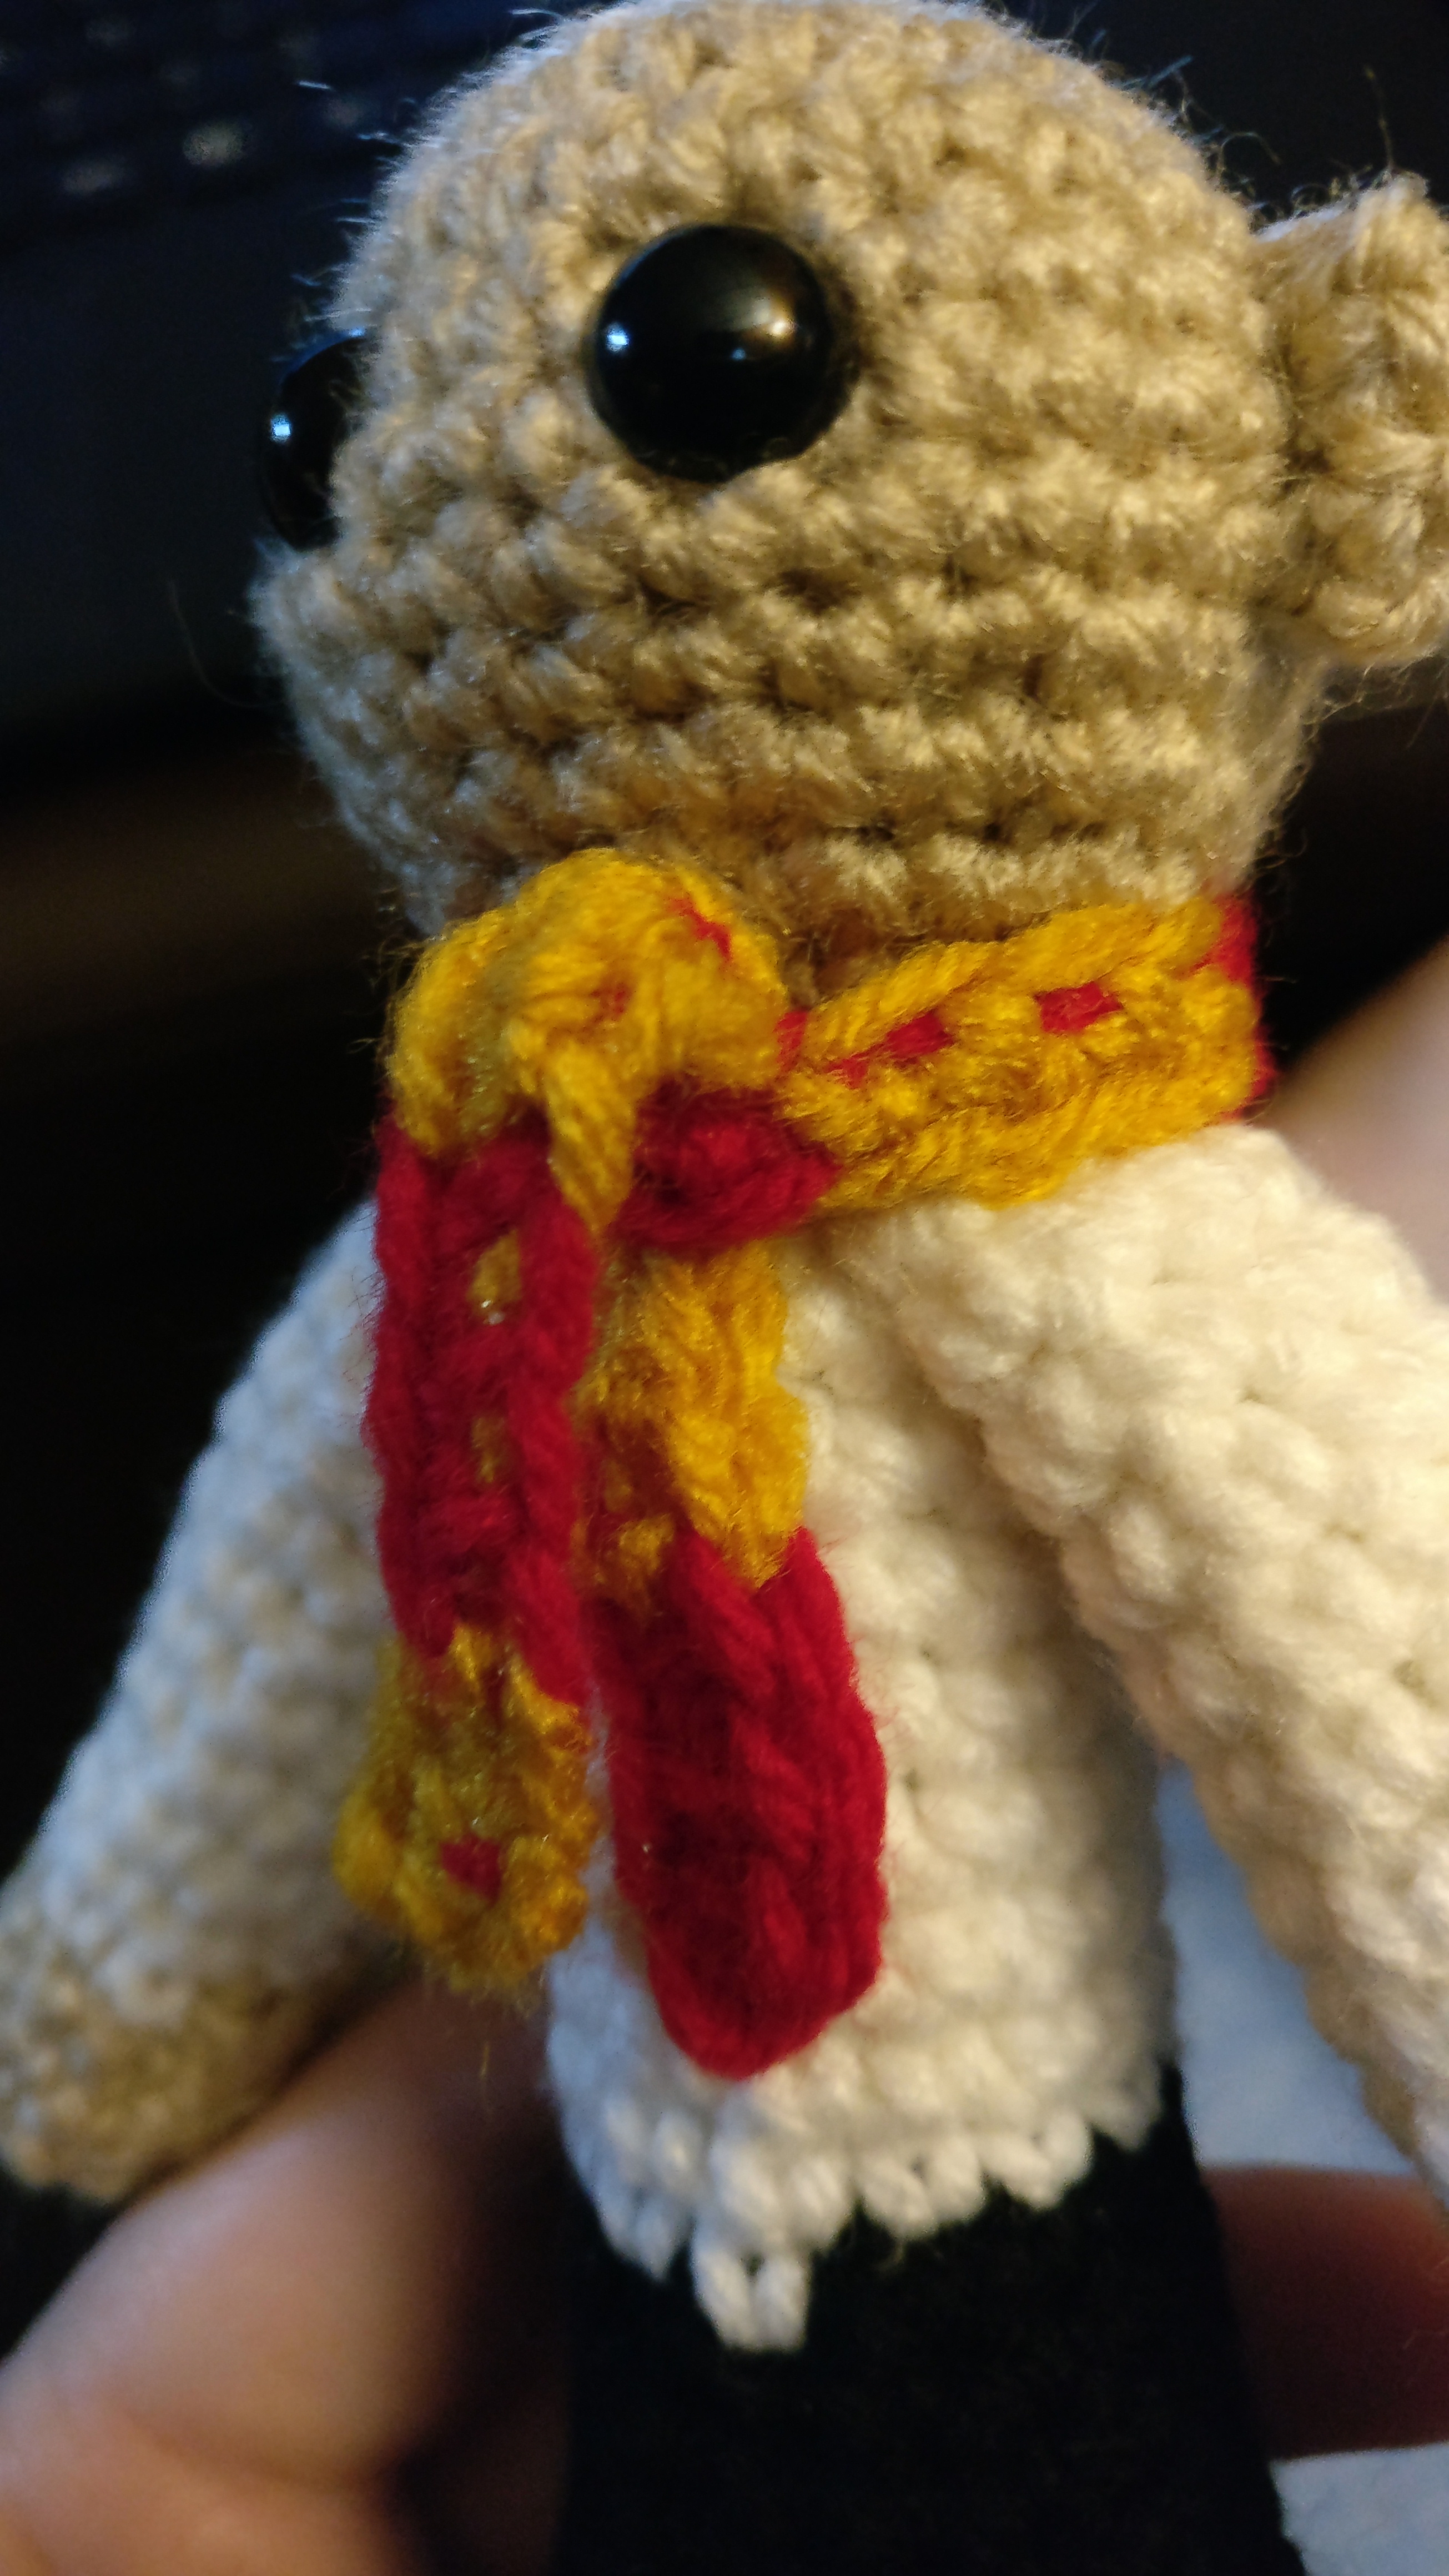
Tie So, I played around with quite a few ideas to make this happen… more than I would like to admit for a tie. Now if you would like another way than what I am about to describe, then in one color just ch 21, sc across then use the other color to sew in the stripes. If you want another way, here’s what I did. Essentially you are going to be doing a foundation sc row. On every third sc, change to the next color. Make sure you crochet over the end and carry the unused yarn by crocheting over it. Make 30 foundation sc then just bind off and weave in the ends. Tie it around the neck flipping both ends down. The vest will hold the tie down.
Vest in gray ch 18 (make sure this goes around the doll’s waist) sl st to first sc, making sure not to twist, ch 2 (does not count as a st) dc around, sl st to the beginning ch 2, dc around for 3 rounds, for a total of 4 rounds ch 11, turn and hdc in the 2nd ch and across (10 hdc) then sc in the first dc. Sc in next 3 dc. ch 11, turn and hdc in the 2nd ch and across (10hdc) then sc in next unused dc. Bind off and leave a long end. Slide vest onto the body then sew the vest straps to the vest. Make sure to position the tie inside the vest how you want it to look.
Cloak in black ch 21, turn and sc in each ch, ch 1 and turn *inc, sc* across, ch 1 and turn *inc, sc in next 2, ch 1 and turn sc in next 3, ch 6 and skip 12 sc, sc in next 10, ch 6 and skip 12 sc, sc in next 3, ch 1 and turn sc across in all sc and ch, ch 2 (does not count as stitch) and turn *dc inc, dc in next 3* dc in last, ch 2 and turn dc across for 8 rows ch 1 and sc around the opening and bottom of the cloak, sl st to the first and weave in end Cloak sleeves, repeat on each arm Join the yarn in one of the corners of the sleeve opening. Ch 1 and sc around the opening, sl st to beginning, ch 2 (does not count as stitch) Dc around, sl st to beginning and ch 2. Repeat for a total of 4 rounds. Ch 1 and then sc around, sl st to beginning, bind off and weave in the ends.
Hair in brown I cut about 12″ strands and hooked them onto the head. Then I split the strands apart with the help of a needle to help give that busy effect.
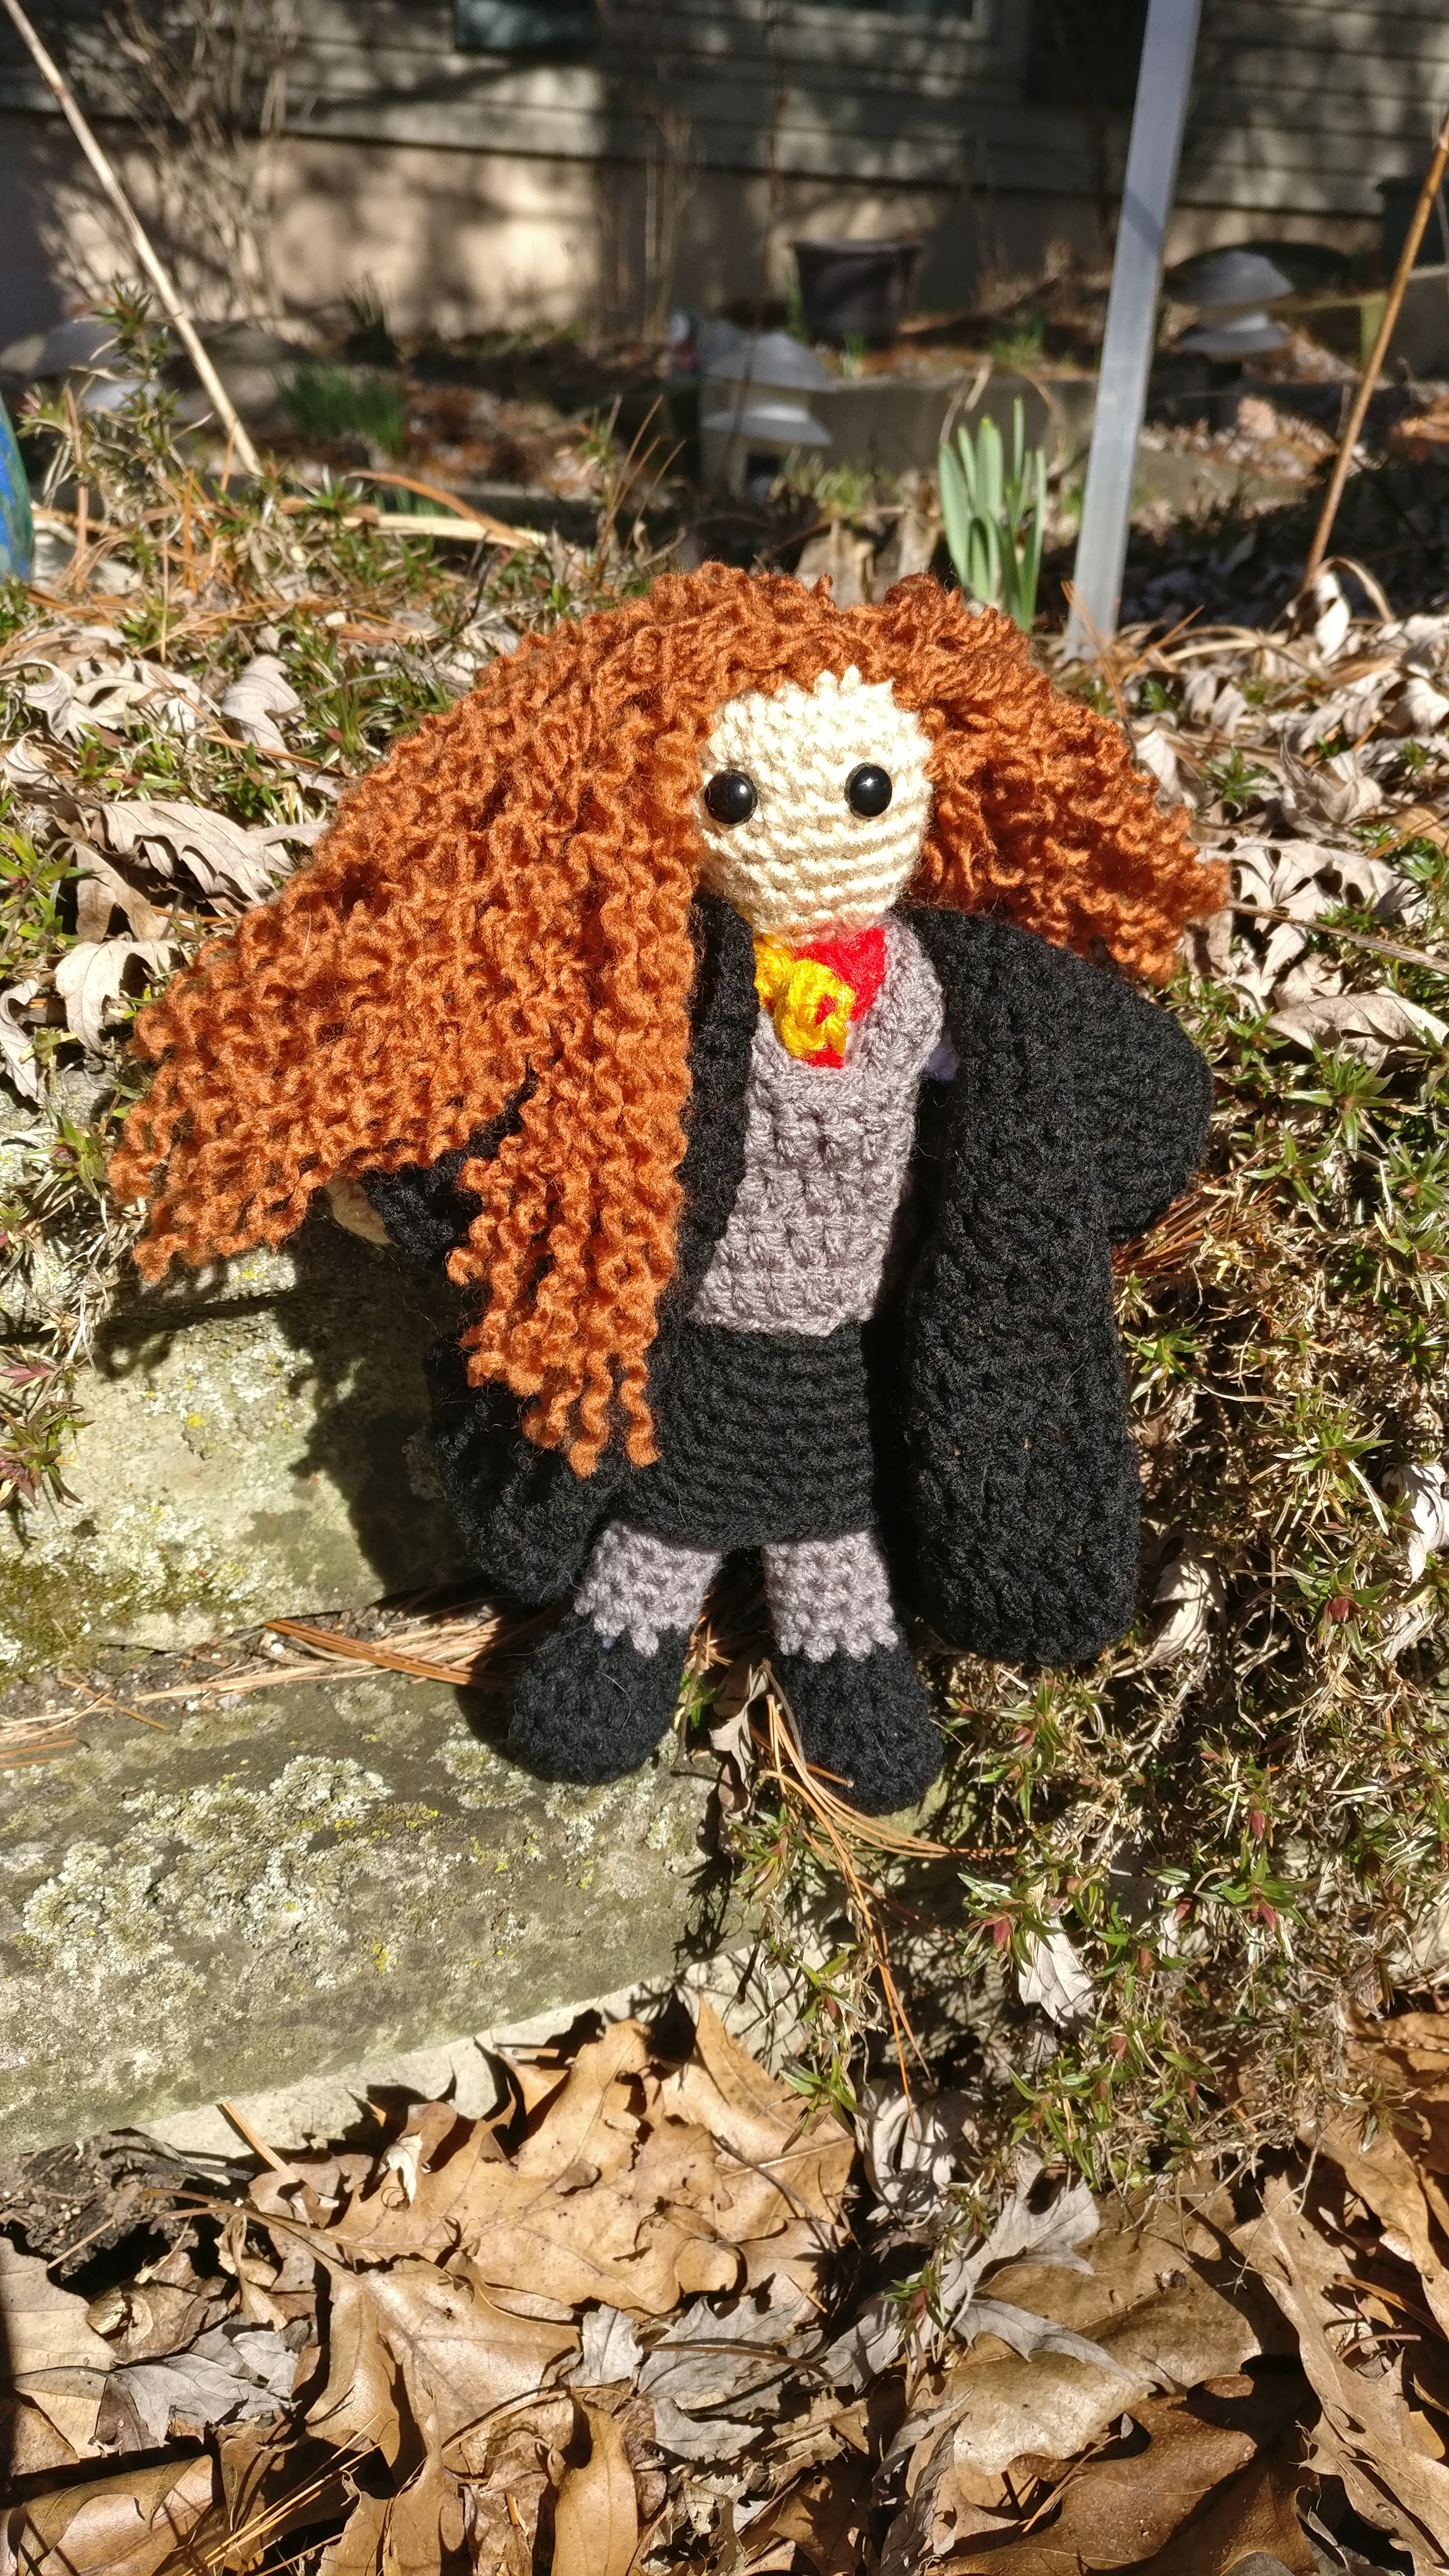
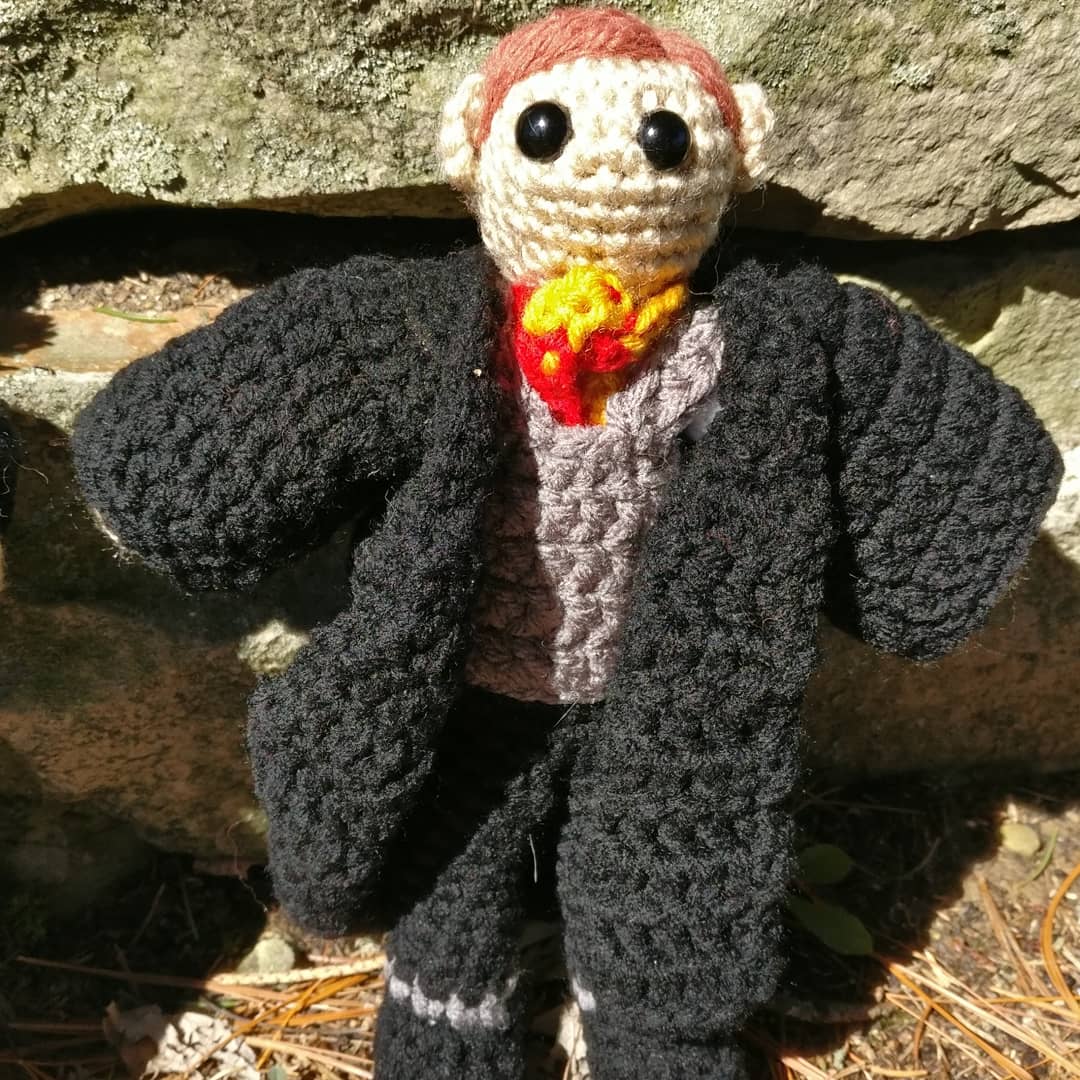
My next picture with my lovely model Norbert I choose to do how she got her name. Of course I couldn’t find suitable patterns, so here I go making my own. For Harry and Ron the only differences are the fine touches really. Harry gets black hair, glasses and the lightning bolt scar. Ron gets red hair. That’s about it.
Worsted weight yarn (or any weight of your choosing) Size G hook (or whatever hook to make a tight crochet with your yarn) Safety eyes, 9mm Poly-fil for stuffing
Legs(make two) start with black 8 sc in magic circle inc around sc around for 2 rounds dec x4, sc x8 dec x2, sc x8 (by this round it should be 10sc) Stuff foot and continue to stuff as you go and then change to grey (don’t bind off, just carry behind) Now, if you like the color change you see in Harry: sc around for 2 rounds, switch back to black sc around for 8 rounds. Bind off both, but no need to leave a long tail for sewing. If you prefer Ron’s leg color change: sc around, switch back to black sc around for 9 rounds. Bind off both, but no need to leave a long tail for sewing.
Now about joining the legs, what you need to do is hold the legs together and sl st through both the legs twice in the middle where they meet, from the front of the legs to the back. Then continue around the legs. You should end with 2 sl st and 16 sc (8 sc around each leg). Moving on to the body you will forgo the sl st and only work in the sc.
Body continuing with black sc around for 3 rounds *dec, 3* x3, sc, make sure to continue to stuff as you go and switch to white sc around for 8 rounds sc, dec, dec, 2 sec, dec, dec dec around, Bind off both, but no need to leave a long tail for sewing.
Arms (make two) start with skin color 6 sc in magic circle inc around sc around for 2 rounds *dec, sc in next 2* around, make sure to stuff lightly as you go and switch to white sc around for 10 rounds. Bind off, leaving a tail to go ahead and sew onto the sides of the body.
Head 6 sc in magic circle inc around *inc, sc* around *inc, sc in next 2* around sc around for 6 rounds, insert safety eyes between rounds 5 and 6 (not counting the magic circle as a round), leaving about 3 sc in between. *dec, sc in next 2* around *dec, sc* around, be sure to stuff dec around, bind off, leaving a tail to go ahead and sew on
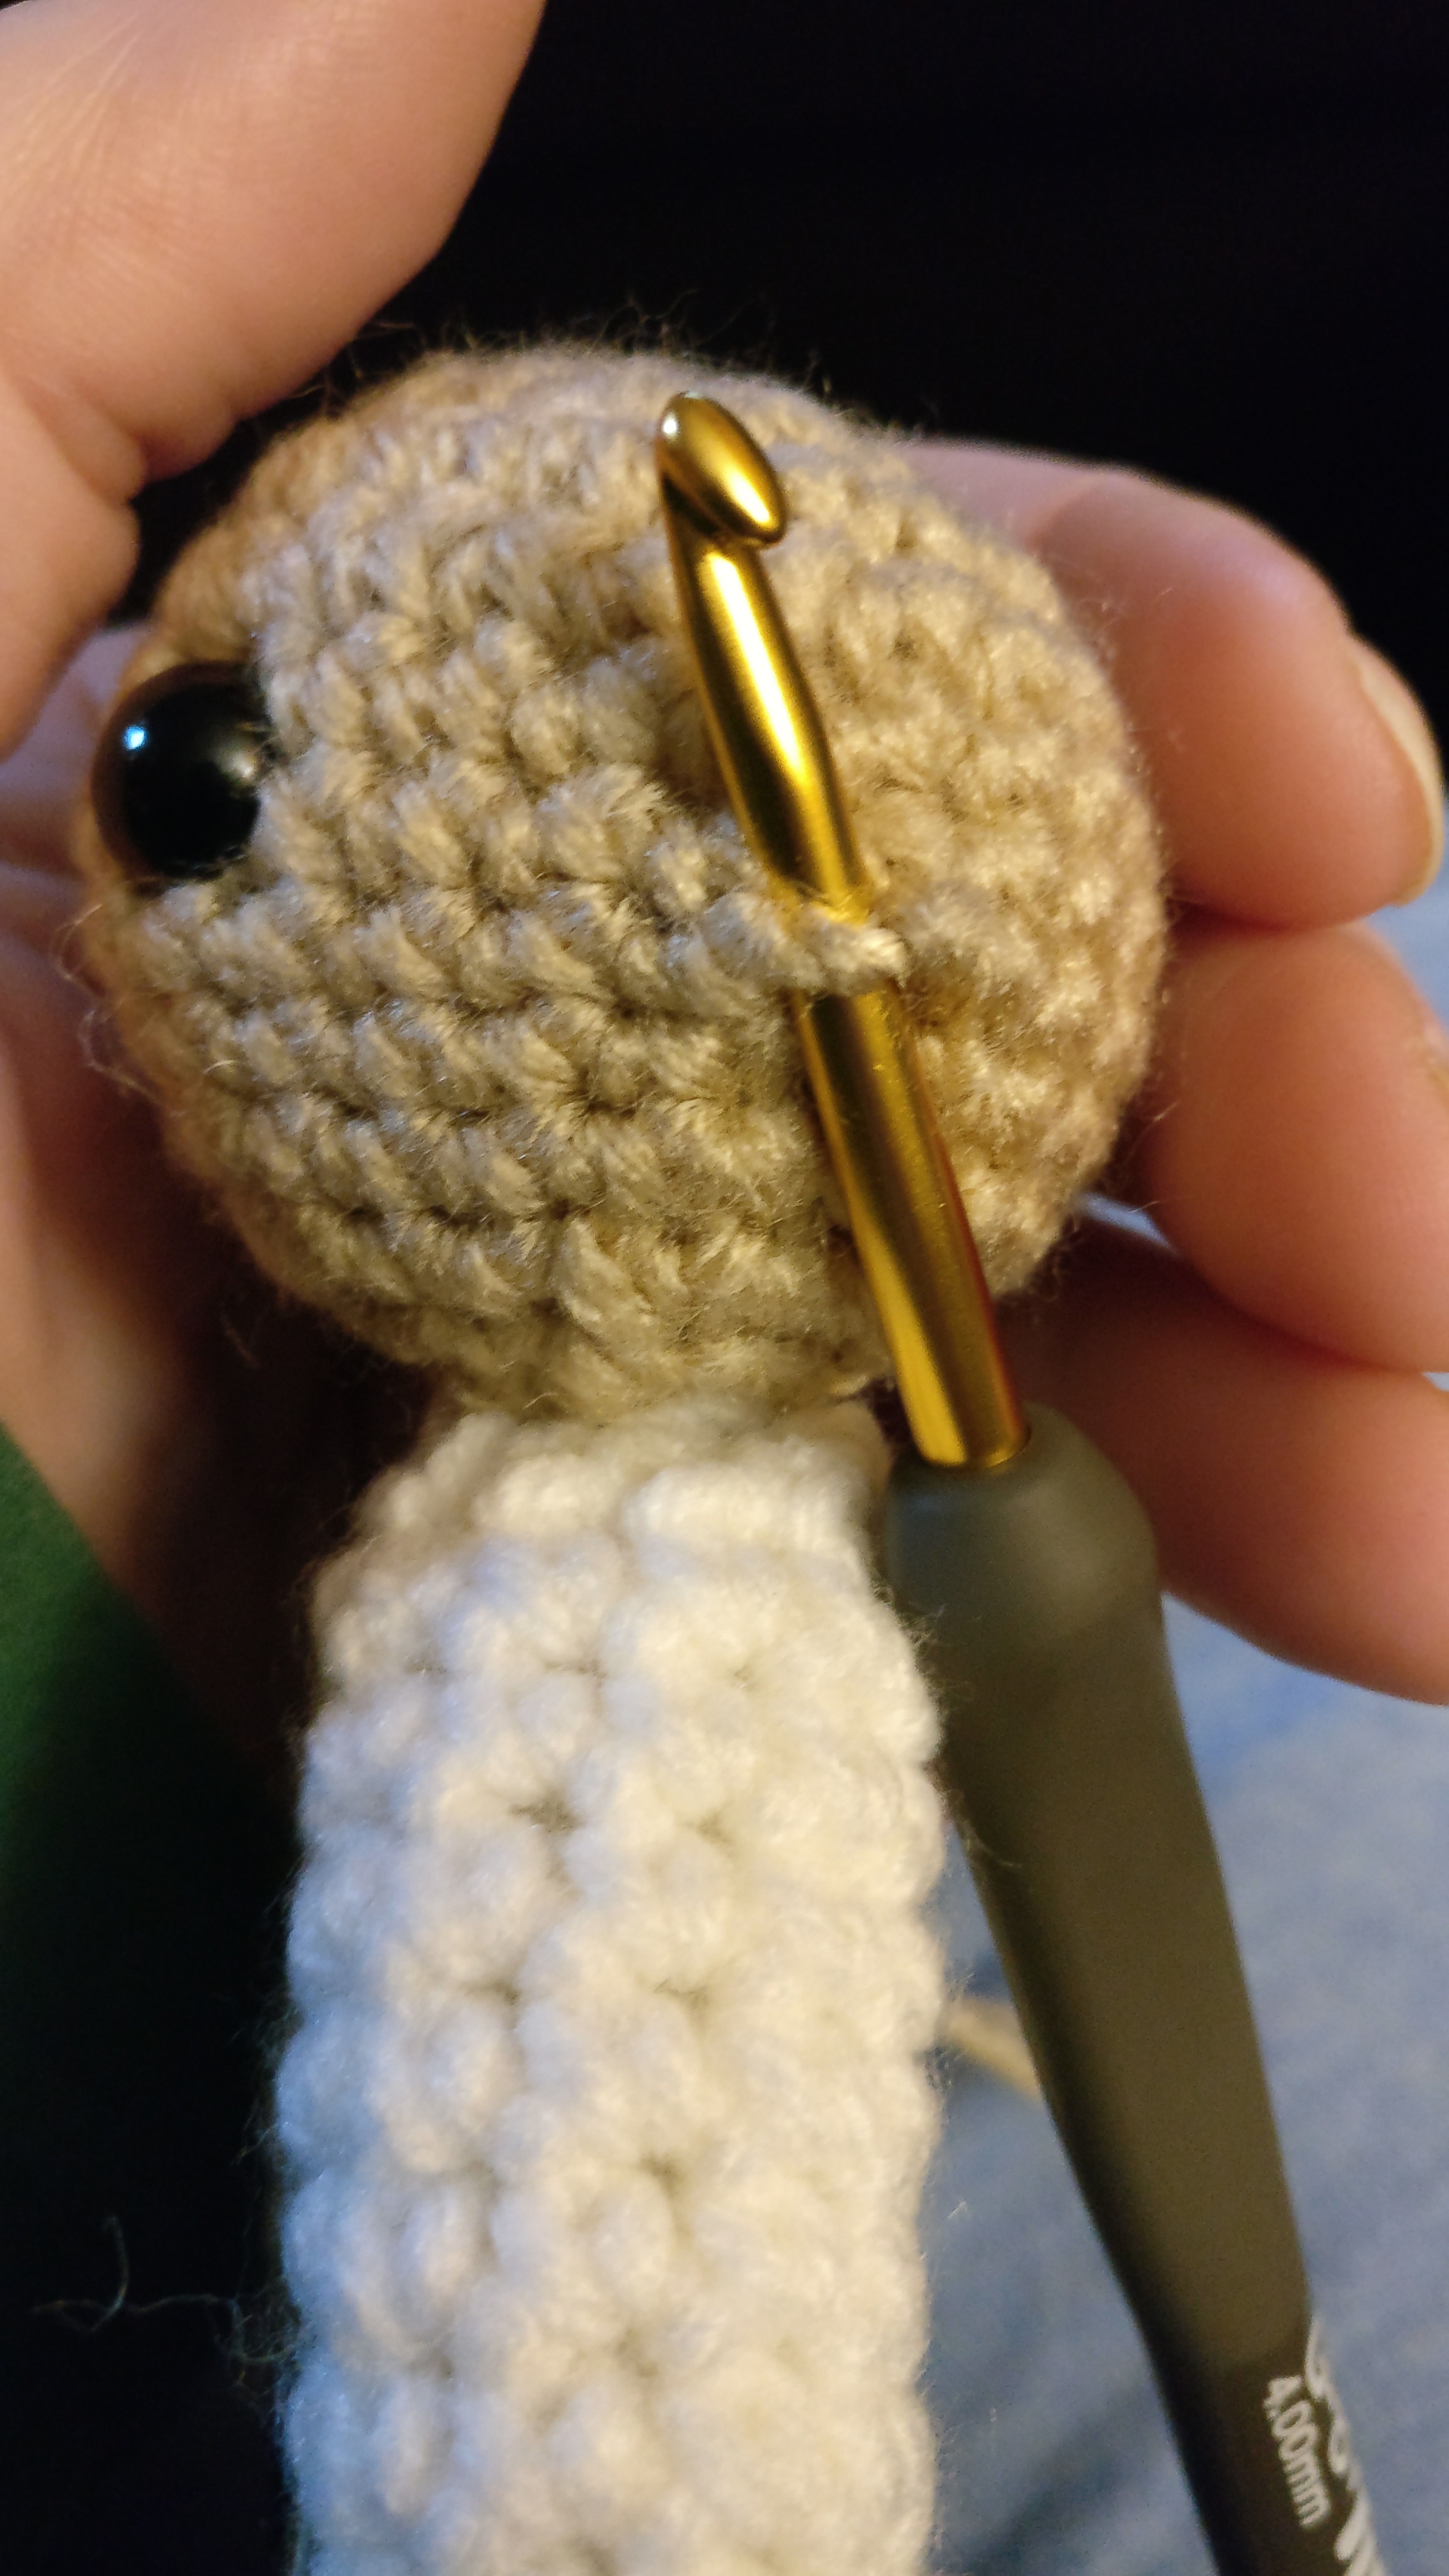
Ears (optional) What you’re going to do now is to work the ears right onto the head. Go roughly 5 stitches to the side of the eyes and insert your hook between rounds 8 and 9 and coming up round 8.
Now yo, pull through, yo, pull through the loop, do sc in the same spot, do sc in the next 3 spots moving up the head. Ch 1, turn, sc in each of the 3st, finish off and weave in the tails. Use the ends to help shape the ear a bit. Repeat for the other side of the head.
Tie So, I played around with quite a few ideas to make this happen… more than I would like to admit for a tie. Now if you would like another way than what I am about to describe, then in one color just ch 21, sc across then use the other color to sew in the stripes. If you want another way, here’s what I did. Essentially you are going to be doing a foundation sc row. On every third sc, change to the next color. Make sure you crochet over the end and carry the unused yarn by crocheting over it. Make 30 foundation sc then just bind off and weave in the ends. Tie it around the neck flipping both ends down. The vest will hold the tie down
Vest in gray ch 18 (make sure this goes around the doll’s waist) sl st to first sc, making sure not to twist, ch 2 (does not count as a st) dc around, sl st to the beginning ch 2, dc around for 3 rounds, for a total of 4 rounds ch 11, turn and hdc in the 2nd ch and across (10 hdc) then sc in the first dc. Sc in next 3 dc. ch 11, turn and hdc in the 2nd ch and across (10hdc) then sc in next unused dc. Bind off and leave a long end. Slide vest onto the body then sew the vest straps to the vest. Make sure to position the tie inside the vest how you want it to look.
Cloak in black ch 21, turn and sc in each ch, ch 1 and turn *inc, sc* across, ch 1 and turn *inc, sc in next 2, ch 1 and turn sc in next 3, ch 6 and skip 12 sc, sc in next 10, ch 6 and skip 12 sc, sc in next 3, ch 1 and turn sc across in all sc and ch, ch 2 (does not count as stitch) and turn *dc inc, dc in next 3* dc in last, ch 2 and turn dc across for 8 rows ch 1 and sc around the opening and bottom of the cloak, sl st to the first and weave in end Cloak sleeves, repeat on each arm Join the yarn in one of the corners of the sleeve opening. Ch 1 and sc around the opening, sl st to beginning, ch 2 (does not count as stitch) Dc around, sl st to beginning and ch 2. Repeat for a total of 4 rounds. Ch 1 and then sc around, sl st to beginning, bind off and weave in the ends.
The rest is really just fine touches. For Harry, sew a lightening bolt on the forehead and sew the glasses on. For both add some hair onto the top. For Harry I took about 5″ pieces of yarn to hook them onto the head then I split the 4ply yarn into half using a needle to help. I then gave him a hair cuto to style the hair a bit. For Ron I actually just embroidered the hair on just because when I pose them all together I wanted them to look different. Personally, I am partial to how Harry’s hair turned out.
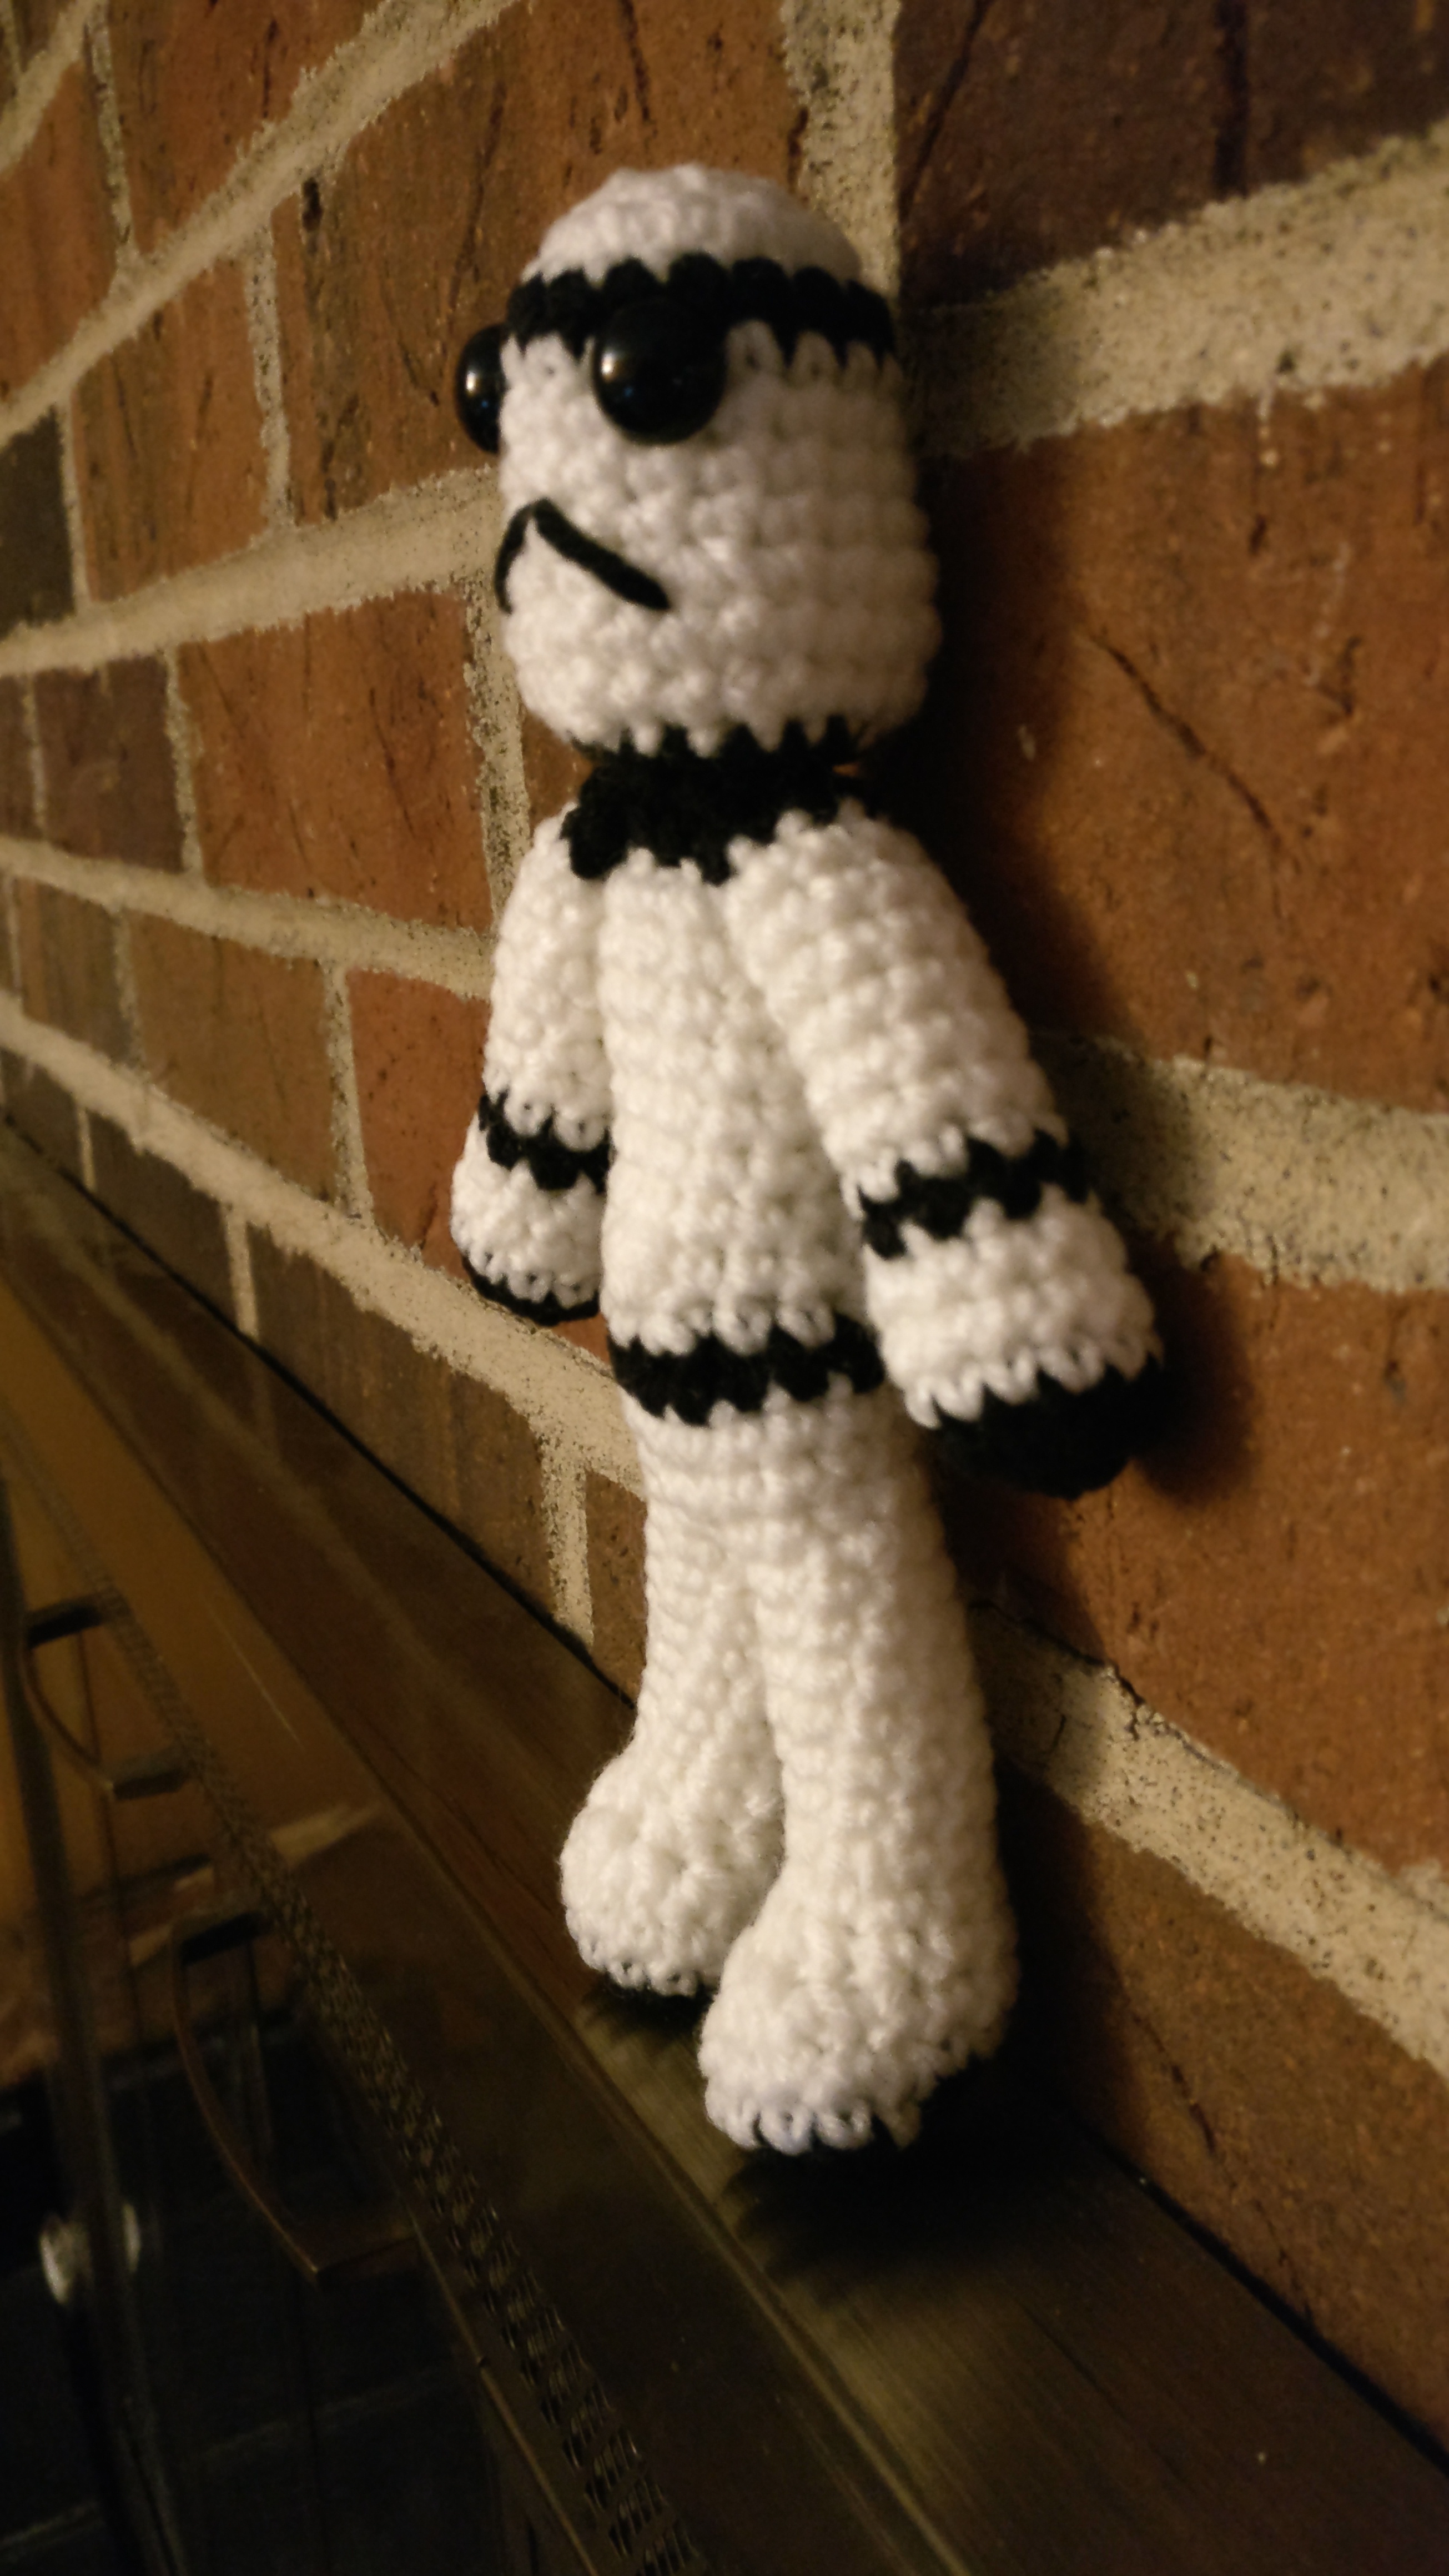
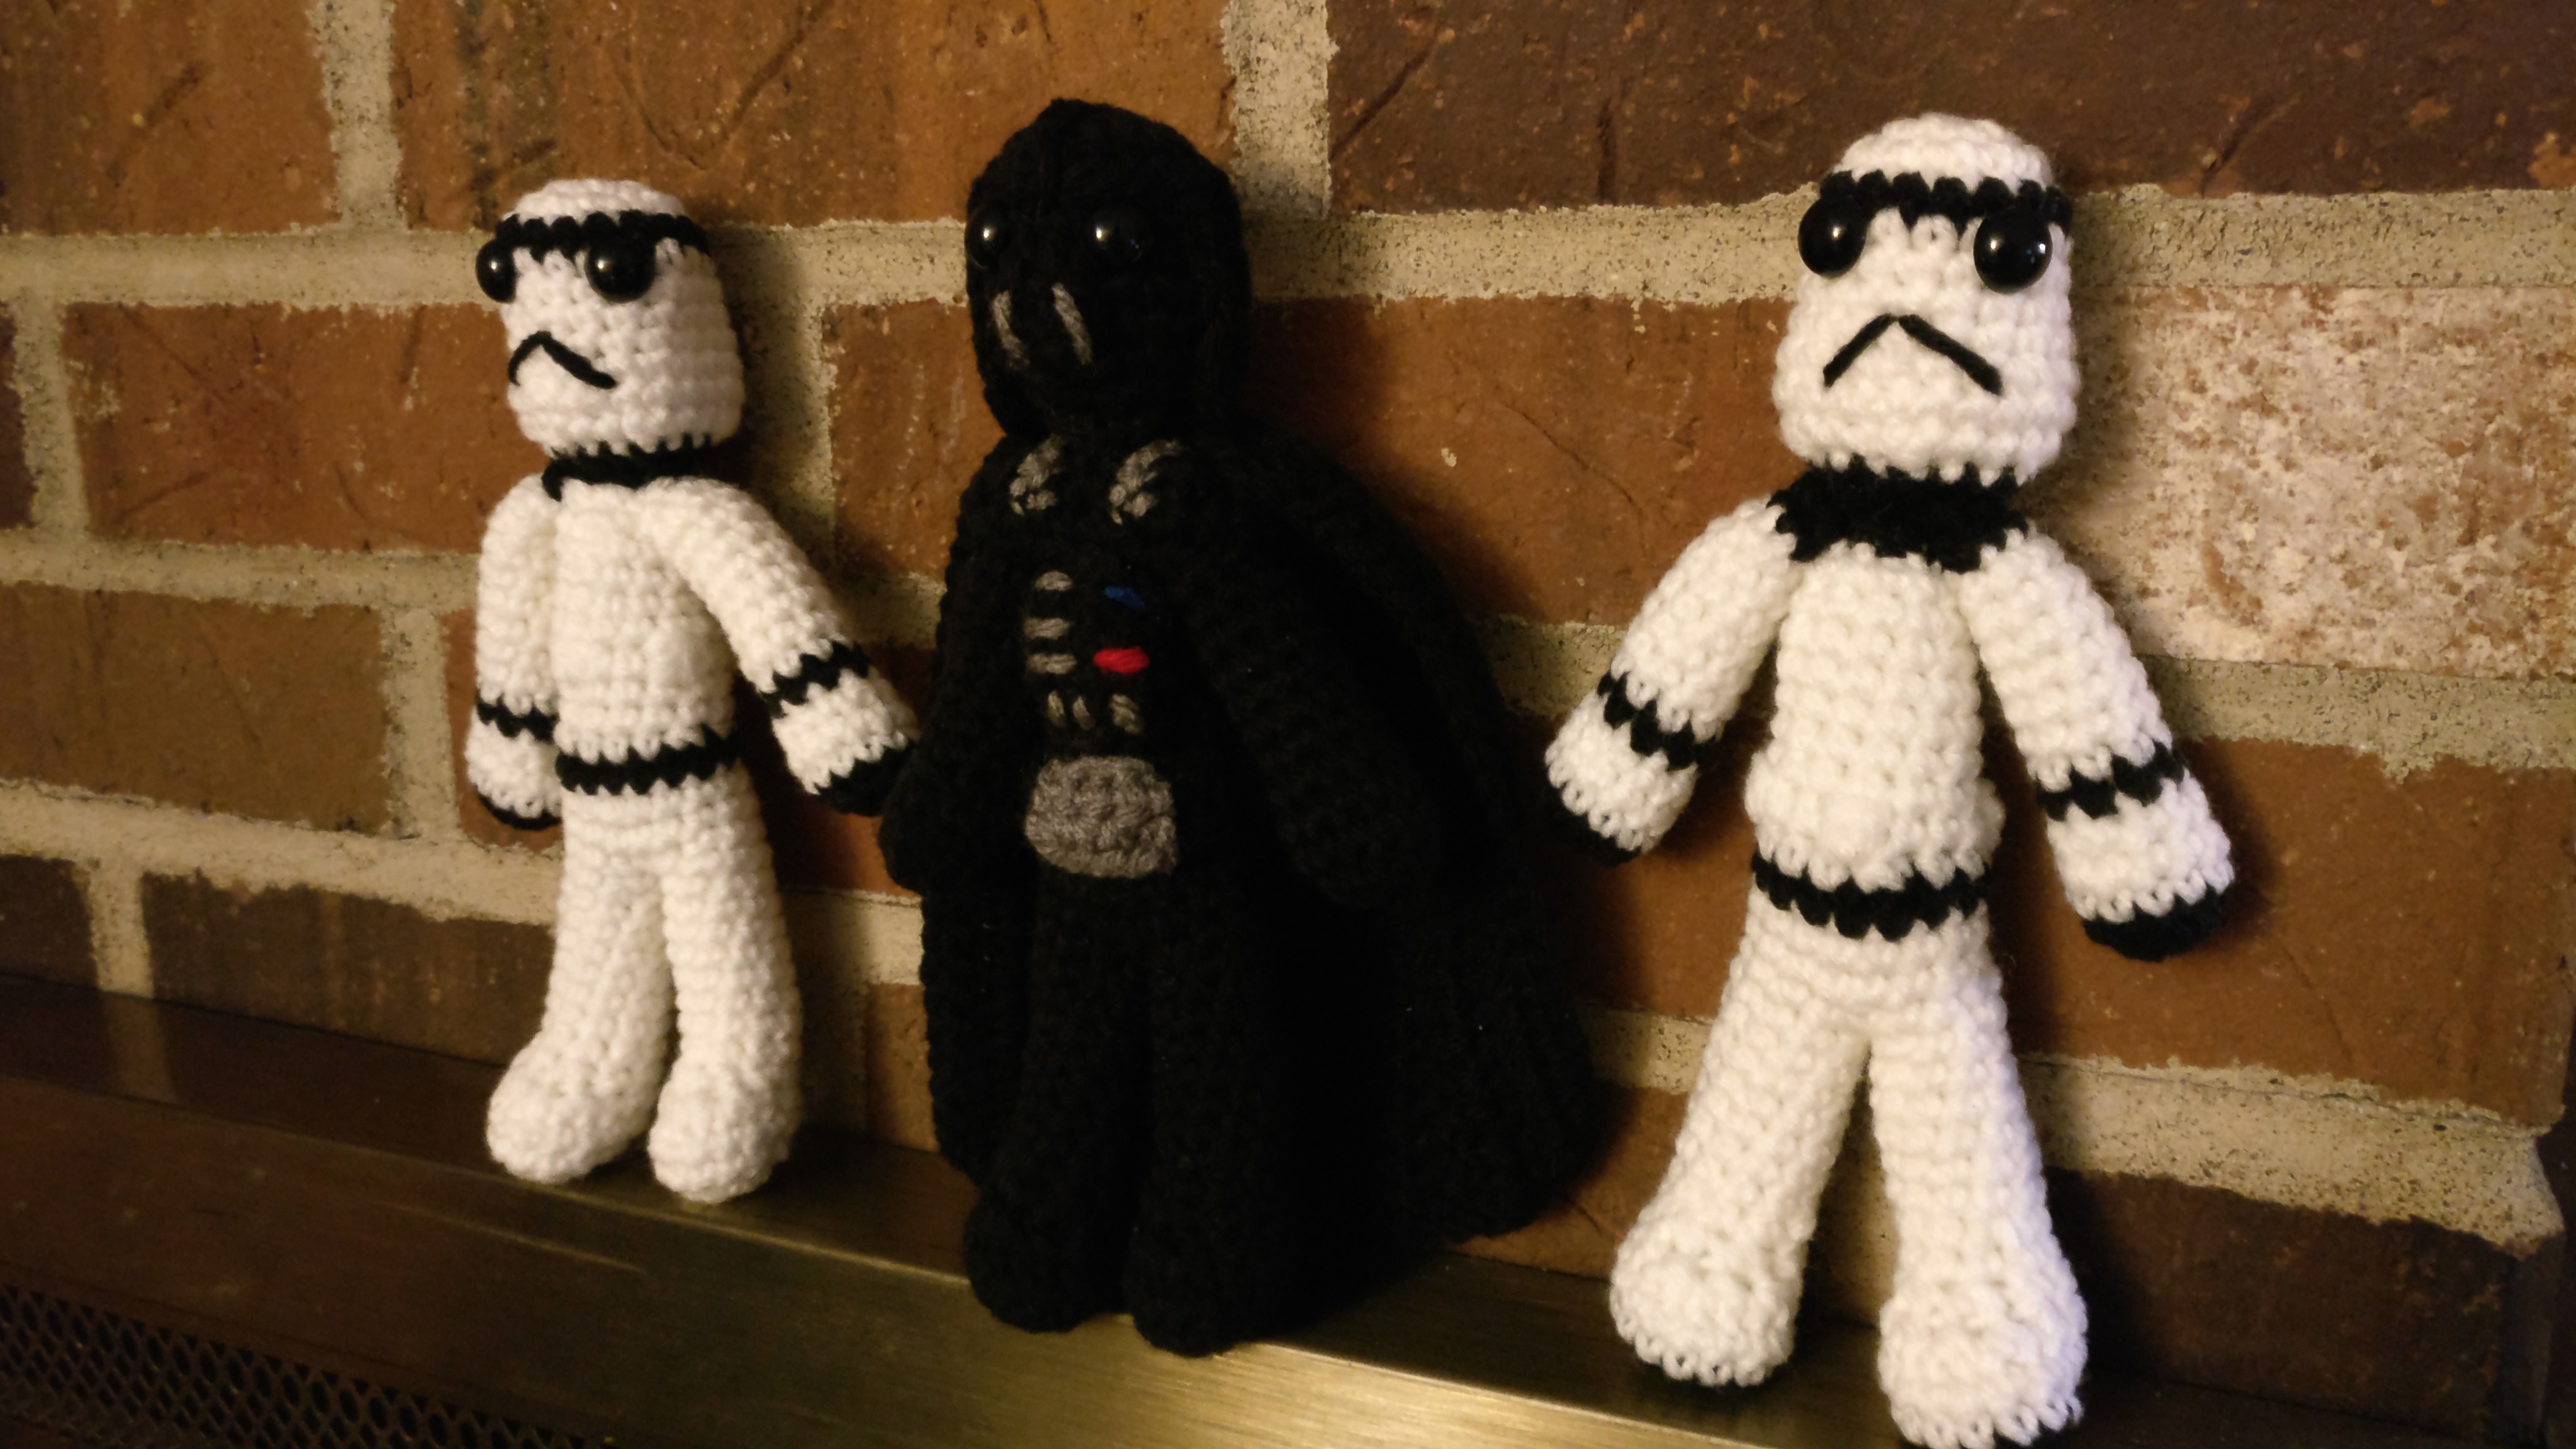
Of course after making Darth Vader, I had to make the Storm Trooper pattern to go with my Norbert (who will of course be dressed as Princess Leia). They are such bad shots anyway so I’m not going to have them holding their weapons…
Worsted weight yarn (or any weight of your choosing) in black and white Size G hook (or whatever hook to make a tight crochet with your yarn) Safety eyes, 12mm Poly-fil for stuffing
Legs(make two) start in black 8 sc in magic circle inc around sc around for 2 rounds and switch to white dec x4, sc x8 dec x2, sc x8 (by this round it should be 10sc) Stuff foot and continue to stuff as you go. sc around for 8 rounds. Bind off both, but no need to leave a long tail for sewing.
Now about joining the legs, what you need to do is hold the legs together and sl st through both the legs twice in the middle where they meet, from the front of the legs to the back. Then continue around the legs. You should end with 2 sl st and 16 sc (8 sc around each leg). Moving on to the body you will forgo the sl st and only work in the sc.
Body sc around for 2 rounds and switch to black sc around for 1 round and switch back to white *dec, 3* x3, sc, make sure to continue to stuff as you go sc around for 2 rounds sc, *dc tog (dc 2tog), sc, sc* x3, dc tog, sc sc around for 5 rounds and switch to black sc, dec, dec, 2 sec, dec, dec dec around, Bind off both, but no need to leave a long tail for sewing.
Arms (make two) start with black 6 sc in magic circle inc around and switch to white sc around for 2 rounds *dec, sc in next 2* around, make sure to stuff lightly as you go and switch to black sc around and switch to white sc around for 7 rounds and switch to black sc around for 2 rounds. Bind off, leaving a tail to go ahead and sew onto the sides of the body.
Head start with white 6 sc in magic circle inc around *inc, sc* around switch to black sc around and switch to white sc around for 4 round, insert safety eyes between rounds 4 and 5, leaving about 3 sc in between. *inc, 2 sc* around sc around *dec, 2 sc* around and switch to black *dec, sc* around, be sure to stuff dec around, bind off, leaving a tail to go ahead and make an upside down ‘v’ for the mouth then sew it onto the body.
Again I find myself in need of a pattern and not a free suitable one in sight. My original Norbert Calendar was a hit that I didn’t realize that so many people liked. We didn’t make one this year and had many people inquire about it… so here I go again.
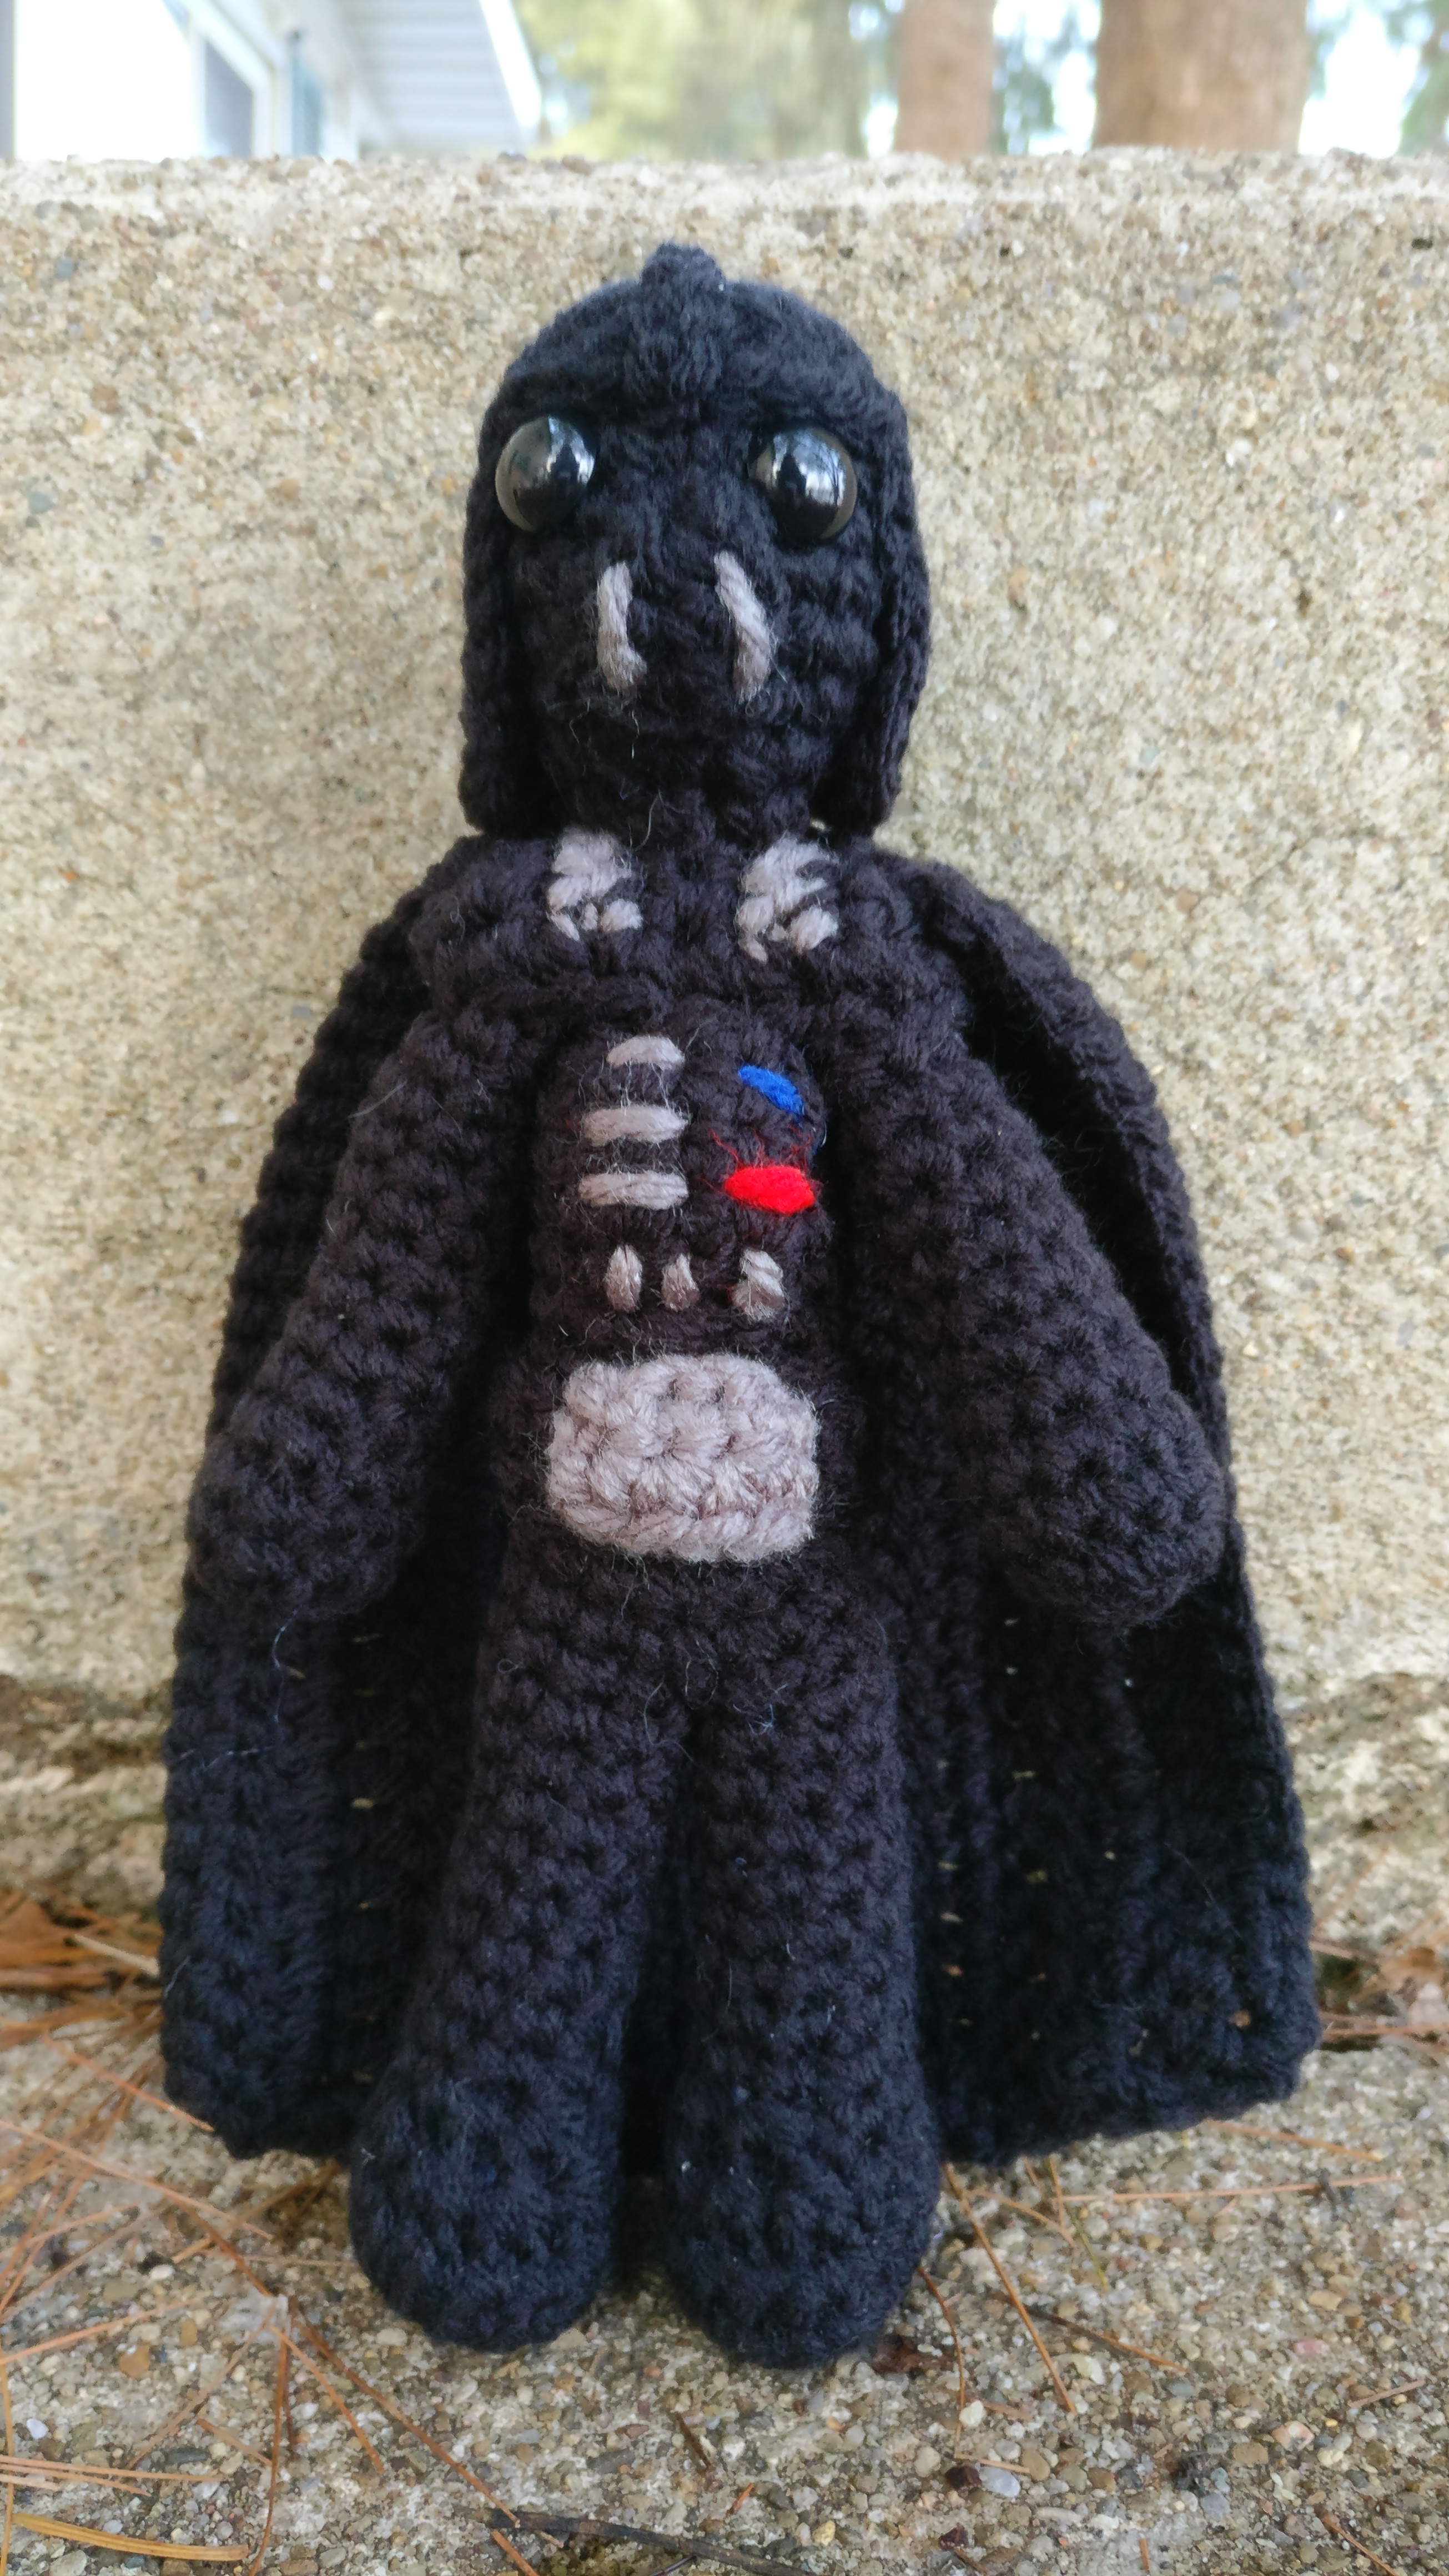
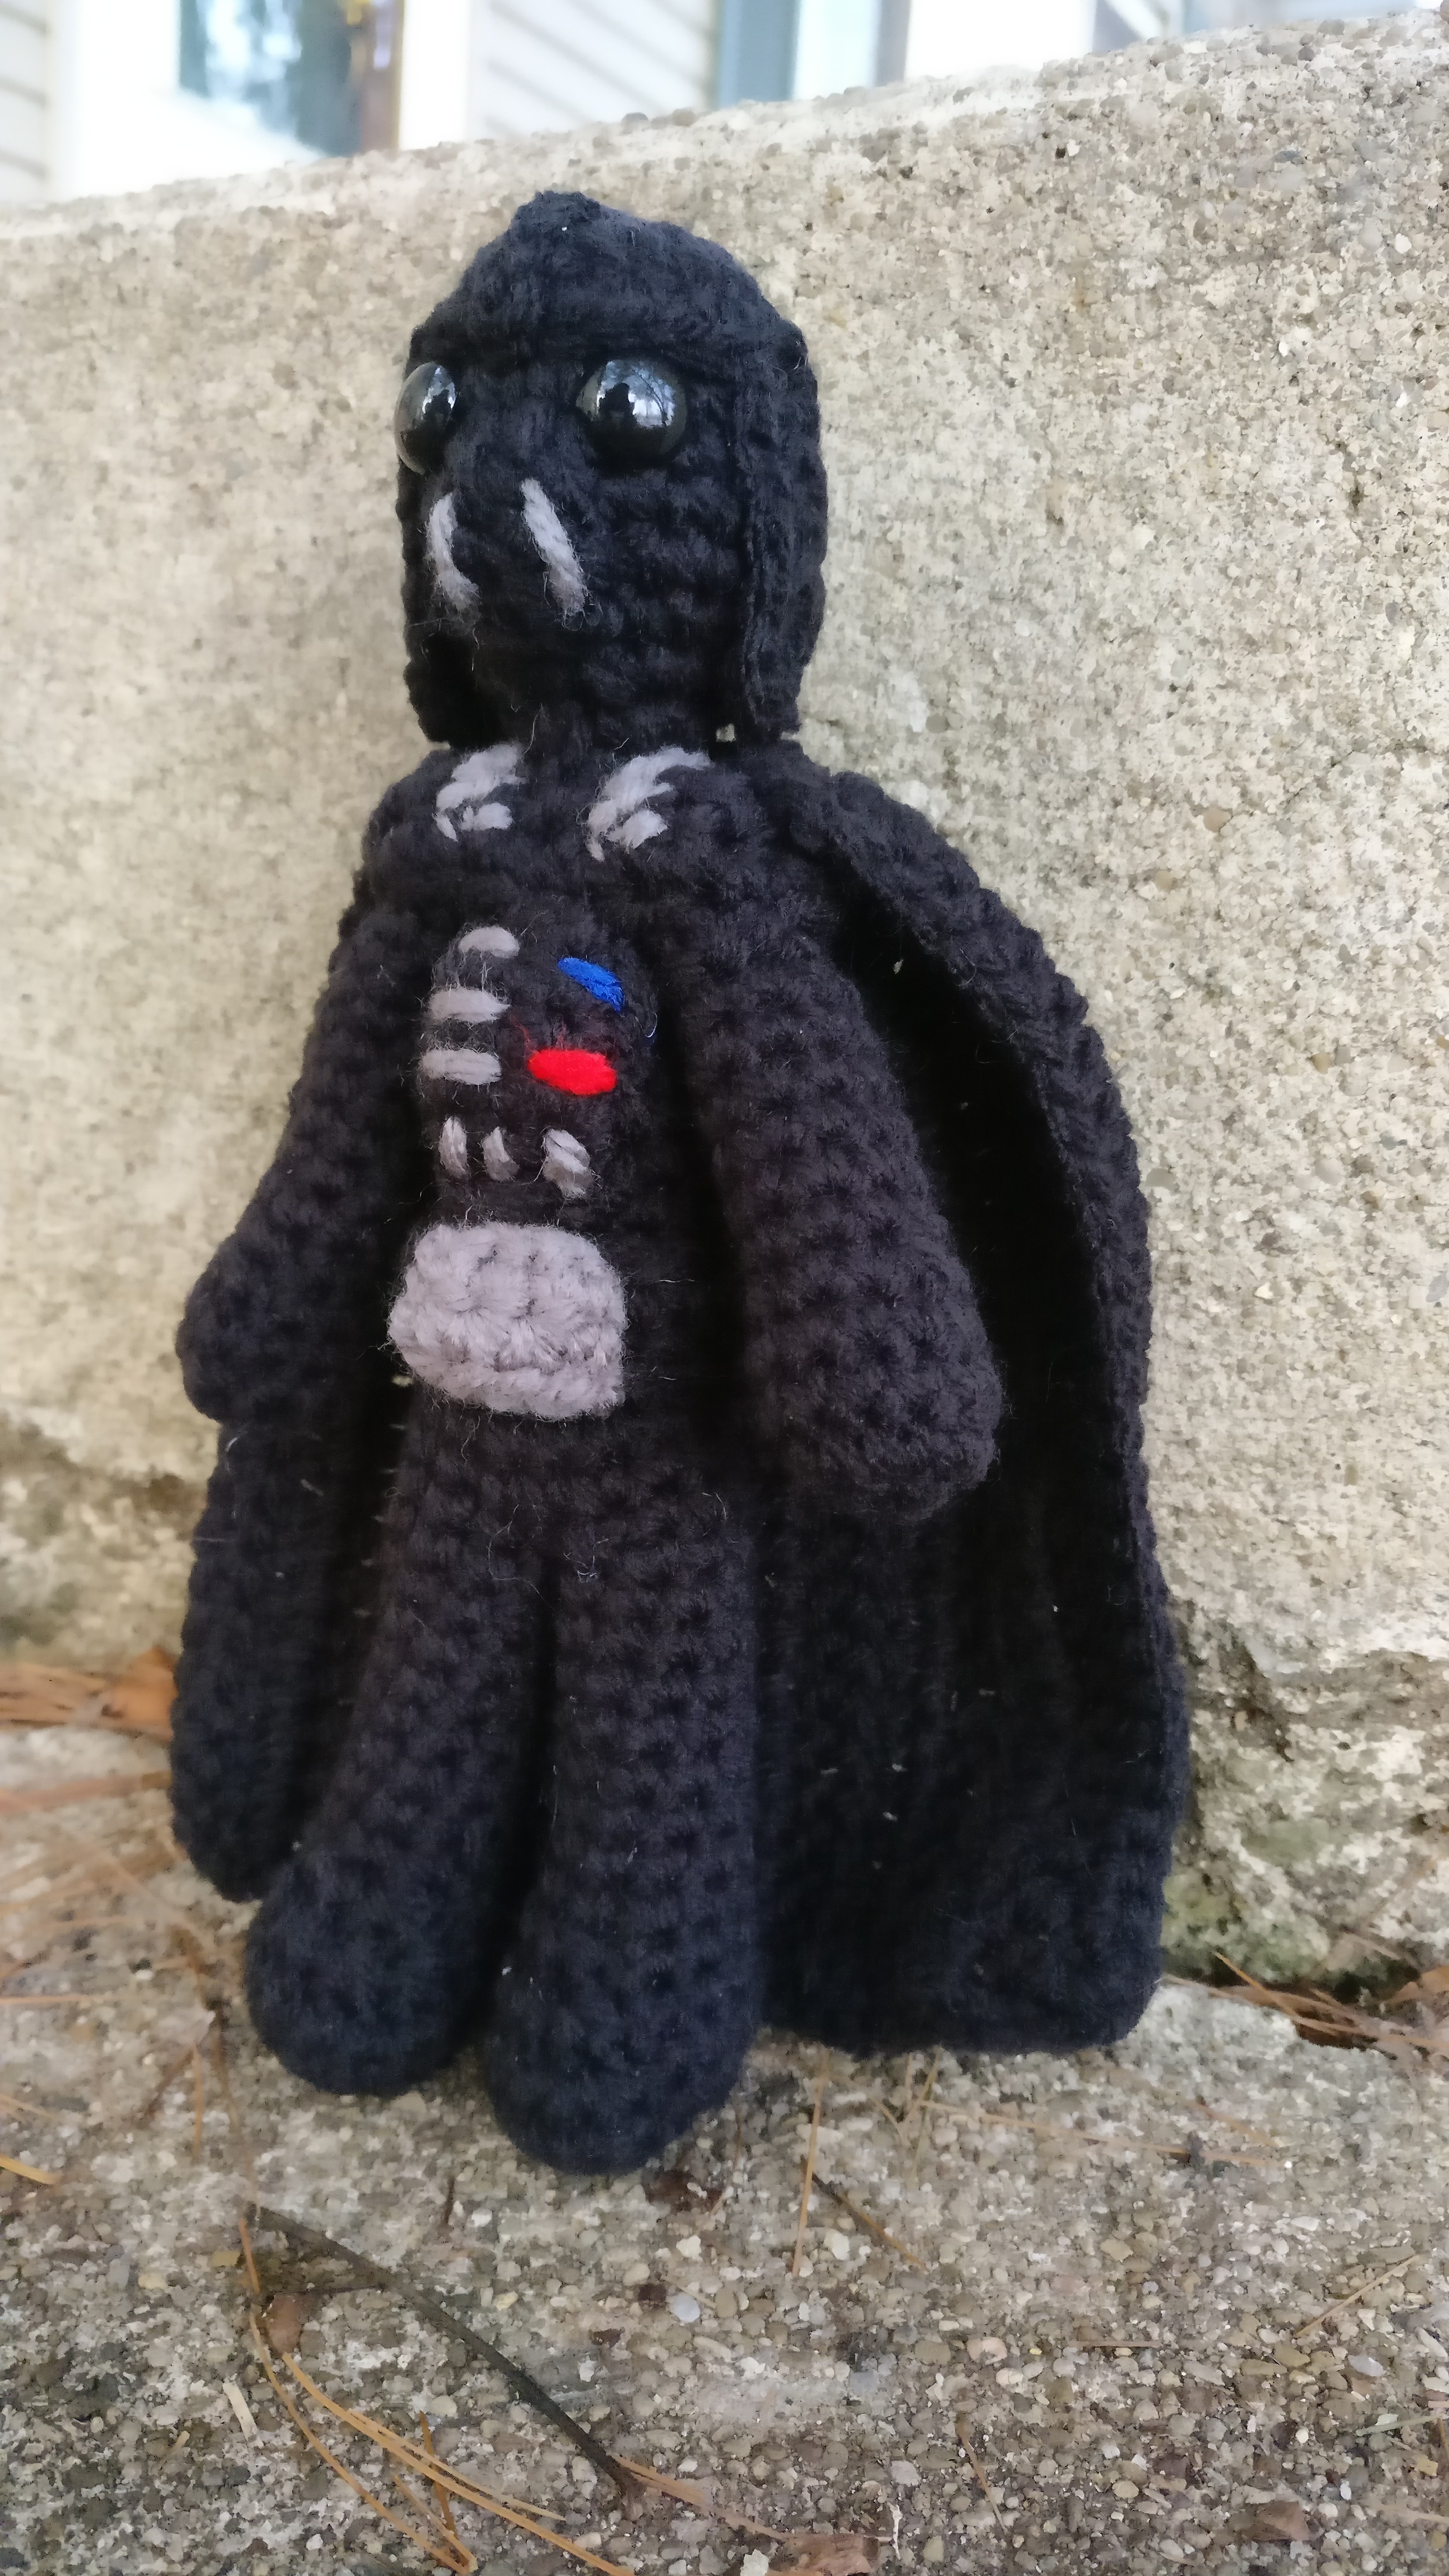
I wanted to make a roughly 6″ Darth Vader and Storm Troopers. I do have a long standing grump about paying for patterns, so I’ve decided to pay homage to these iconic characters in yarm. I freely give this pattern out for others to celebrate them as well.
Worsted weight yarn i(or any weight of your choosing) n black, dark grey, red and green Size G hook (or whatever hook to make a tight crochet with your yarn) Safety eyes, 12mm Poly-fil for stuffing
Legs(make two) 8 sc in magic circle inc around sc around for 2 rounds dec x4, sc x8 dec x2, sc x8 (by this round it should be 10sc) Stuff foot and continue to stuff as you go. sc around for 8 rounds. Bind off both, but no need to leave a long tail for sewing.
Now about joining the legs, what you need to do is hold the legs together and sl st through both the legs twice in the middle where they meet, from the front of the legs to the back. Then continue around the legs. You should end with 2 sl st and 16 sc (8 sc around each leg). Moving on to the body you will forgo the sl st and only work in the sc.
Body sc around for 3 rounds *dec, 3* x3, sc, make sure to continue to stuff as you go sc around for 8 rounds sc, dec, dec, 2 sec, dec, dec dec around, Bind off both, but no need to leave a long tail for sewing.
Arms (make two) 6 sc in magic circle inc around sc around for 2 rounds *dec, sc in next 2* around, make sure to stuff lightly as you go sc around for 10 rounds. Bind off, leaving a tail to go ahead and sew onto the sides of the body.
Upper body armor 4 sc in magic circle, ch 1 and turn *inc, sc* across, ch 1 and turn sc across, switch colors to dark grey, ch 1 and turn sc across, switch back to black, ch 1 and turn sc across for 3 round, switch colors to dark grey, ch 1 and turn sc across, switch back to black, ch 1 and turn *dec, sc* across, ch 1 and turn dec x2, ch 1 and sc around the armor sl, ,st to first sc of the round going around the armor, bind off and leave a long tail. Sew this to the top of the body (no need to stuff, just push the ends under as you sew), the sides hanging down over the ‘shoulders’.
Head 6 sc in magic circle inc around *inc, sc* around sc around for 5 round, insert safety eyes between rounds 4 and 5, leaving about 3 sc in between. *dec, sc* around, be sure to stuff dec around, bind off, leaving a tail to go ahead and sew in the middle of the upper body armor.
Mouth ch 2, ,3 sc in first ch, ch 1 and turn sc across, ch 1 and turn sc, sc inc, sc, bind off, leave a tail and sew to face. Stuff the end behind as you sew. Sew two vertical lines in grey for accent markings.
Helmet 6 sc in magic circle inc around *inc, sc* around sc in next 2, hdc and dc in next, dc and hdc in next, sc in the rest. Ch 1 and turn sc in the next 12, ch 1 and turn. Repeat this for 6 rows. Ch 1 and sc around the helmet, put 3 sc in the bottom points/corners of the back of the helmet (the sc rows). Bind off, leave a tail and sew onto the head. Ch 18 and bind off, leave a tail and sew down the middle of the helmet starting between the eyes.
Belt Start with black and ch 19. Sc in second chain from hook and across. Ch 1 and turn sc across, bind off with a long tail to sew around his middle. In grey, for the buckle, ch 5, sc in the second chain from hook and across. Ch 1 and turn sc across, bind off with a long tail to sew to the front of the belt.
Abdomen light box ch 6, sc in second chain from hook, ch 1 and turn sc across, ch 1 and turn. Repeat for a total of 4 rows. Bind off with a long tail to sew on the abdomen. Before you sew though, use the blue, red and grey to add some accent lines.
Cape Now, with the cape you can attach some felt or cloth if you prefer. I went ahead and crocheted one up so I could include it in these instructions and as a matter of preference as well. ch 27, dc in the third chain from hook and across, ch 2 (does not count as a st) and turn dc across, ch 2 and turn for total of 12 rows. Sc around it all, putting 3 sc in each corner. When you get back to the beginning of the sc around, sl st to the first one and tie a little knot leaving a long tail for sewing. Now to make your life easier to make the gathered look of the top of the cape use your needle to help weave the end in about every 2-3 stitches along the top. When you get to the end, gently pull and compare it to where you will sew the cape to the upper body armor then sew it on.
This pattern began as someone messaging me on Facebook. They couldn’t find the pattern anywhere and wanted to make it for a friend of theirs that has cancer. I’ve been wanting to write more patterns of my own up and I loved this idea and reasons! Not to mention this is right up my alley….
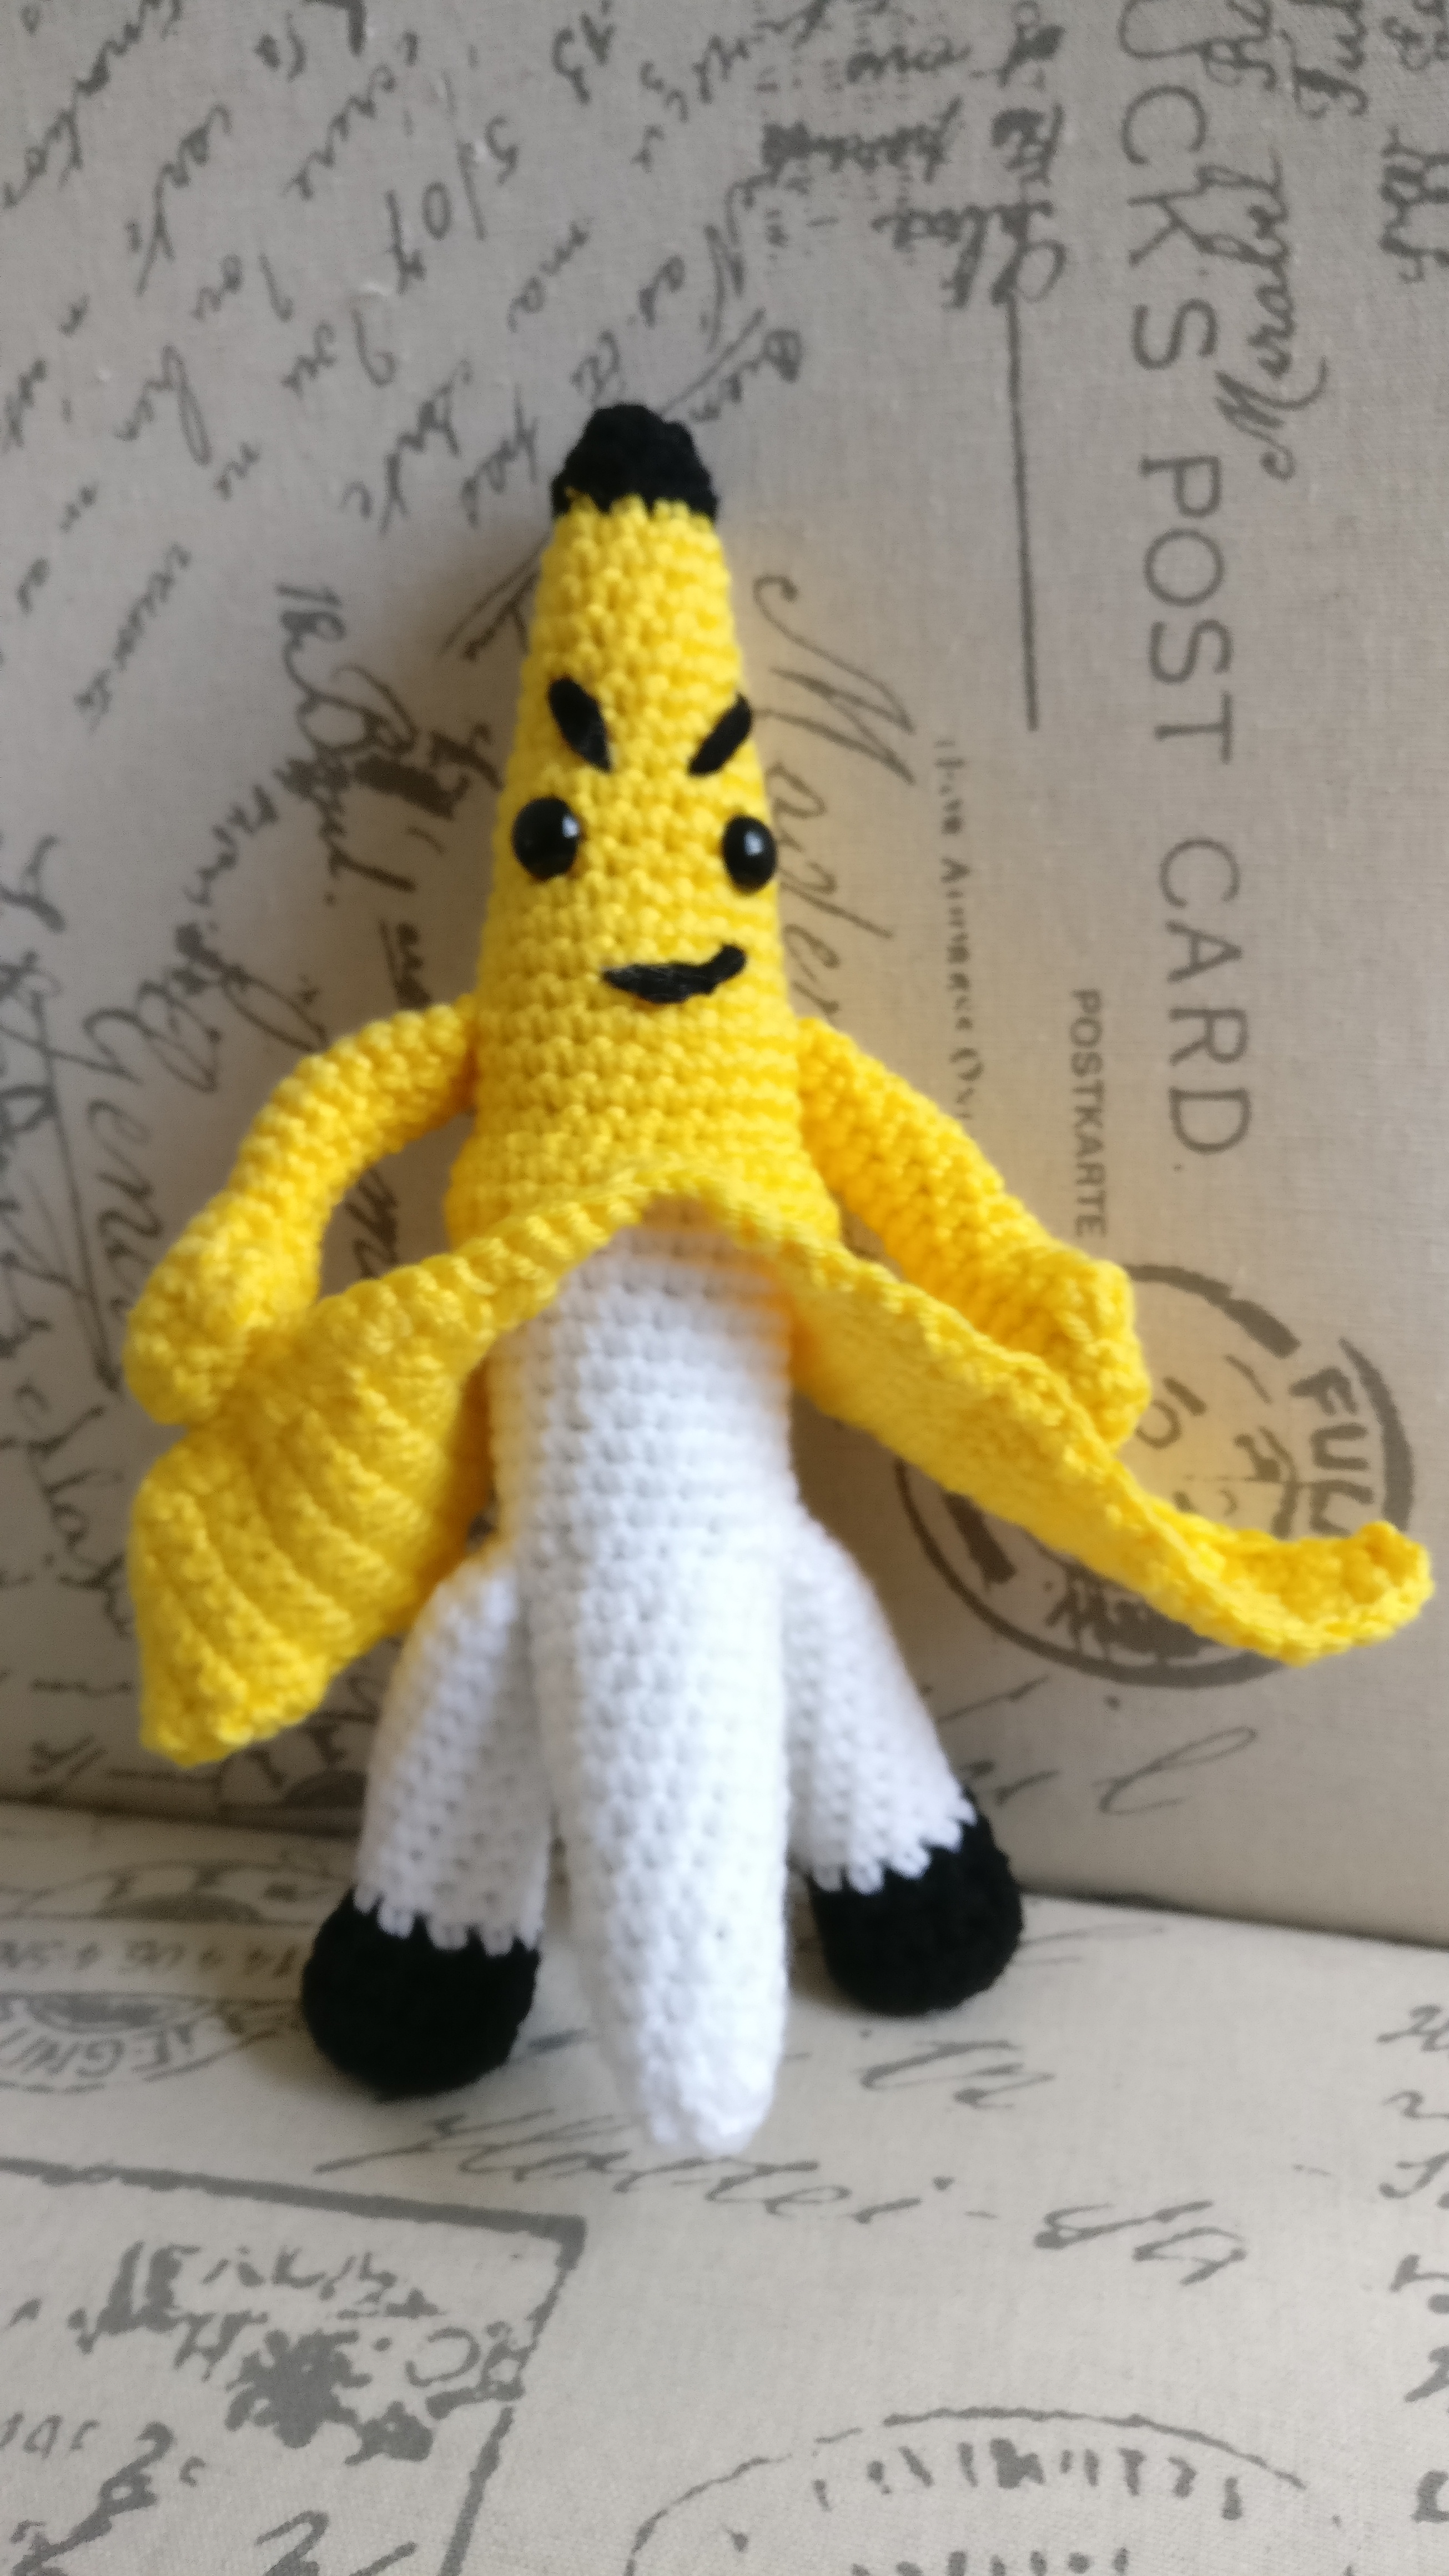
This is worked in the round as typical for amigurumi. Mine turned out to be about 10″ tall. I choose to make it a little larger and not use wire for the arms and legs. This way it is washable!
G hook
12mm safety eyes
worsted weight yarn in yellow, white and black
polyfill for stuffing
Start with black
6 sc in magic circle
*inc, sc* around
sc around then change to yellow (leave a long end of black here on the outside to make sewing the eyebrows and mouth a little easier on yourself if you want)
In back loops only (just for this round) sc around
*inc, sc in next 2* around
sc around for 2 rounds
*inc, sc in next 3* around
sc around for 3 rounds
*inc, sc in next 4* around
sc around for 3 rounds
*inc, sc in next 5* around
sc around for 3 rounds
*inc, sc in next 6* around
sc around for 3 rounds then change to white
in back loops only (just for this round) sc around
Take a moment to insert the safety eyes before moving on. Count down 11/12 rounds of yellow and place them with 4 stitches in between. Also, stuff the head at least to eye level to make your life easier and then keep stuffing as you go. Keep in mind that as you stuff you are also giving it that slightly curved shape as well. This is the easiest way since it is just a slight curve than to get fancy with the stitches I have found.
sc around for 6 rounds
*dec, sc in next 6* around
sc around for 3 rounds
*dec, sc in next 5* around
sc around for 3 rounds
*dec, sc in next 4* around
sc around for 3 rounds
*dec, sc in next 3* around
sc around for the next 3 rounds
*dec, sc in next 2* around
sc around for the next 2 rounds
*dec, sc* around
dec around then bind off and weave in the end
Now, turn your banana upside down with the yellow end facing down. Locate the approximate middle of the back where you did the round of back loop only in yellow before changing to white. This may or may not be the beginning of the round, but it doesn’t matter. (Also, you may be off a stitch or two. It’ll be fine. I’m not one for counting exactly as you may have noticed from my patterns. I like stress free as possible.) Join your yellow yarn here and continue as follows:
ch 1 and sc around in the front loops only then sl st to beginning (ch does not count as a stitch)
ch 1 and then sc around to the front stopping about halfway, in the middle, Leave the rest of this round unworked for now and turn.
ch 1 and sc back to where you started then turn
ch 1, sc across then turn for 3 rows
ch 1, dec, sc across then dec over the last 2 stitches
ch 1, sc across then turn for 4 rows
ch 1, dec, sc across then dec over the last 2 stitches
ch 1, sc across then turn for 4 rows
ch 1, dec, sc across then dec over the last 2 stitches
ch 1, sc across then turn for 4 rows
ch 1, dec, sc across then dec over the last 2 stitches
ch 1, sc across then turn for 4 rows
ch 1, dec, sc across then dec over the last 2 stitches (it really is a dec, dec basically since you should be down to 4 or 5 stitches.
ch 1, sc across then turn for 2 rows
ch 1, then dec across the last stitches, cut and bind off yarn.
Now, join yarn in the last sc you worked before turning (yeah, the same, not the next one).
ch 1 and then sc around to the back stopping at the last stitch before the peal you just made.
ch 1 and sc back to where you started then turn
ch 1, sc across then turn for 3 rows
ch 1, dec, sc across then dec over the last 2 stitches
ch 1, sc across then turn for 4 rows
ch 1, dec, sc across then dec over the last 2 stitches
ch 1, sc across then turn for 4 rows
ch 1, dec, sc across then dec over the last 2 stitches
ch 1, sc across then turn for 4 rows
ch 1, dec, sc across then dec over the last 2 stitches
ch 1, sc across then turn for 4 rows
ch 1, dec, sc across then dec over the last 2 stitches (it really is a dec, sc, dec basically since you should be down to 3 stitches. At least I was.. if you aren’t it should be close and it will be fine.
ch 1, sc across then turn for 2 rows
ch 1, then dec across the last stitches. It was a dec over 3 for me.
ch 1, turn then sc evenly up and down both sides of the peals. Place 2 sc at the tips of the peals. Sl st then bind off and weave in ends.
Legs, make two and make them both before sewing as it makes it easier to get an even amount of stuffing in each.
start with black
6 sc in magic circle
*inc* around
*inc, sc* around
sc around
6 dec, 6sc
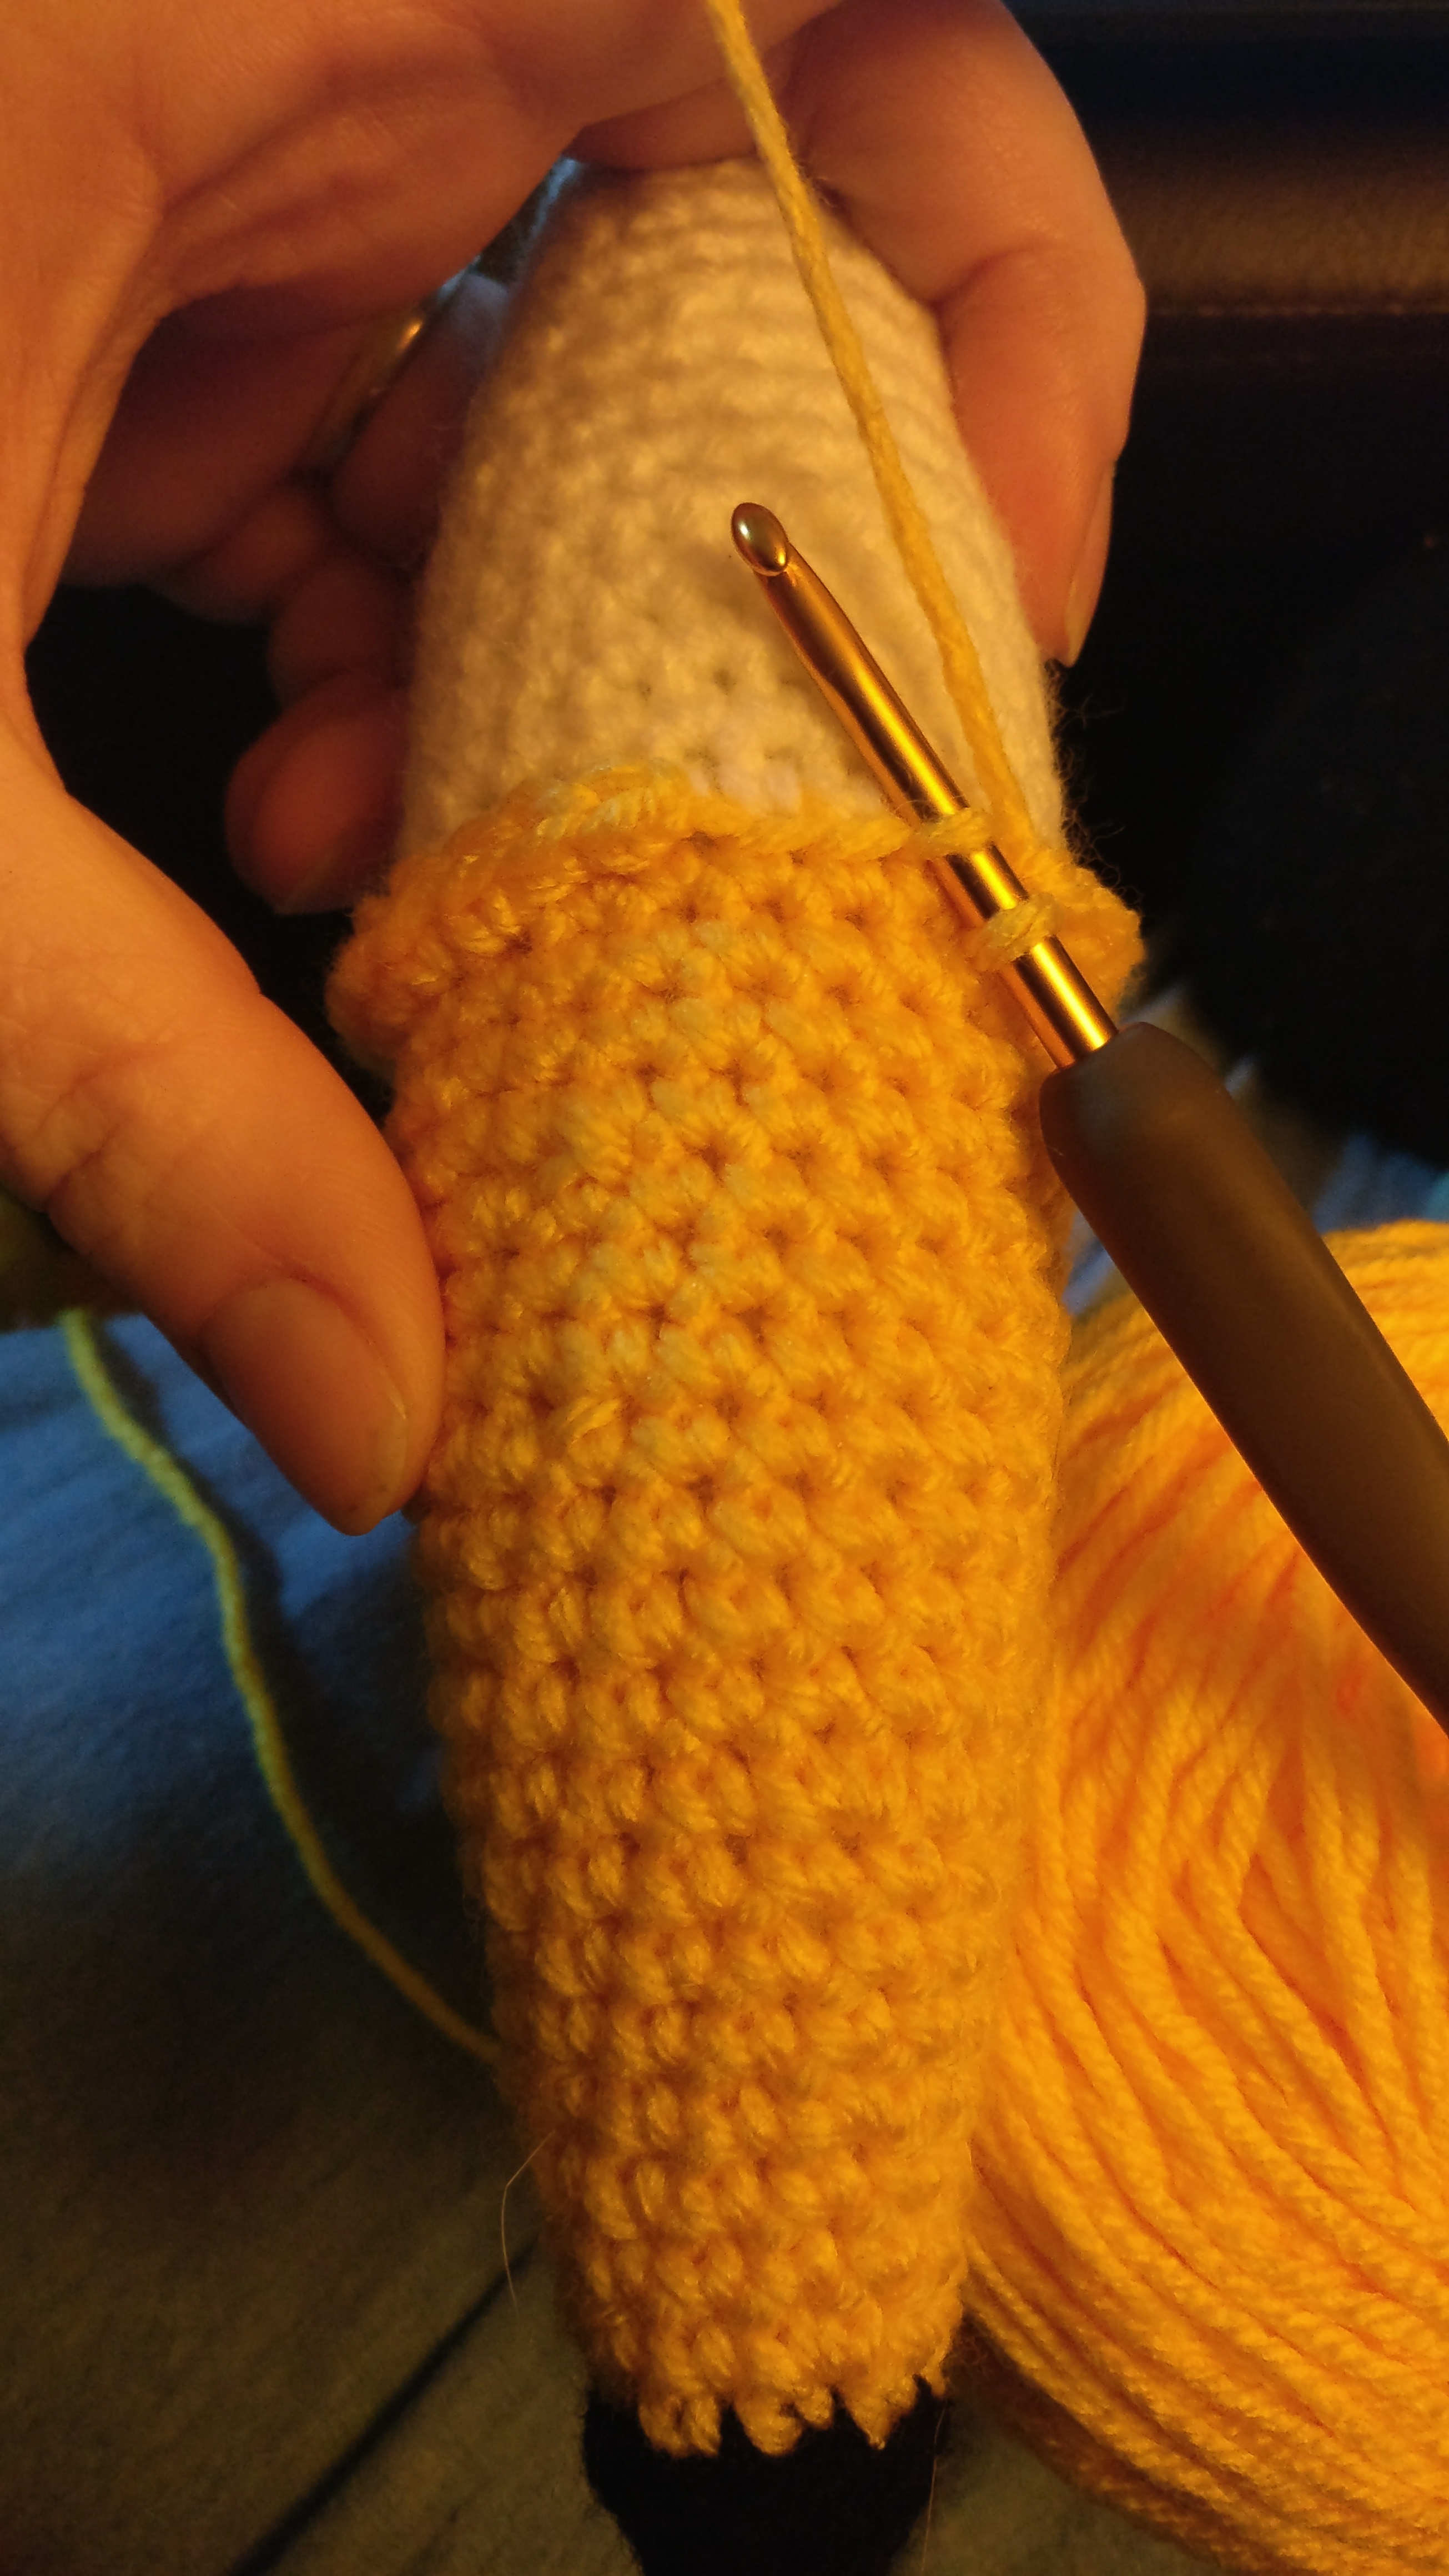
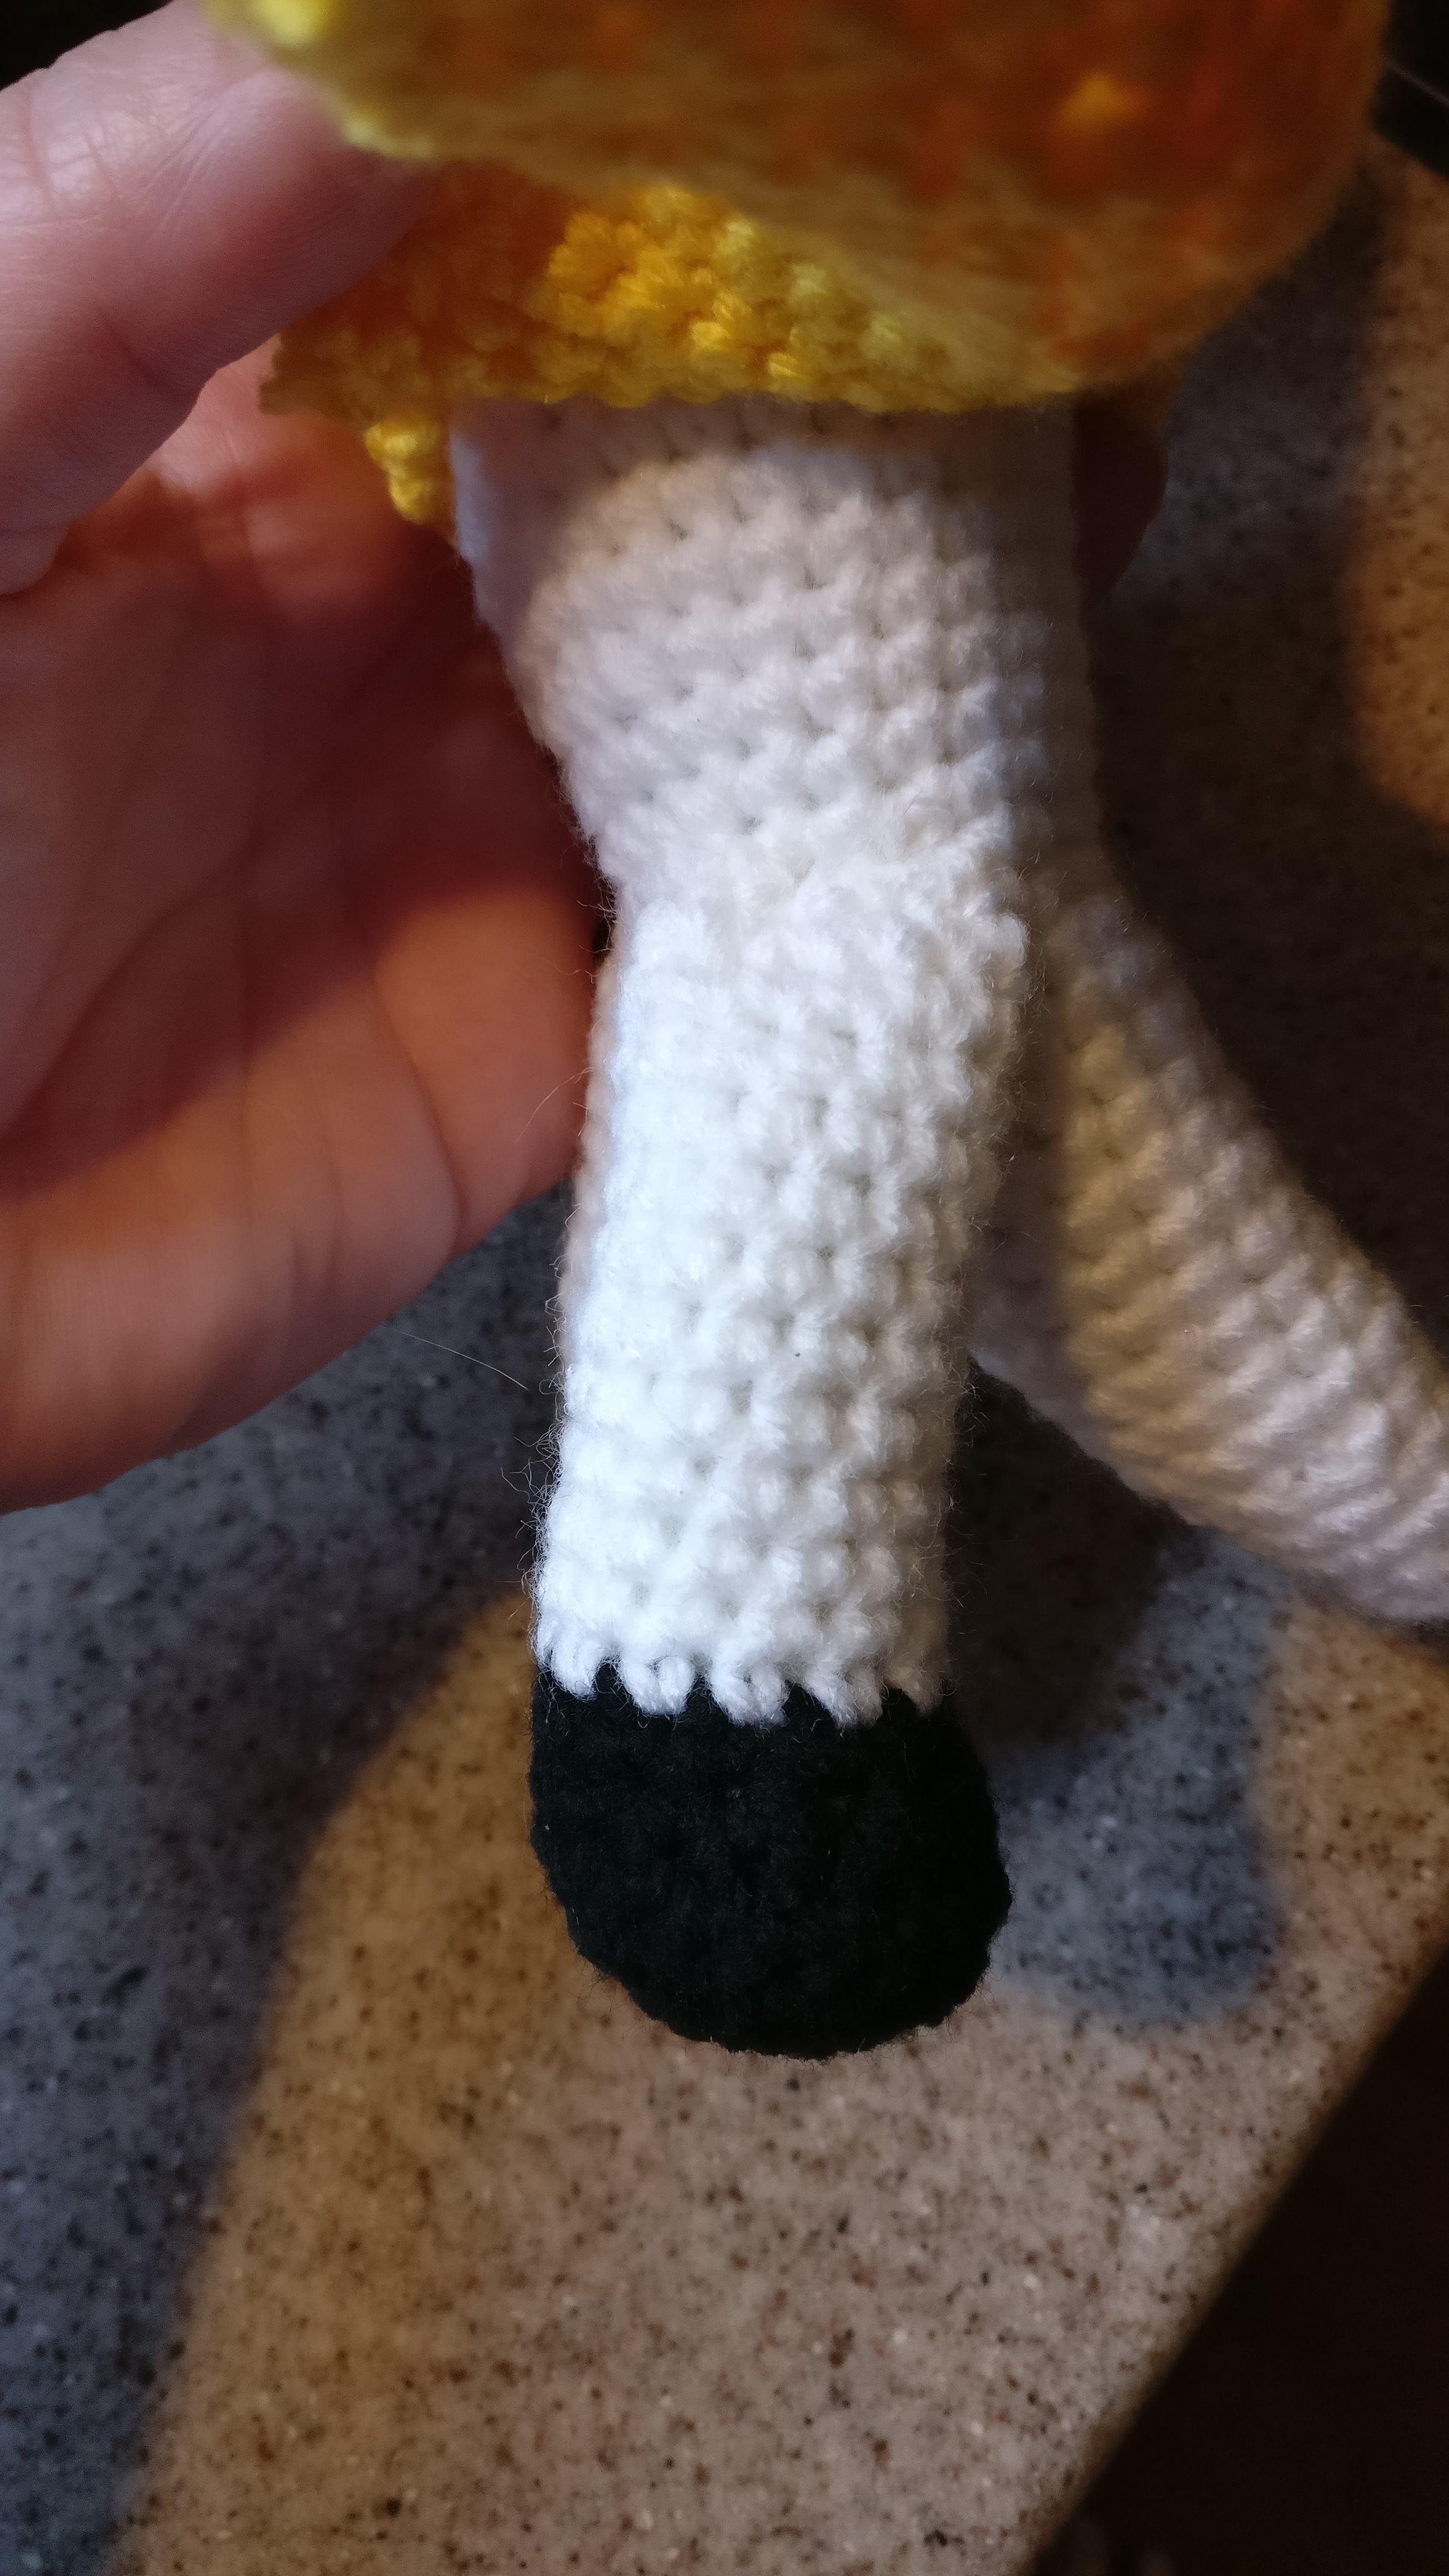
sc around, change to white and making sure to stuff as you go. Keep it stuffed pretty tightly as it will help him stand, but try to keep the bottom fairly flat.
sc around for 12 rounds, bind off leaving a long tail to sew.
To sew on, keep in mind that the legs go down with the bottom of the banana facing out. I found it best to turn the banana to the side, count down about 10-12 white rows, pinch the top of the legs closed and then sew onto the banana. Some people find it easier to pin in place before sewing and it might make it easier to line them up better.
Arms, make two and make them both before sewing as it makes it easier to get an even amount of stuffing in each.
with yellow
6 sc in magic circle
*inc* around
sc around
8 sc, 3 dc in same st, 3 sc (make sure to push the dc outwards to create a thumb)
8 sc, dec over the next 3 dc, 3 sc
*dec, sc* around and stuff the hand to hold shape and stuff very lightly as you go so it bends easily
sc around for 10 rounds.
To sew on, pinch the top of the arms closed and sew it onto the yellow part of the banana about 3-4 rows above the peal. Make sure to have the thumbs facing up. I did sew at a slight slant from back to front, but that’s me. I then ran the yarn on the inside of the arms to the hands to sew the peal into place so it look like he is holding open the peals.
Finally take the black yarn and sew on the face and eyebrows and you’re done!
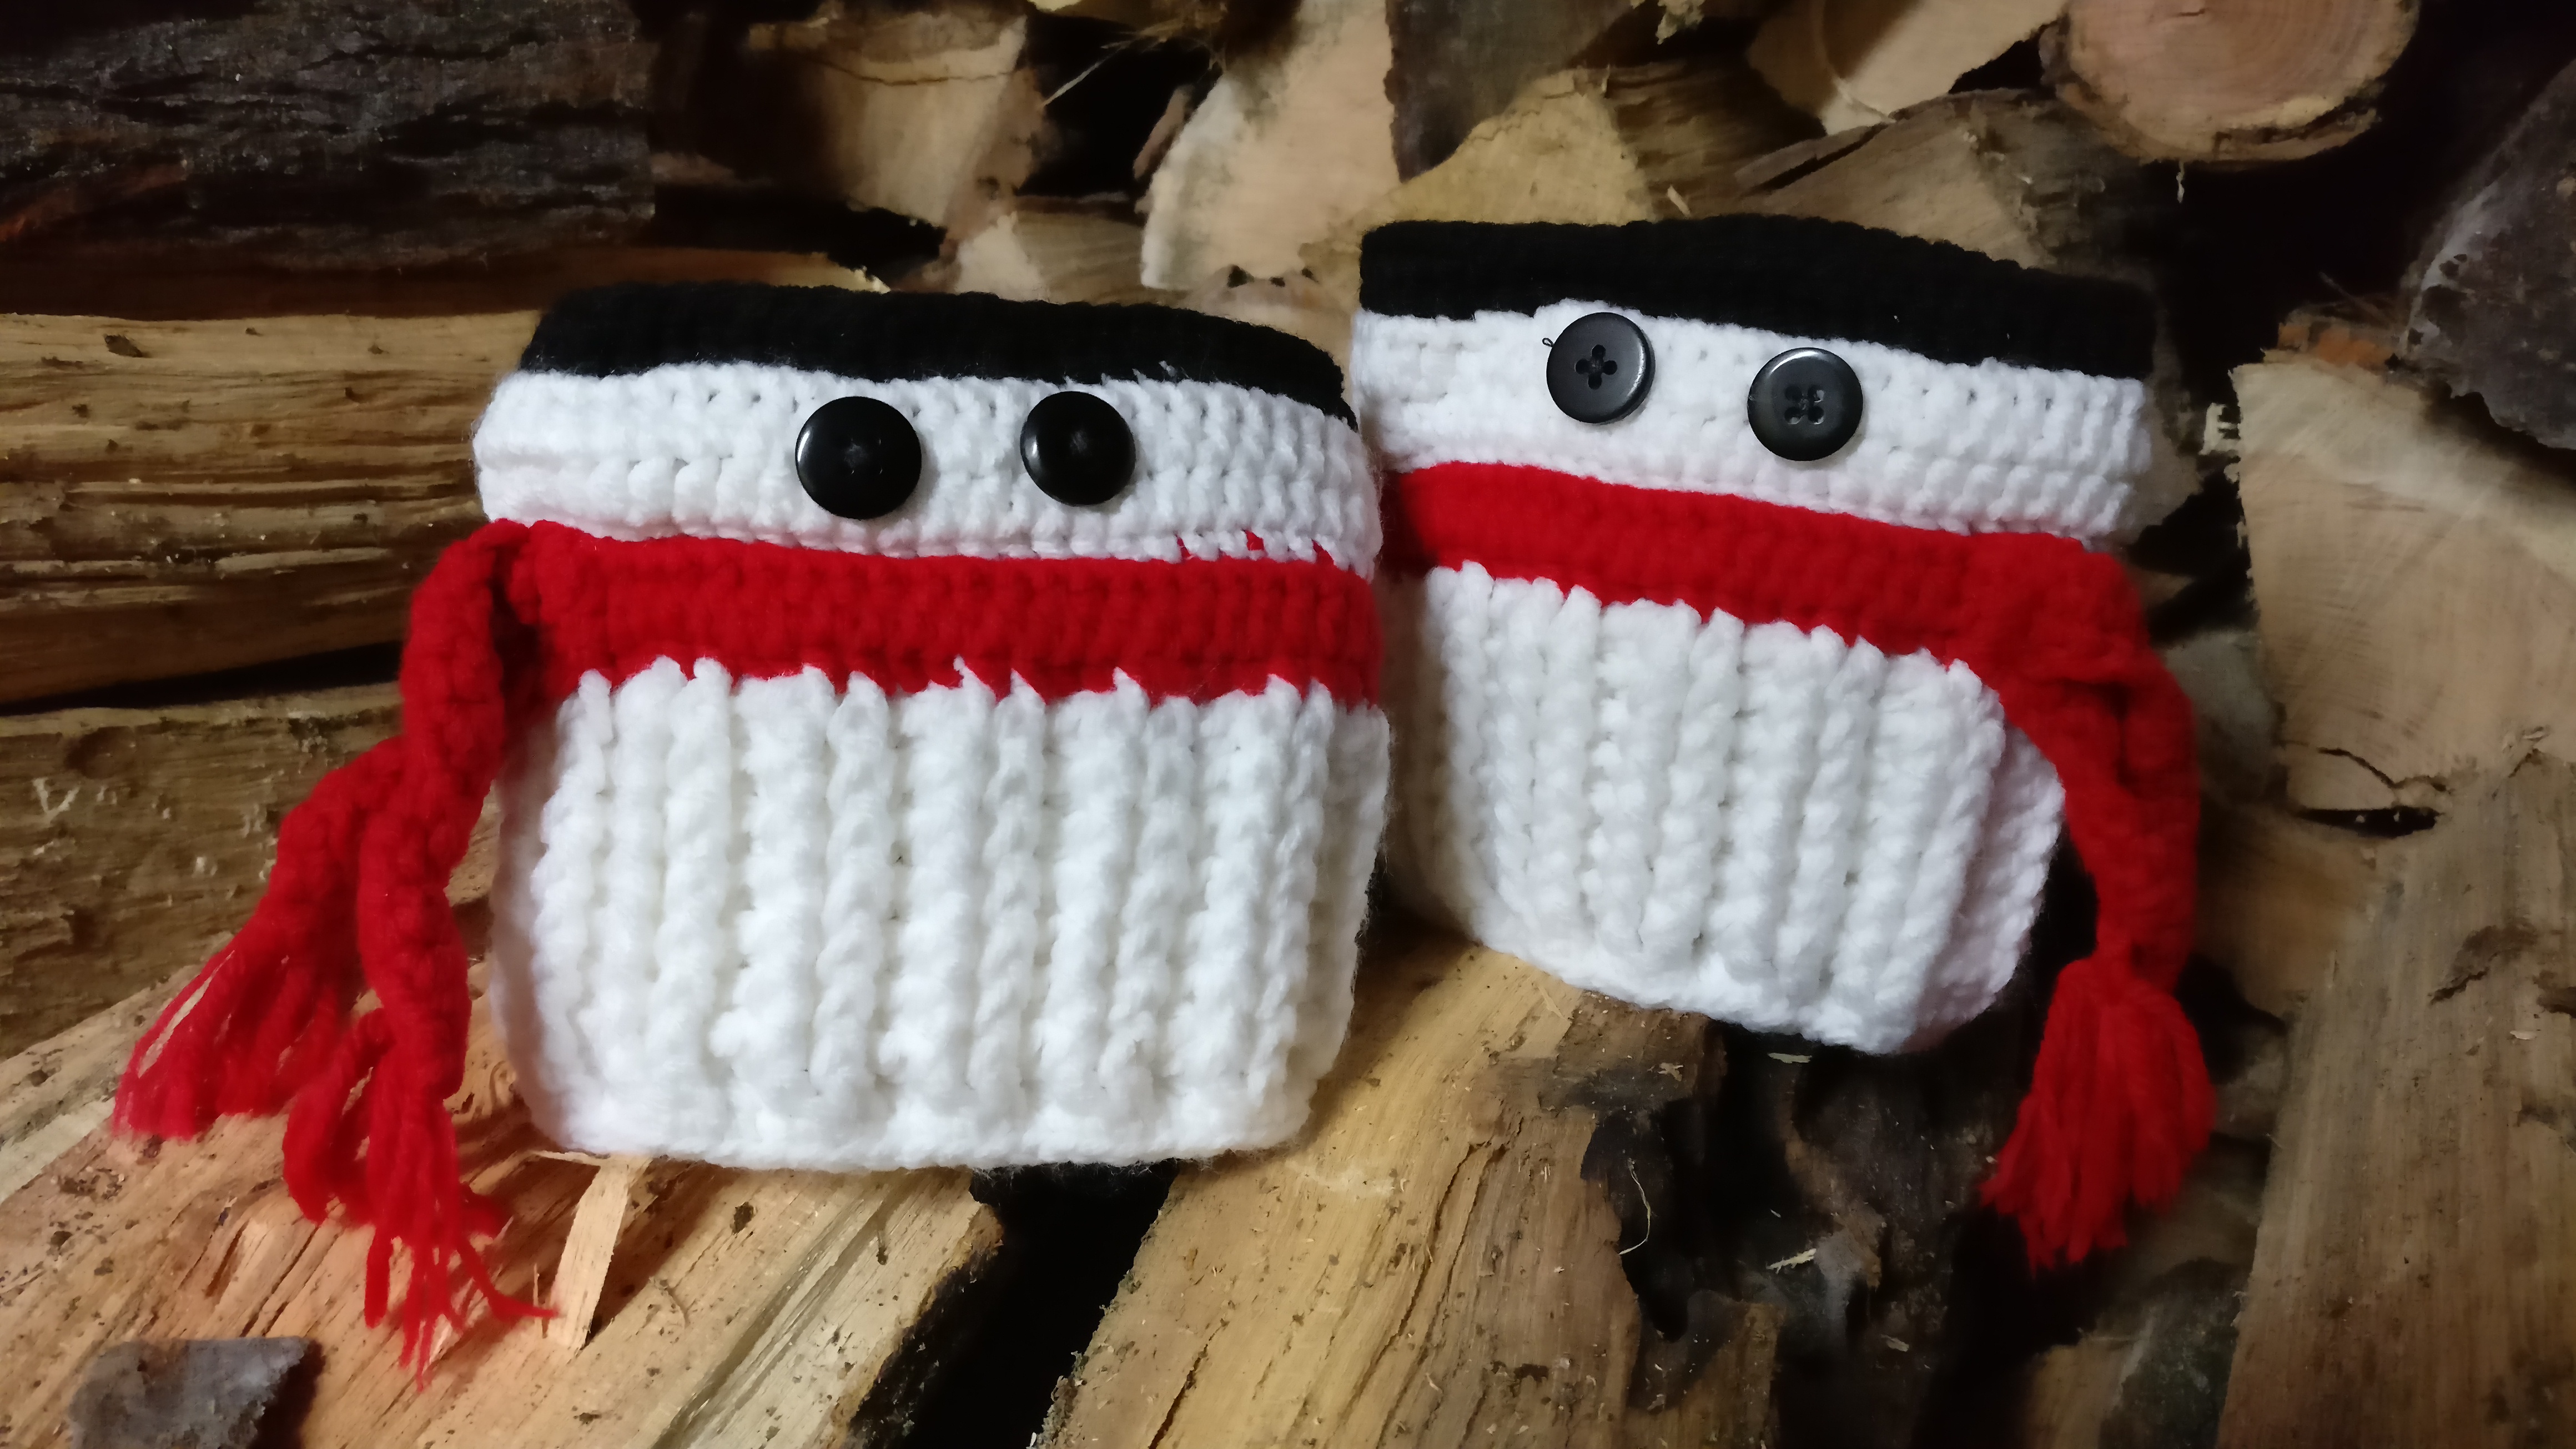
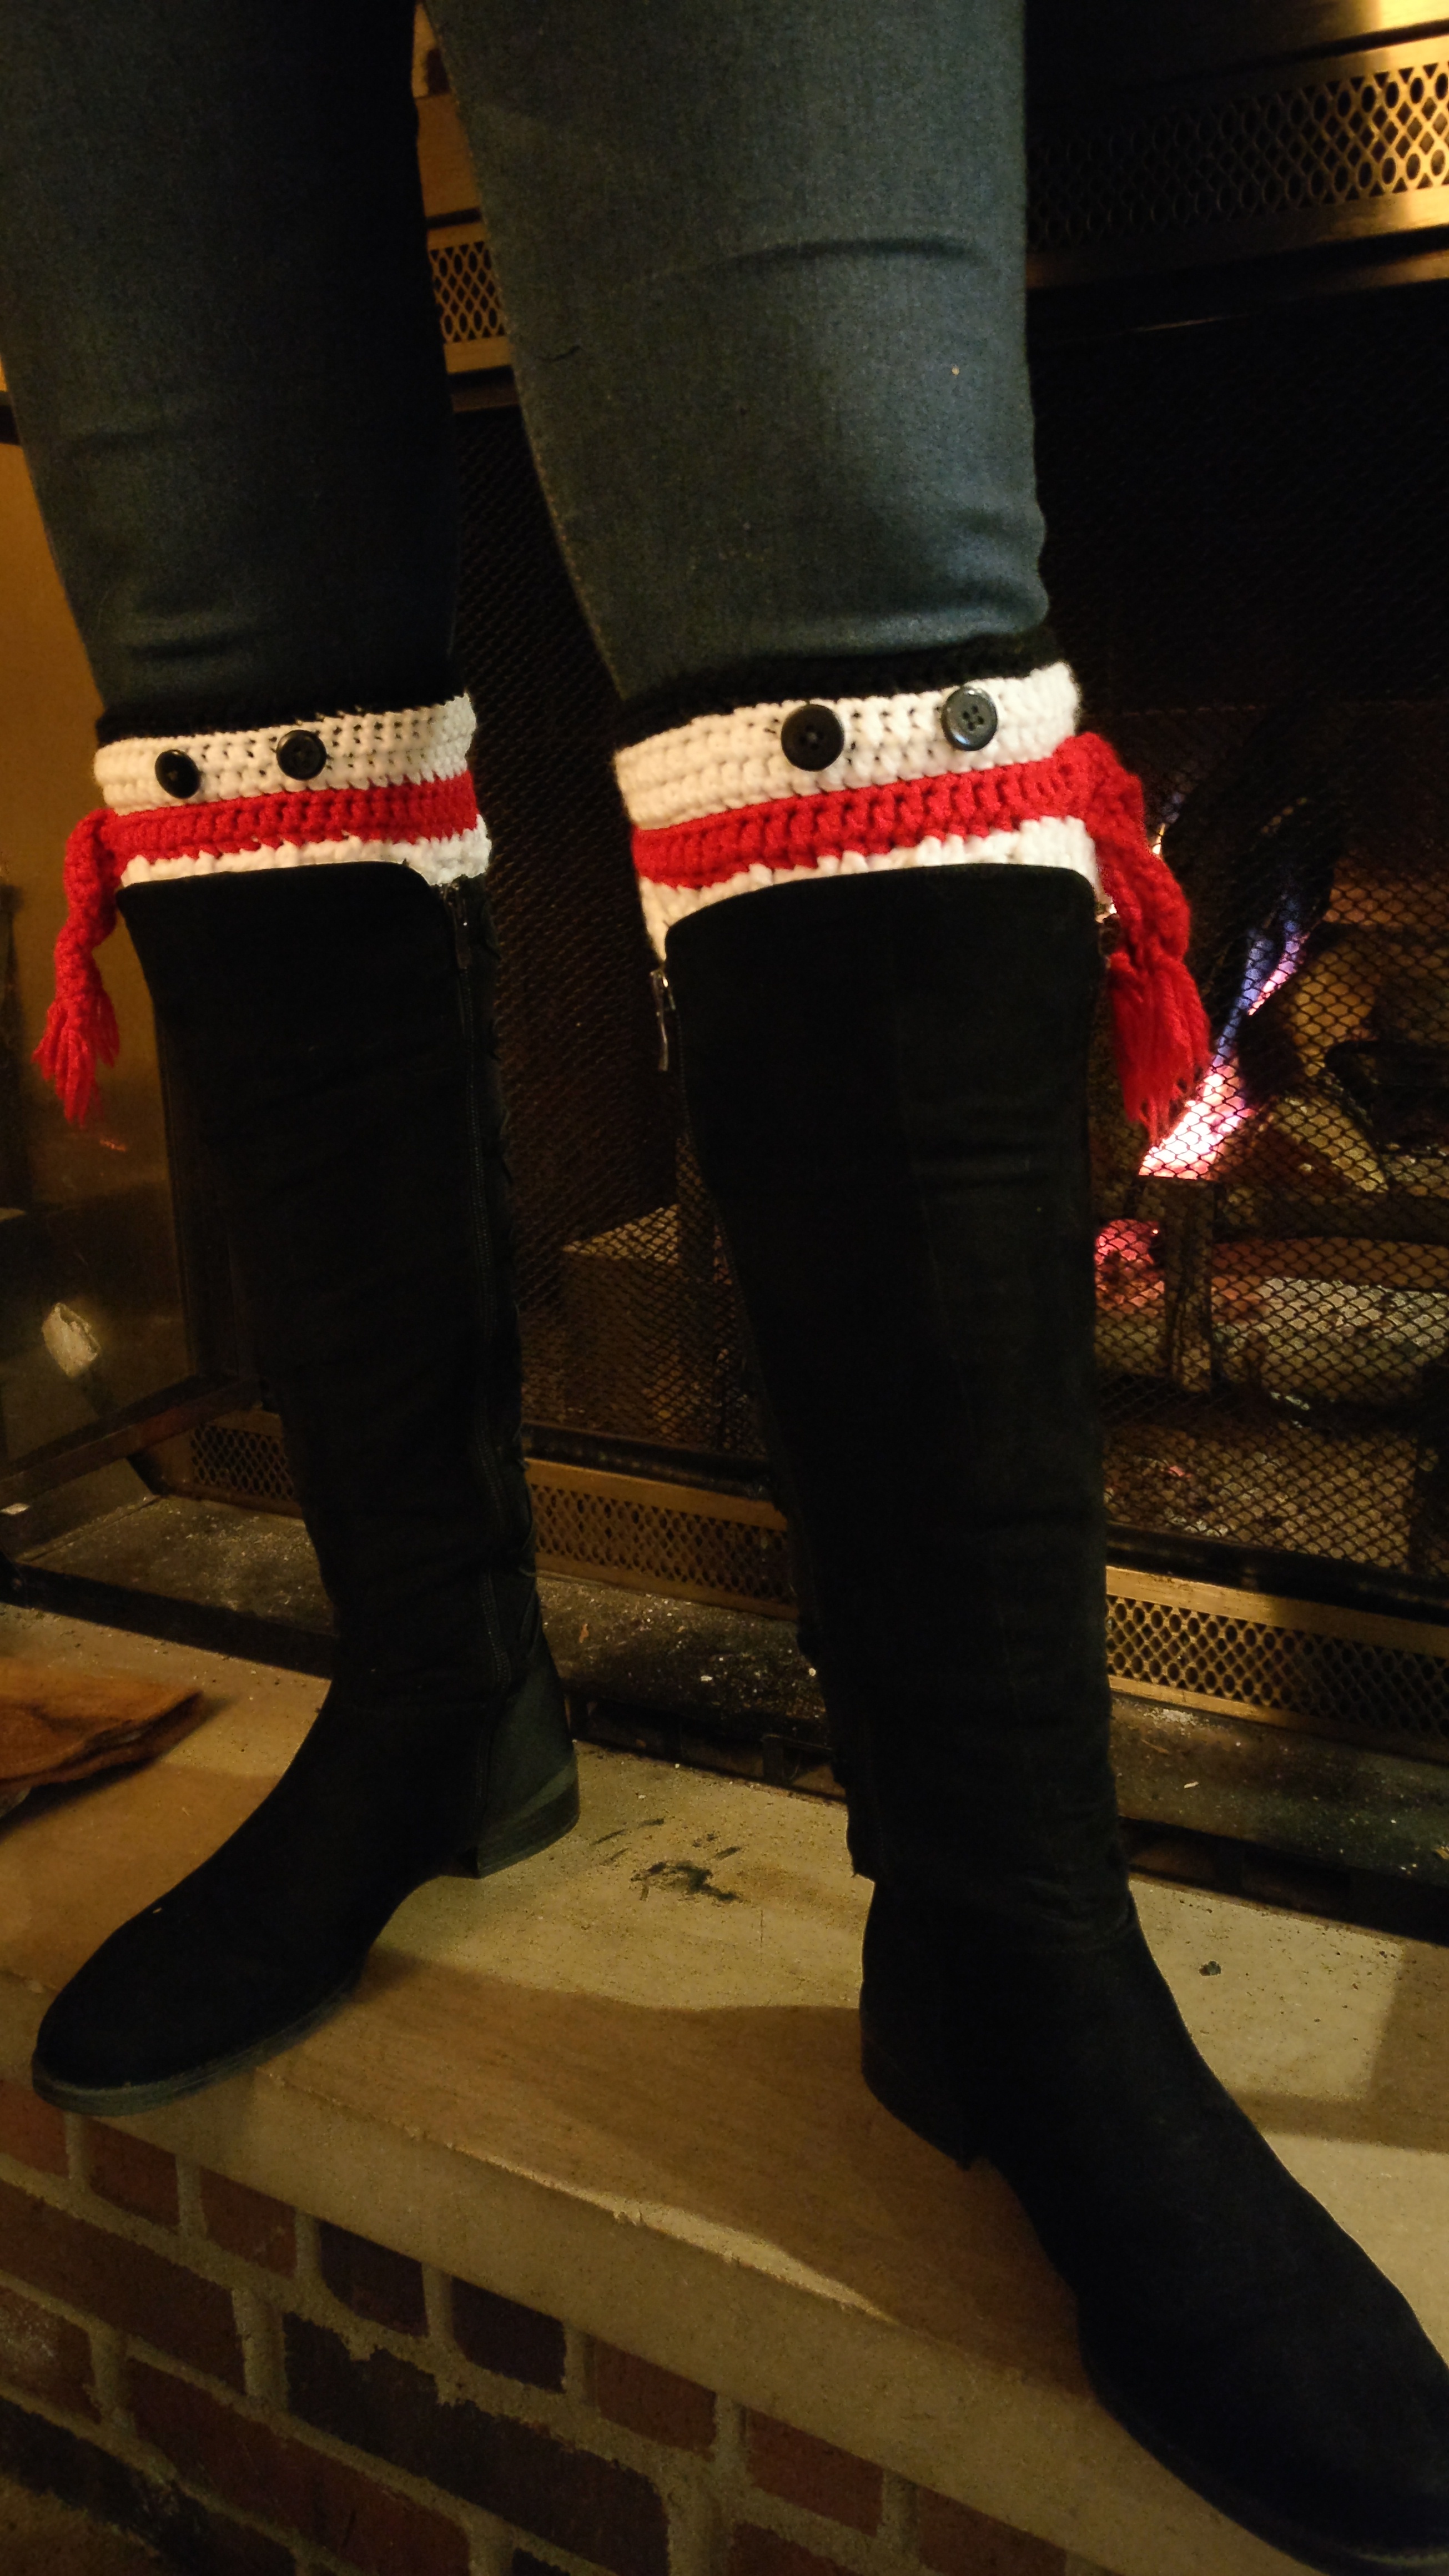
As you may have noticed boot cuffs seem to be everywhere. I personally don’t know the purpose except looks, but that’s just how my mind works. They are quite adorable though… Anywho, I got a request for the Santa boot cuffs (want a great free pattern that’s easy to read and follow, go here: http://www.cuppastitches.com/2017/08/santa-boot-cuffs.html) and I made them up. My problem, I HATE working in the back stitch. I don’t know why as the look is great, but I feel like I’m working forever and going nowhere. So during all the time it took me to make the cuffs I was thinking about a different way to make them… and that’s how I came to make these. Plus, I like snowmen better and it seems to me you could wear them longer in the winter season than Santa ones, but that’s my practical mind again…
Note: Keep in mind, I tend to crochet tightly as I have been told. I have included measurements so you can adjust as needed if you want.
Typical measurements for sizing: Small 13 inches, Medium 15 inches, Large 17 inches. These boot cuffs allow for a decent stretch as well.
I Hook
Red Heart with Love yarn in white, black and red (or contrasting color for scarf)
4 total black buttons (I used 3/4 inch)
black thread to sew on the eyes
Make 2, obviously for a pair, with the ends of the scarf facing different directions as mentioned later
Ch an even amount of stitches, I did 52 for the medium size
ch 2 (beginning ch never count as a st) dc in each st around, sl st to beginning
ch 2 *fpdc (front post double crochet) for 2 st, bpdc (back post double crochet) for 2 st* sl st to beginning fpdc (not the ch 2)
ch 2 fpdc in fpdc and bpdc in bpdc from previous round. Repeat this round 5 more times. This gave me a height of roughly 3 inches.
switch to red or scarf color then ch 1 and fpsc (front post single crochet) in each st around, sl st to beginning
ch 1, hdc in each st, sl st to beginning
ch 1, sc in each st, sl st to beginning change back to white (red part here is 3/4 inch)
ch 1 and fpsc (front post single crochet) in each st around, sl st to beginning
ch 1, hdc in each st, sl st to beginning
ch 1, hdc in each st, sl st to beginning
ch 1, sc in each st, sl st to beginning change to black (white part is just over an inch)
ch 1 and fpsc (front post single crochet) in each st around, sl st to beginning
ch 1, sc in each st, sl st to beginning and bind off (black part here is half an inch)
turn upside down and sc in white around the “bottom” of the cuff, sl st to beginning and bind off.
Weave in all ends.
Sew on the two button eyes in the top white space about 3-4 stitches apart.
To make the rest of the scarf:
In red or scarf color, ch 31 turn and sc in each st for a total of 30 and turn
ch 1, sc in each st for 2 rows, bind off. Don’t worry about weaving in these ends.
Now cut 6 lengths of about 6 inches in the scarf color. Tie or hook in like you do with crochet hair to the two ends of the scarf. Fold in half and sew onto your cuff, slightly to the side of where you put the eyes. Keep in mind that on one cuff should have the scarf ends to the left and one to the right.
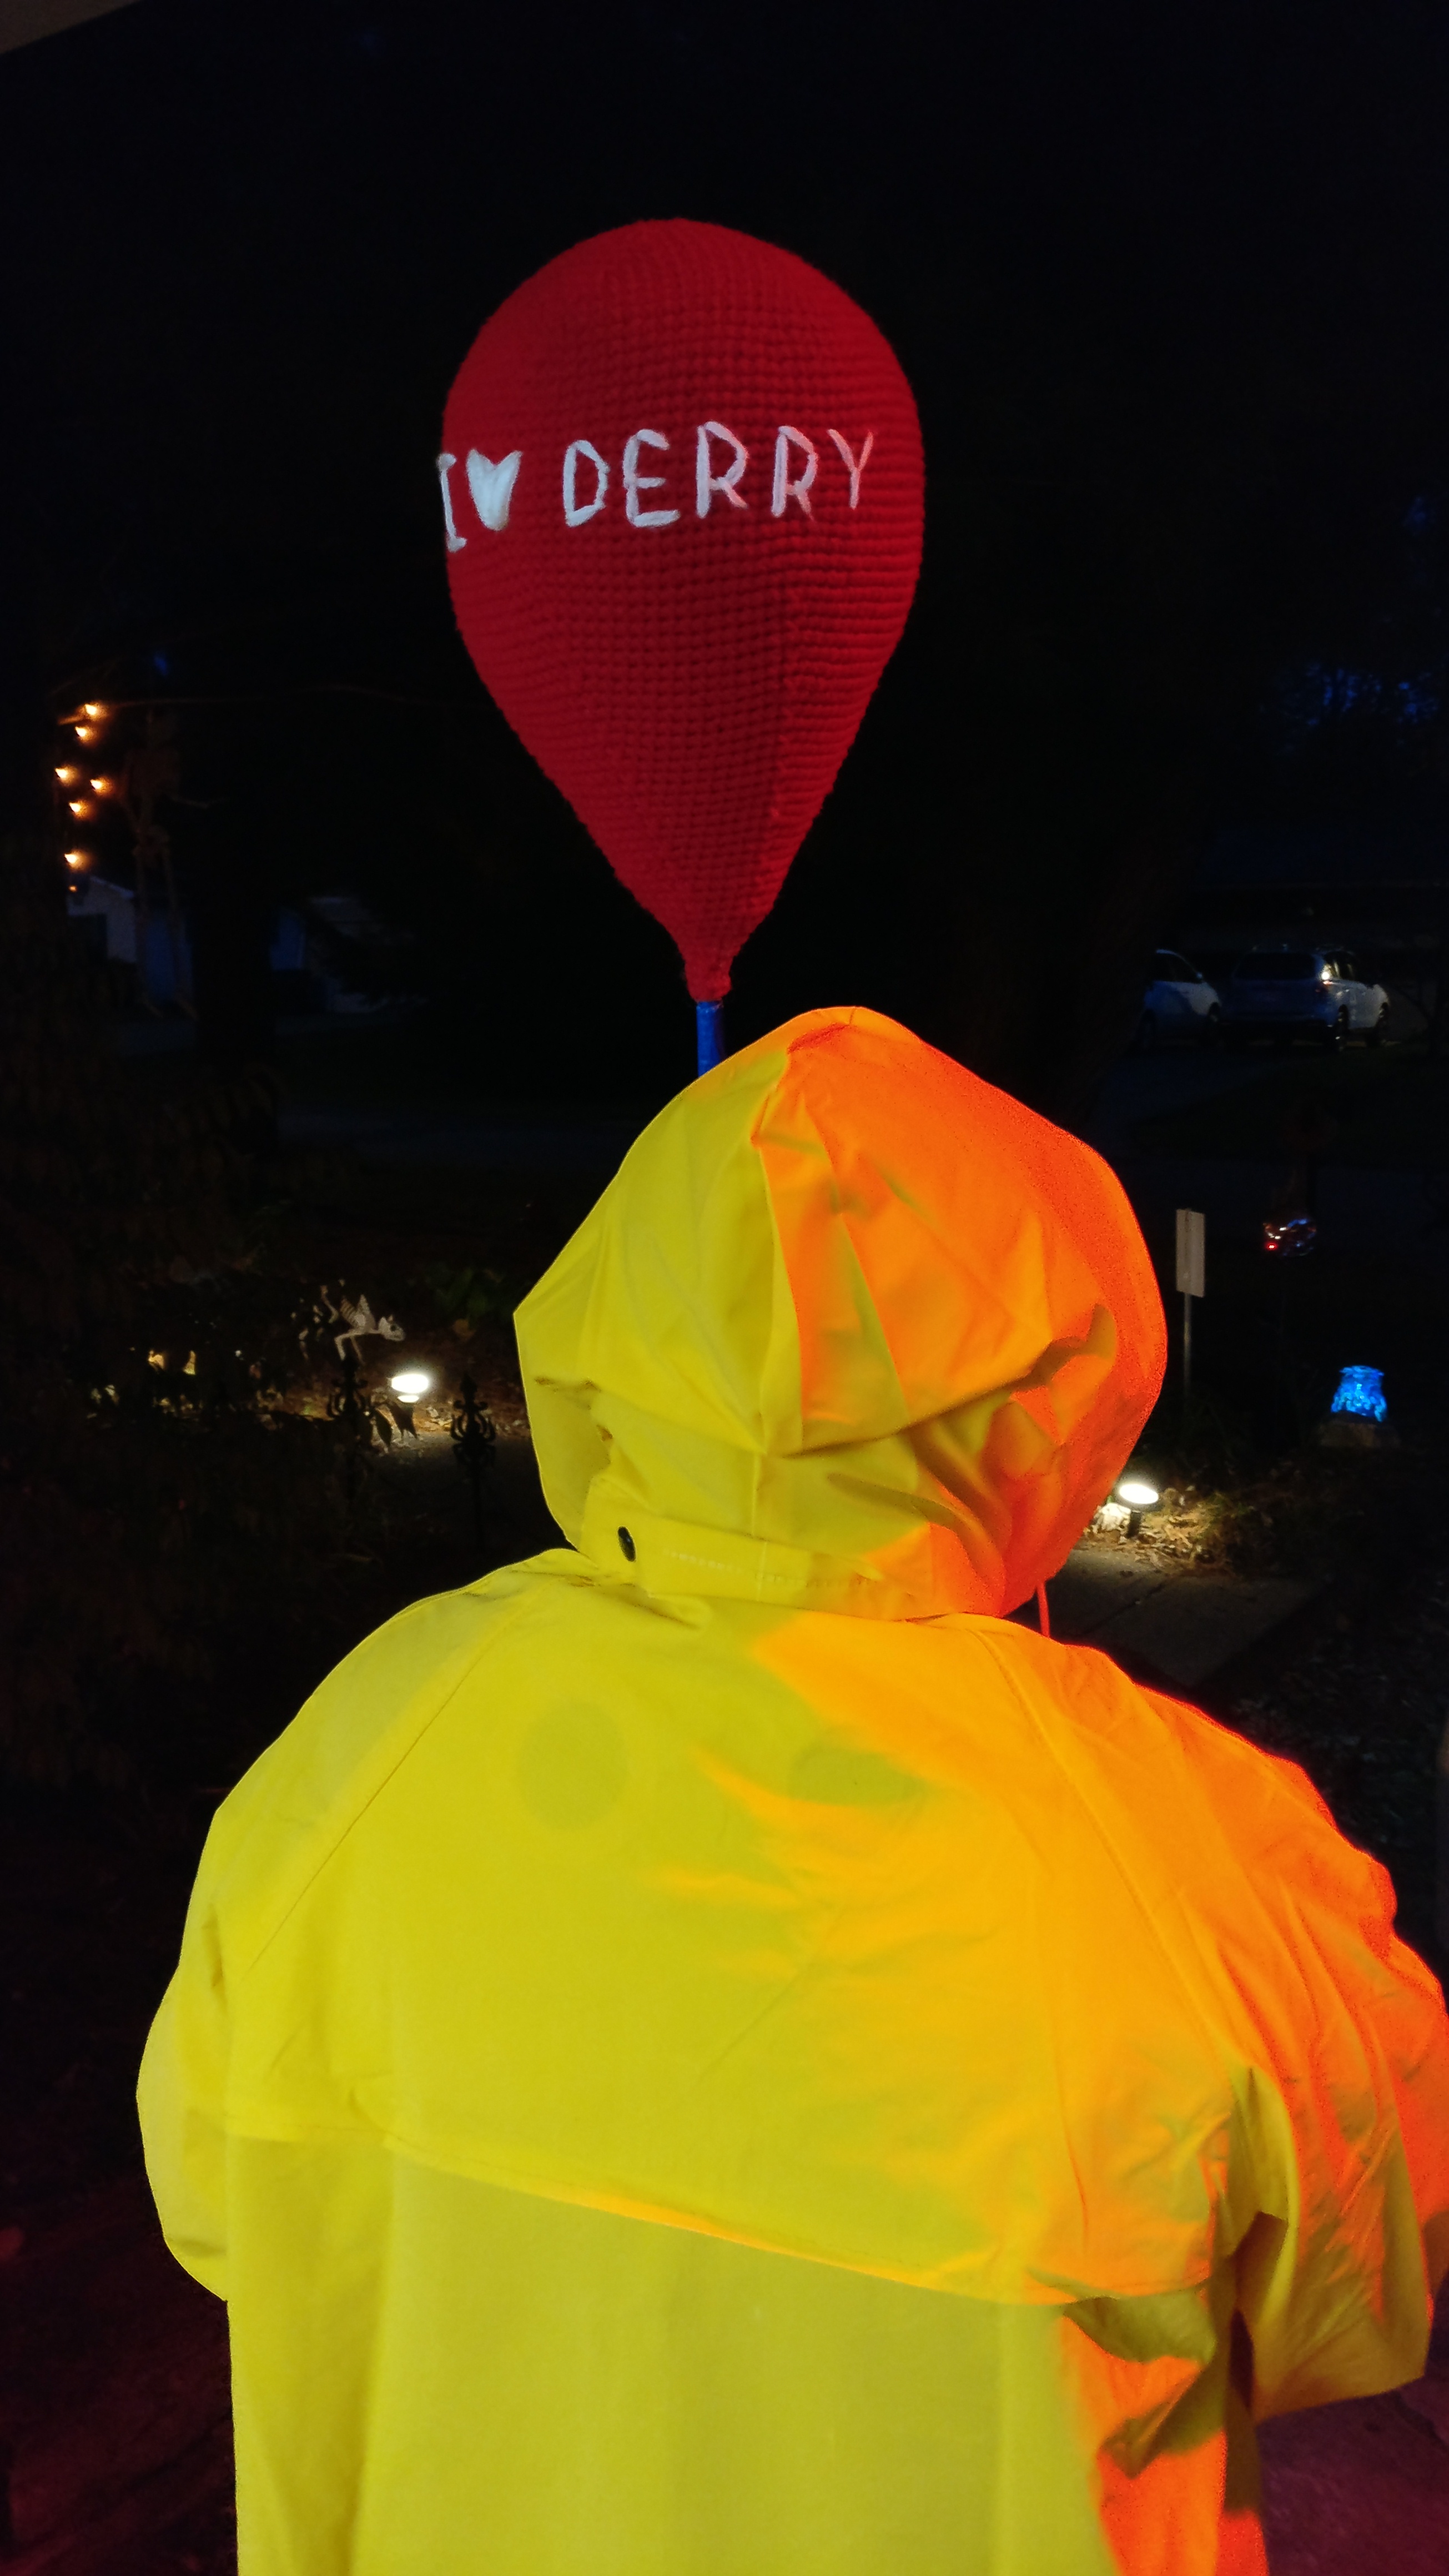
This year my son decided he wanted to be Georgie from Stephen King’s It. Great! Another easy costume to pull together! I had originally thought to make a paper mache balloon for him to carry (a real helium balloon was just asking to get let go and I so didn’t want to deal with that breakdown). Then I got more and more afraid that he would drop it and break it or that I wouldn’t be able to hold the balloon upright without making a hole in it… so I decided just to go ahead and make one! Of course there wasn’t a pattern readily available because how many people think to make a large balloon out of crochet? So, here’s my It balloon pattern…. written as a amigurumi style pattern.
Note: This balloon is big. Like adult head size. You could decrease the amount of increase rounds then decrease the sc and decrease, sc rounds by the exact same and it will work out fine.
Note: As I was making this it made me think that this would be awesome in blue or pink for a baby gift…
G hook or whatever you usually use to keep the polyfil from showing
worsted weight yarn in color of choice, I used red that I had in my stash (which feels like some scratchy Red Heart basic) and white for the lettering
polyfil
dowel of whatever length you want
Duck Tape (I had dark blue and not black so I just used that. Wrapping it around the dowel helps with the stability)
Super Glue (to keep the balloon from sliding)
option red ribbon (I plan on doing this after we use it for Halloween just in the attempt to keep at least one thing off his floor)
6sc in magic circle
*inc* around
*inc, sc* around
*inc, 2 sc* around
*inc, 3 sc* around
*inc, 4 sc* around
*inc, 5 sc* around
*inc, ,6 sc* around
*inc, ,7 sc* around
*inc, ,8 sc* around
*inc, ,9 sc* around
*inc, ,10 sc* around
*inc, ,11 sc* around
*inc, ,12 sc* around
*inc, ,13 sc* around
*inc, ,14 sc* around
*inc, ,15 sc* around
sc around for 15 rounds
*dec, 15 sc* around
sc around
*dec, 14 sc* around
sc around
*dec, 13 sc* around
sc around
*dec, 12 sc* around
sc around
*dec, 11 sc* around
sc around
*dec, 10 sc* around
sc around
*dec, 9 sc* around
sc around
*dec, 8 sc* around
sc around
*dec, 7 sc* around
sc around
*dec, 6 sc* around
sc around
*dec, 5 sc* around
sc around
*dec, 4 sc* around
sc around
Make sure you go ahead and stuff the balloon and insert the dowel. Try to get the dowel in just under a little bit of stuffing at the top of the balloon. Stuff around the dowel… The next few rows you will work around the dowel closing in the balloon and keep stuffing as you go. It’s awkward, but it works.
*dec, 3 sc* around
sc around
*dec, 2 sc* around
sc around
*dec, 1 sc* around
sc around
dec around
sc around
sc around
bind off, weave in end
This is where the super glue comes in. Drop a few drops to where you closed in. This keeps the balloon from sliding off the dowel.
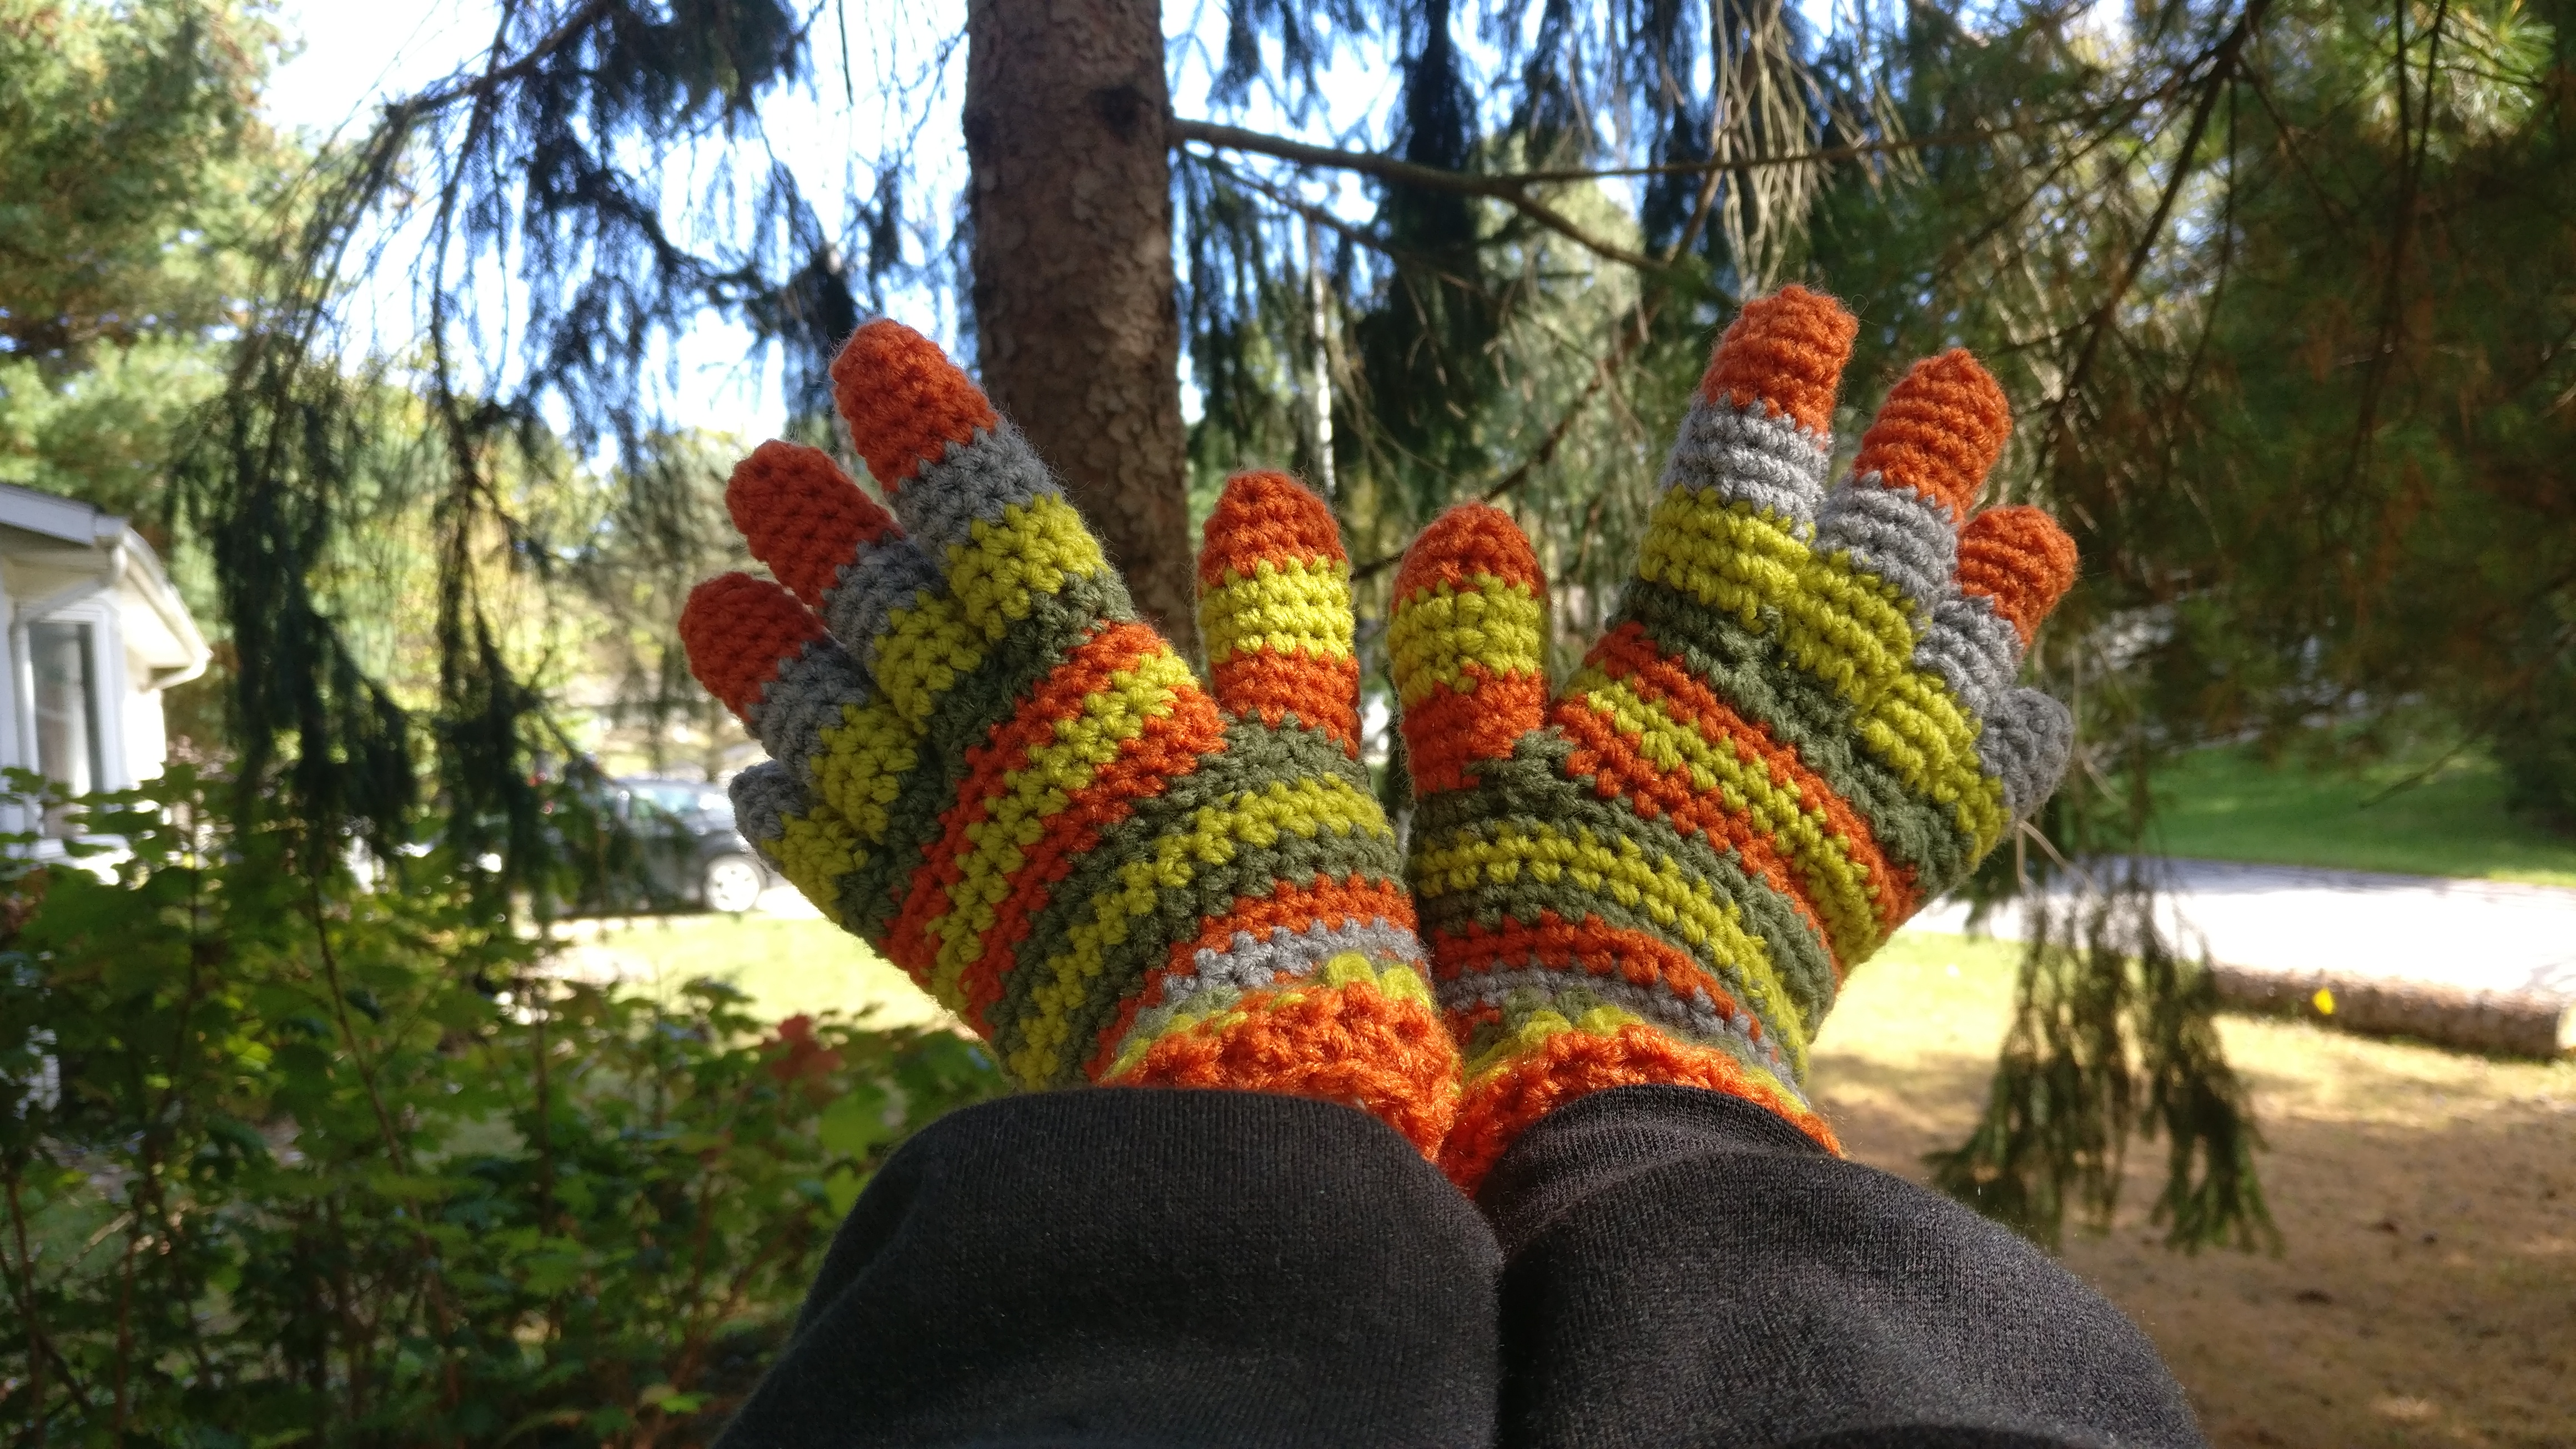
As my daughter decided to dress up as Coraline this year for Halloween. I was thrilled! Not only have we always loved the movie, but it is an easy costume to pull together. Though she mentioned she wanted some gloves like the ones from the movie. I originally thought it would be no problem. The movie has been out for a while, I won’t have a problem finding the pattern. Yeah, in part I could… for knitting. Now if I even attempted to knit these she might get them in a few years. So, here’s my humble attempt to recreate them in crochet.
Size I hook (now, I do tend to crochet a bit tight as some others have pointed out. These gloves are meant to fit what I would consider a small/medium woman.) worsted weight yarn in the colors of your choice/ I used orange, medium gray, olive green and a yellow green that was in my stash… great time to stash bust!
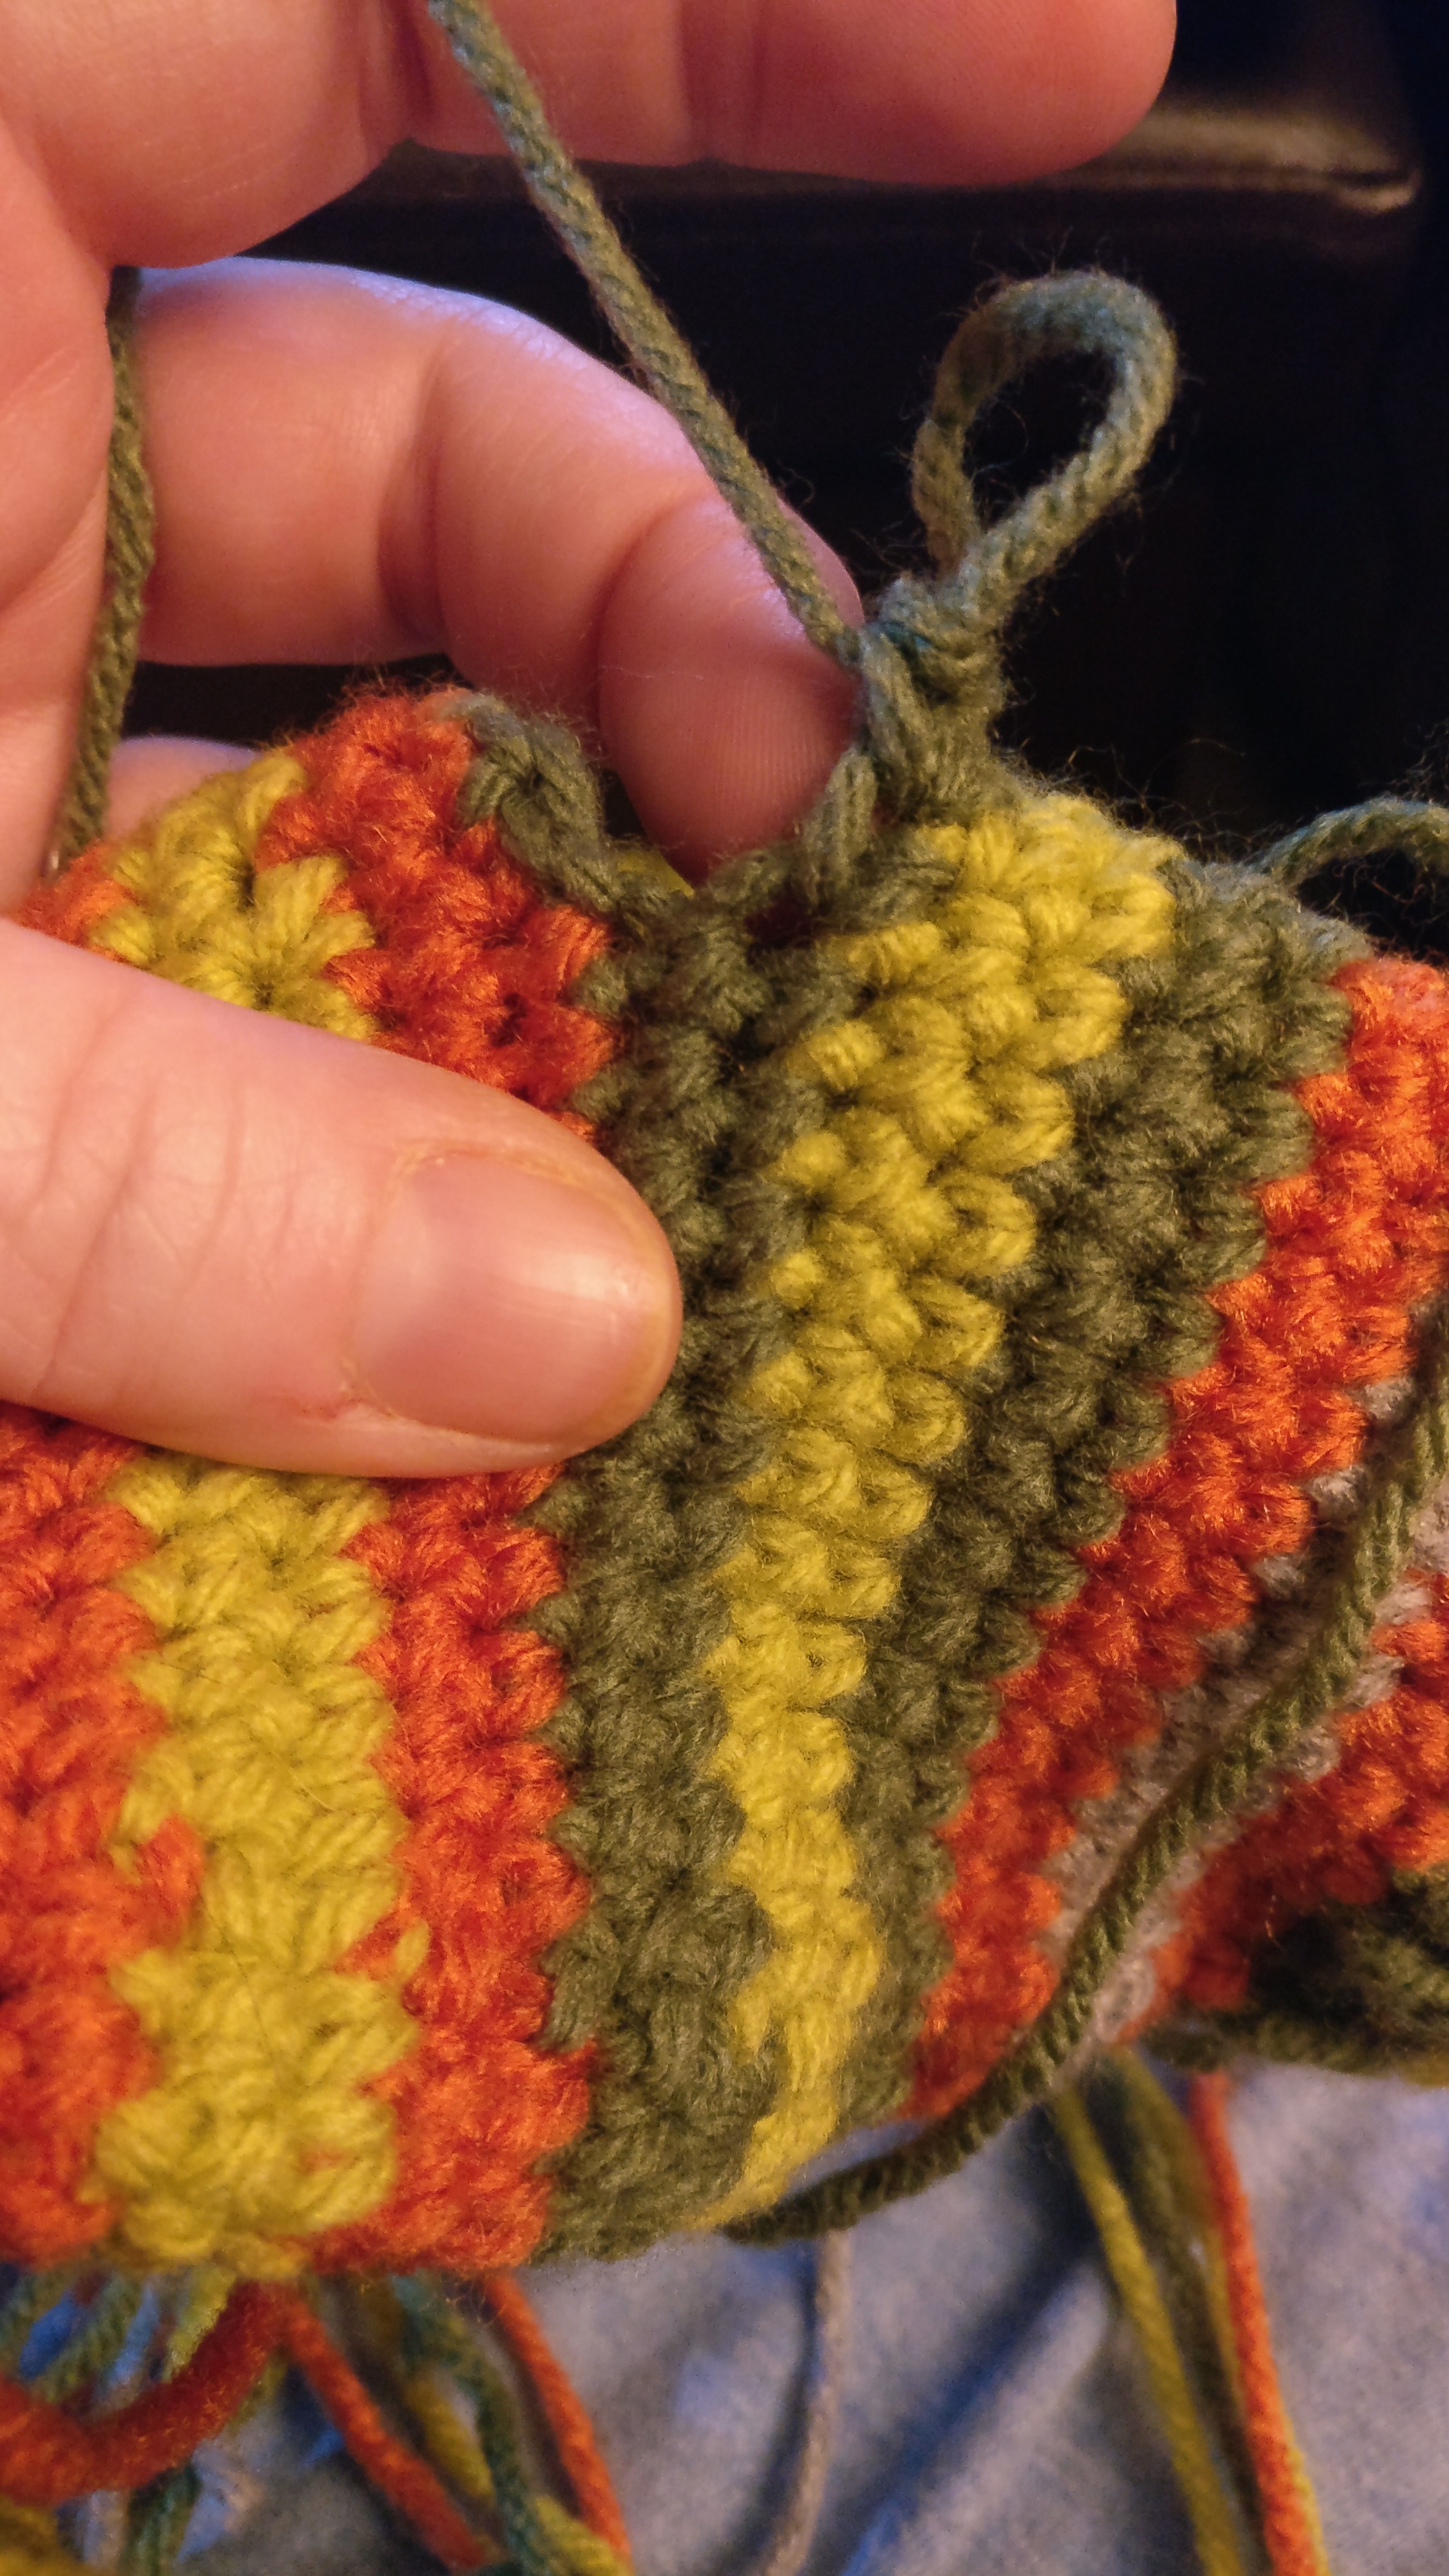
Notes: Note on sizing. This pattern worked for me to make my daughter a pair of gloves. I tried them on her multiple times, much to her annoyance. She does have small woman size hands. They would never have fit my hands. NEVER. I also don’t know how well they would fit a smaller child since I don’t have one to try them on. This was my first foray into making gloves honestly. Note on color changes. I found it easier to change colors and then let the ends fall to the FRONT of your work. You so don’t want to have to try and turn the glove inside out to sew in the ends later. I didn’t carry the yarn as I usually would because I was afraid of any extra loops for fingers to get caught on. Most likely just my mind. Note on fingers. When pulling up the yarn to start another finger I found that if I left an extra long beginning ‘end’ then it made it easier to sew the webbing of the fingers together later. Make two, they are interchangeable on the sides… or make one. Who am I to tell you what to do?
Cuff: RND 1: Starting with orange, 25 fsc (foundation single crochet or ch 25 and a round of sc), sl st to join. This measured 8″. RND 2: ch 1(doesn’t count for a stitch), hdc around, sl st to join RND 3: change to yellow green, ch 1, fphdc (front post half double crochet x2 stitches, bphdc (back post half double crochet) x2 around and ends with a single fphdc and sl st to join RND 4: ch 1, fphdc in fphdc, bphdc in bphdc, end with single fphdc and sl st to join RND 5-6: change to olive green and repeat RND 4 RND 7: change to orange and sc around, sl st to join RND 8: ch 1, inc (increase), 1 sc in next 10 sc, inc in next 2 sc, 1 sc in next 10 sc, inc in next 2 sc, sl st to join RND 9-10: change to gray and sc around then sl st to join RNDS 11-12: change to orange and sc around then sl st to join RNDS 13-14: change to olive green, ch 1 and sc around then sl st to join RNDS 15-16: change to yellow green, ch 1 and sc around then sl st to join RND 17: change to olive green, ch 1 and inc, sc 14, inc, sc to end, sl st to join RND 18: ch 1, sc in next 14 sc, ch 6 and skip the next 6, sc to the end, sl st to join RND 19: change to orange, ch 1, sc in next 14, sc in the next 6 ch, sc to the end, sl st to join RND 20: ch 1, sc around, sl st to join RND 21: change to yellow green, ch 1, sc next 12, dec (decrease), sc in next 5, dec, sc to the end, sl st to join RND 22: ch 1, sc around, sl st to join RND 23-24: change to orange, ch 1, sc around, sl st to join
PINKIE: RND 1 – change to olive green, ch 1, 1 sc in next 7 sc, ch 3, sl st to first sc of this round RND 2 – ch 1, sc in next 7 and in each ch, sl st to join RNDS 3-5: change to yellow green, ch 1 and sc around, sl st to join RNDS 6-8: change to gray, ch 1 and sc around, sl st to join RND 9: ch 1, dec x5, sl st and cut yarn leaving a long end to weave through last stitches to pull close
RING FINGER Using olive green pull up a loop in the last worked stitch from the pinkie, the 7th stitch from the beginning, then pull up another stitch immediately in the 8th stitch then pull through both loops on the hook. RND 1 – Ch 1, sc in the 8th, 9th, and 10th st, ch 3, 1 sc in the third st from the baby finger on the other side of glove and the next stitch. Dec from the 3rd stitch and the first st of the backside of the pinkie, ch 3, sl st to join(make sure it is to the top of the first stitch and not the first loop) RND 2 – ch 1, sc in each st and ch around, sl st to join RNDS 3-5: change to olive green and ch 1, sc around, sl st to join RNDS 6-8: change to gray and ch 1, sc around, sl st to join RNDS 9-11: change to orange and ch 1, sc around, sl st to join RND 12: ch 1, *dec, sc* x4, sl st to join RND 13: ch 1, dec around, sl s to join leaving a long end to close
MIDDLE FINGER Using olive green pull up a loop in the last worked stitch from the pinkie, the 10th stitch from the beginning, then pull up another stitch immediately in the 11th stitch then pull through both loops on the hook. RND 1 – Ch 1, sc in the 11th, 12th, and 13th st, ch 3, 1 sc in the third st from the ring finger on the other side of glove and the next stitch. Dec from the 3rd stitch and the first st of the backside of the ring finger, ch 3, sl st to join(make sure it is to the top of the first stitch and not the first loop) RND 2 – ch 1, sc in each st and ch around, sl st to join RNDS 3-5: change to olive green and ch 1, sc around, sl st to join RNDS 6-8: change to gray and ch 1, sc around, sl st to join RNDS 9-12: change to orange and ch 1, sc around, sl st to join RND 13: ch 1, *dec, sc* x4, sl st to join RND 14: ch 1, dec around, sl s to join leaving a long end to close
INDEX FINGER Using olive green pull up a loop in the last worked stitch from the middle finger, then pull up another stitch immediately in the next stitch then pull through both loops on the hook. RND 1 – Ch 1, sc in next 4, inc, sc in next 3, Dec from the next stitch and the first st of the backside of the middle finger, ch 3, sl st to join(make sure it is to the top of the first stitch and not the first loop) RND 2 – ch 1, sc in each st and ch around, sl st to join RNDS 3-5: change to olive green and ch 1, sc around, sl st to join RNDS 6-8: change to gray and ch 1, sc around, sl st to join RNDS 9-11: change to orange and ch 1, sc around, sl st to join RND 12: ch 1, *dec, sc* x4, sl st to join RND 13: ch 1, dec around, sl s to join leaving a long end to close
THUMB Join olive green at the first skipped stitch for the thumb. RND 1 – ch 1 and sc in the next 6 of the skipped stitches. Place hdc dec using the st on each side of the ‘V’ of the thumb, space 6 sc across the back of the ch, hdc dec in the ‘V’ then sl st to join
RNDS 2-4: change to orange, ch 1, sc around, sl st to join RNDS 5-7: change to yellow green, ch 1, sc around, sl st to join RNDS 8-9: change to orange, ch 1, sc around, sl st to join RND 10: ch 1, *dec, sc* x4, dec, sl st to join RND 11: ch 1, dec around, sl st to join leaving a long end to close
Now do a sc round at the bottom/beginning of the glove to make it look more finished. I do prefer to crochet in the second available hole down, not what would be the back of the chain.
Go put on a good show that you enjoy and get to weaving in the ends and complaining how much they better love these gloves and never want to go without them…. Don’t forget to sew the webbing together. Else that’s exactly where they are going to stick their fingers then look at you wondering what’s wrong and you are going to look at them swearing you thought they were smarter than that. That’s it then.
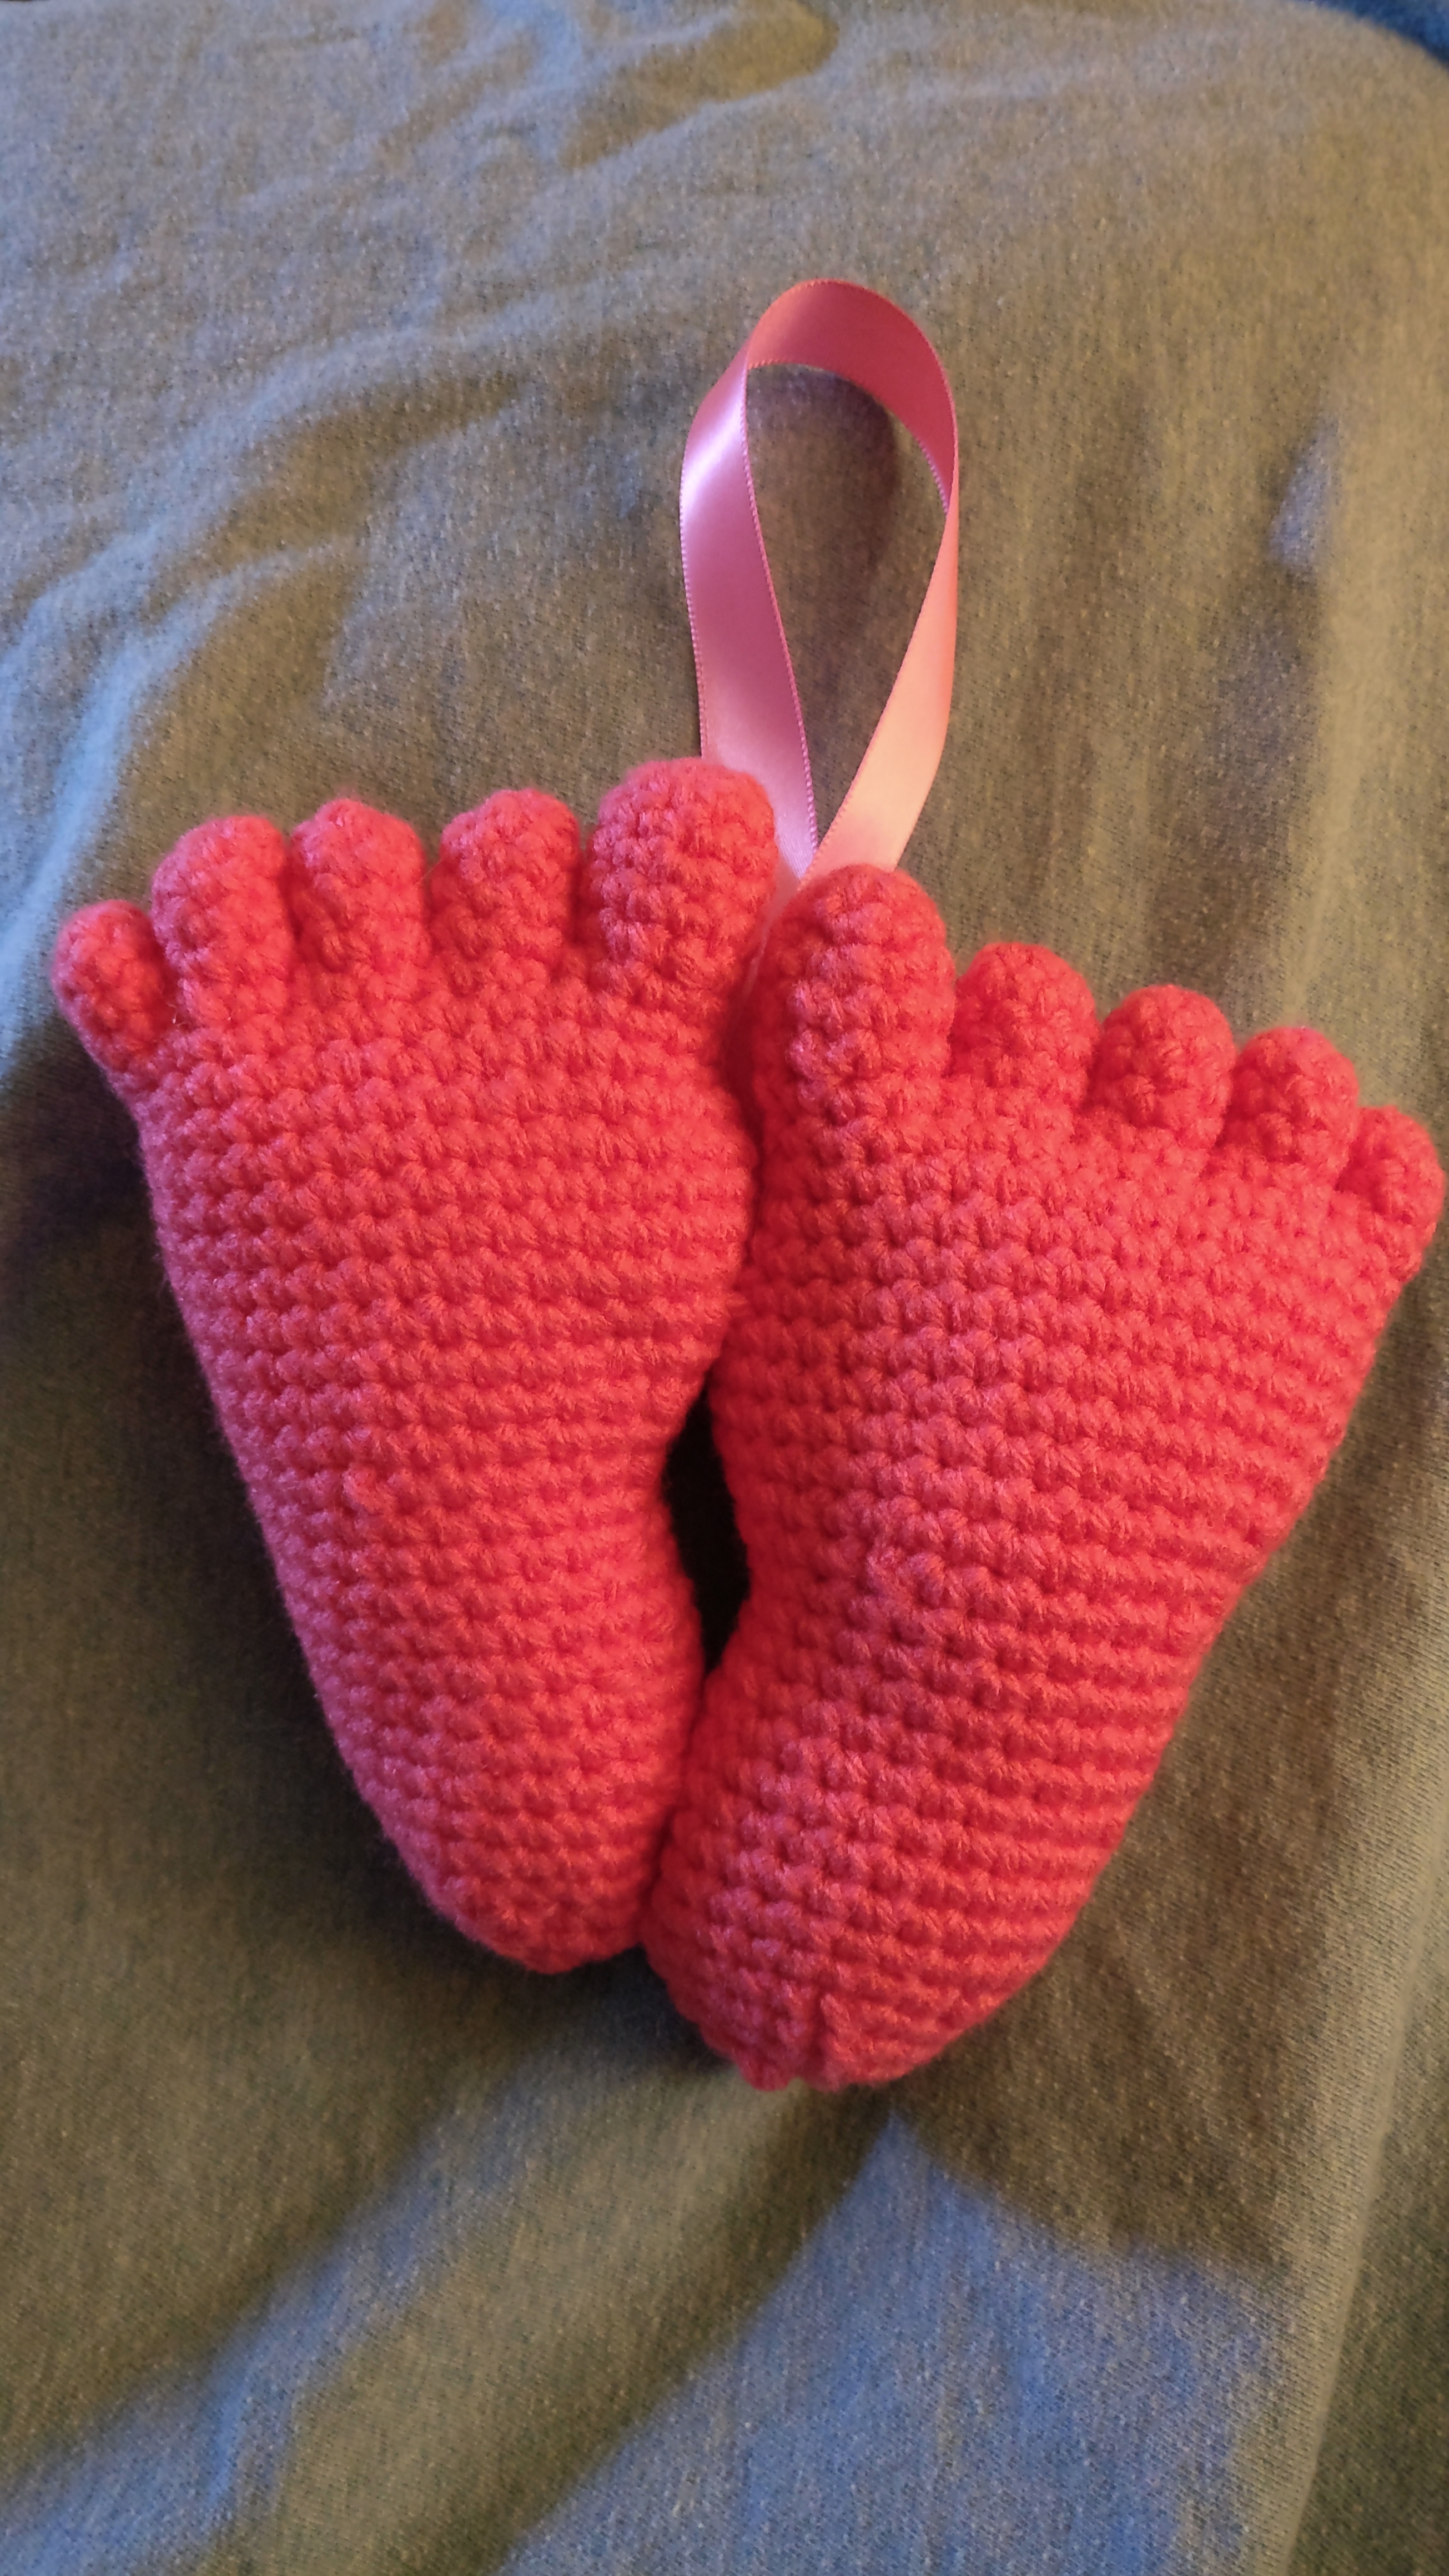
So, I was presented with a picture of a knitted pattern by Sandra Mceachran asking if I had anything similar. I didn’t, but it was a little challenge and got the hamster in my head kicking a little… just a little mind you. It was early and she hadn’t had enough caffeine. After a few cups of coffee, I had a plan of action…
I went back and forth about toe down or sewing on the toes. Going by the picture I went with the toe down and less sewing because let’s face it, I’m all for less sewing on my crochet projects!
G hook (or whatever hook you prefer for your amigurumi projects and so the stuffing doesn’t show)
Yarn of choice (I happened to have pink Bernat worsted weight near me at the time)
Ribbon if wanted for hanging or yarn (I used a satin finish 15mm wide ribbon)
poly-fil
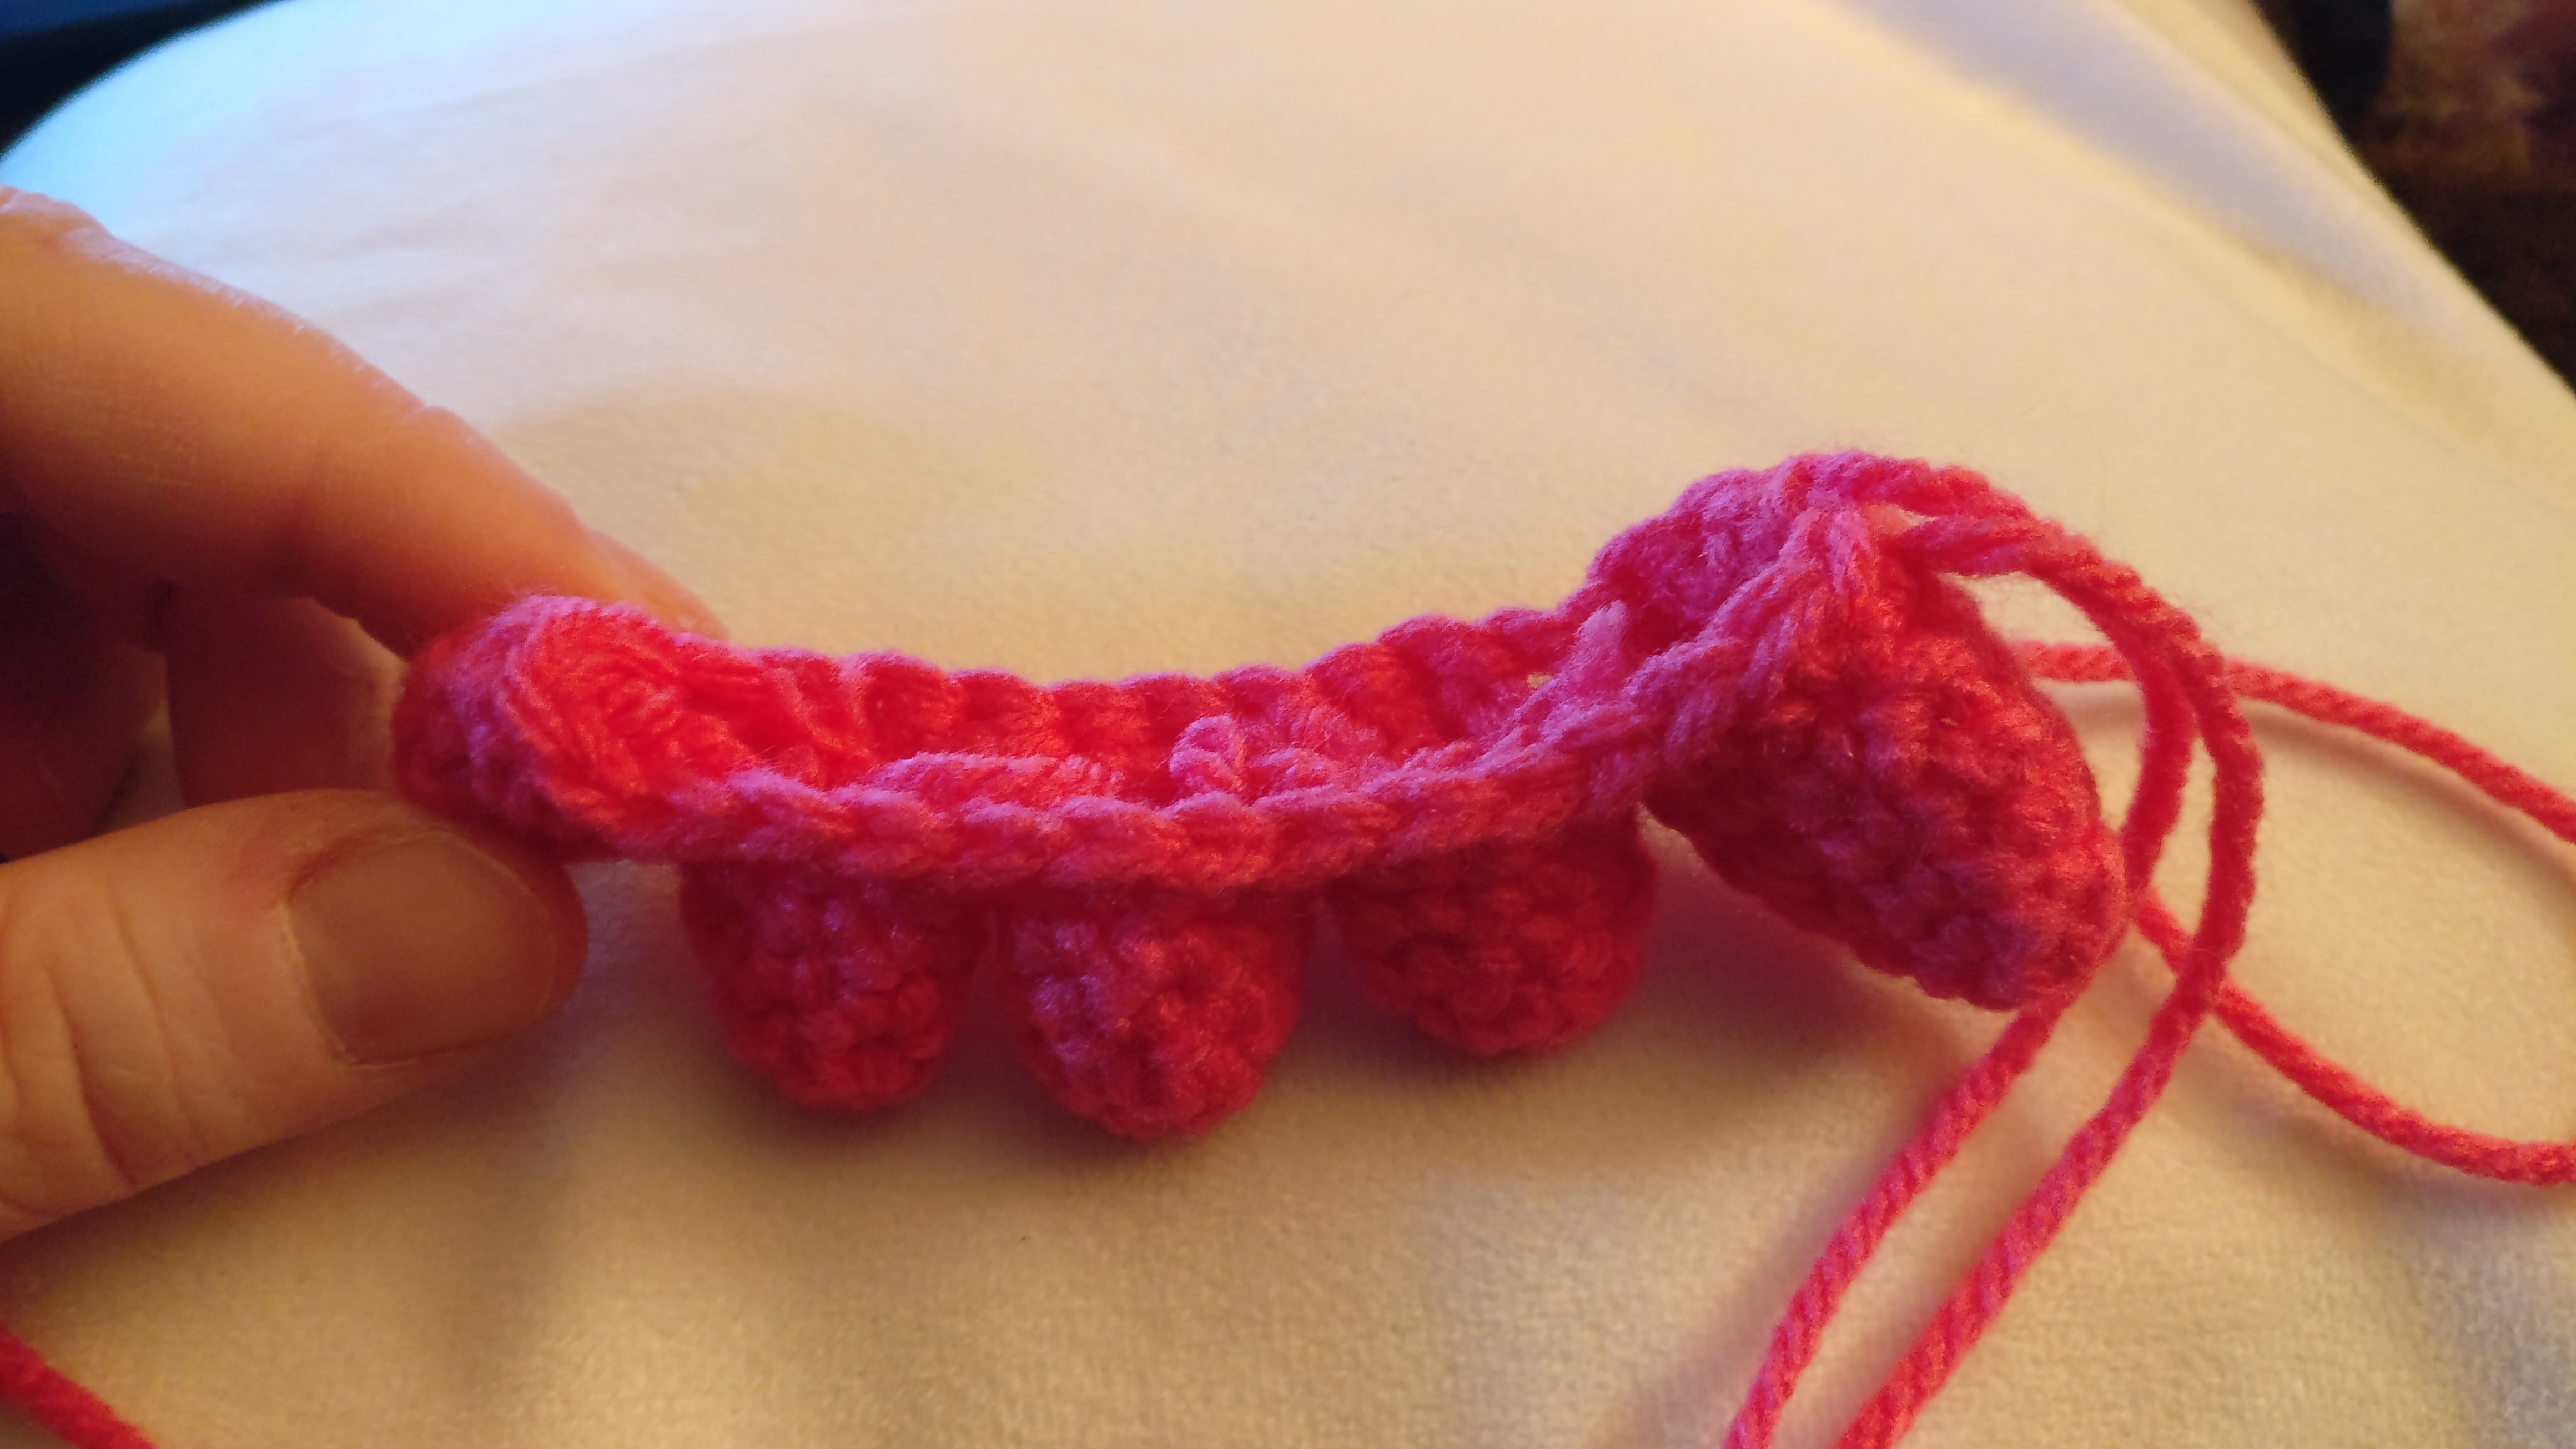
So, make two of these. It is the same on the front as the back so flipping one makes the other foot…
Also, mine ended up being about 6.5 inches from big toe to heel.
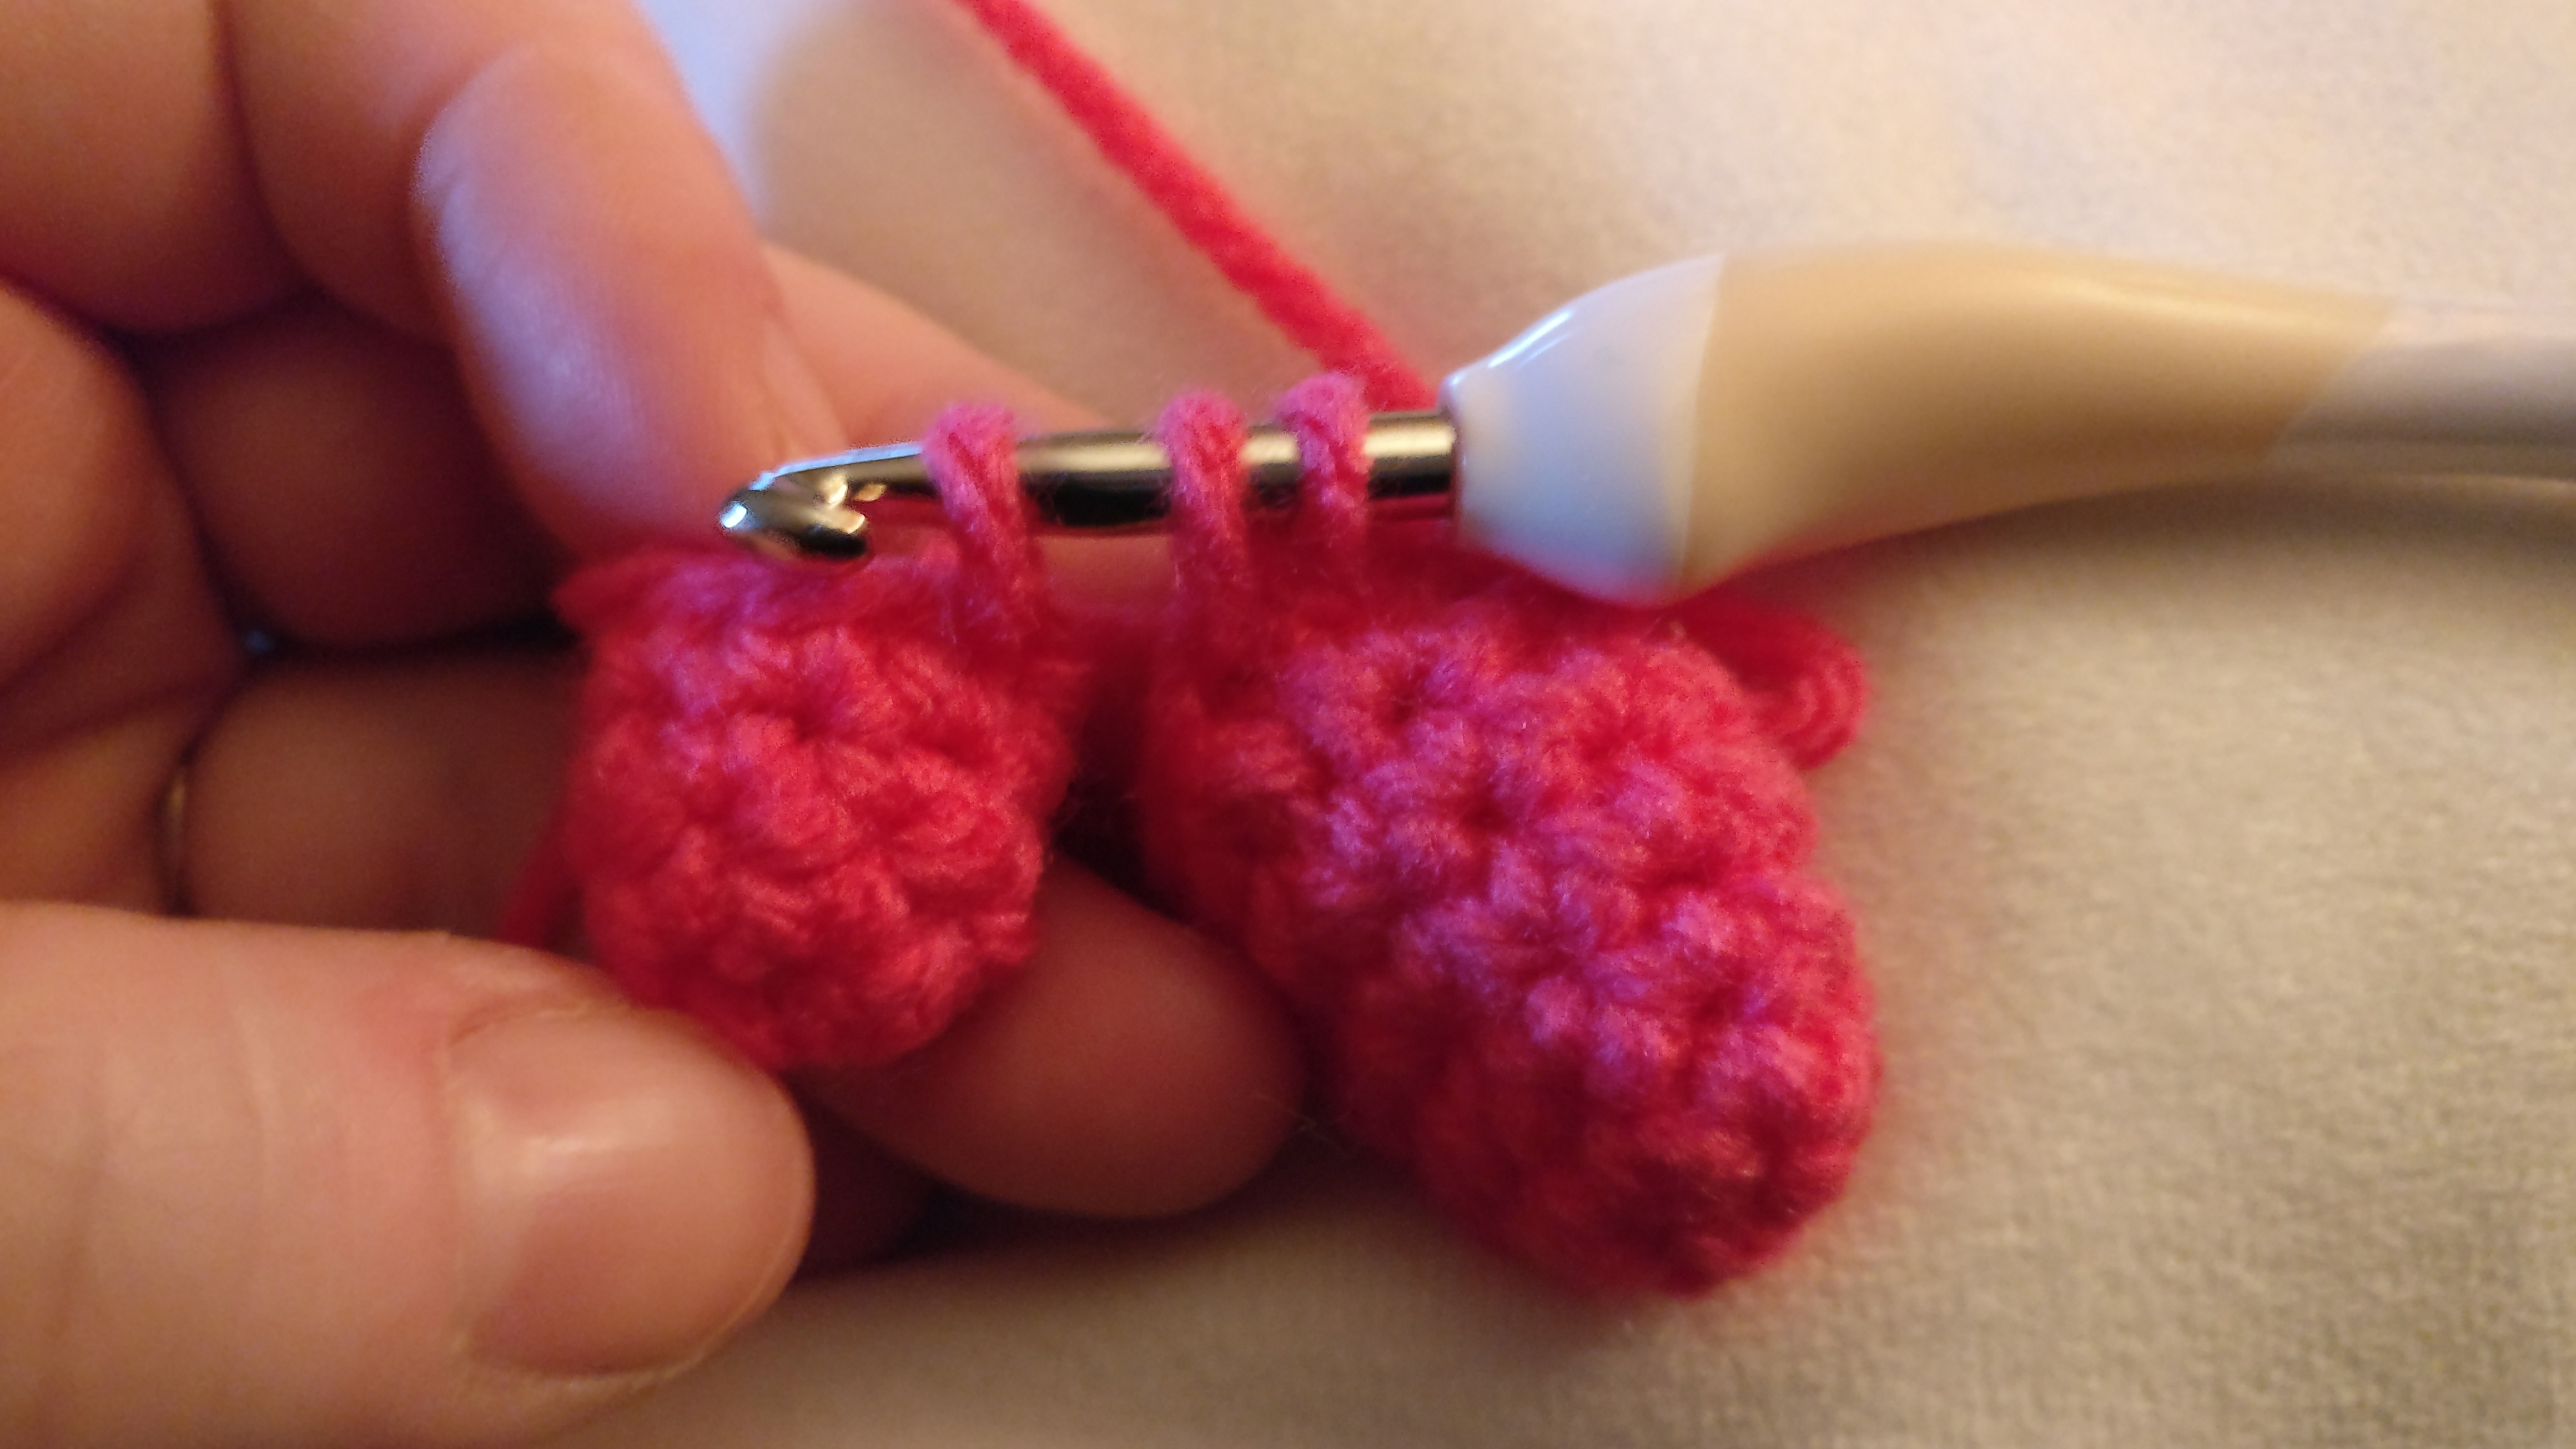
Little Toes, 3 per foot:
6sc in magic circle
*inc, sc in next 2* around
sc for 2 rounds then bind off
Pinky Toe, 1 per foot:
6sc in magic circle
sc around for 2 rounds then bind off
Foot, starting with the big toe:
6sc in magic circle
*inc, sc* around
sc around
*inc, sc in next 2*
sc around
*dec, sc in next 2*
Ok, here’s where it can get tricky. Just take one stitch at a time and it will be fine.
sc in next 3, then crochet together the second toe (draw up a loop in the current toe, draw up a loop in the new toe, yarn over and pull through all 3 loops)
sc in next 2, crochet together third toe, sc in next 2, crochet together fourth toe, sc in next 2, crochet together the pinky toe, sc in next 4 (around the pinky toe), crochet together to the fourth toe, sc in next 2,crochet together to the third toe, sc in next 2, crochet together to the second toe, sc in next 2, crochet together to the big toe, sc in next 4 and you should be back to the beginning with a slightly curling weird thing that resembles toes. It gets to looking better, trust me. Go ahead and stuff all the endings from the toes into the toes to get them out of your way.
Sc around for 2 rows (total of 31 stitches for those keeping count)
Inc in first stitch, sc around until the last 2 stitches. Inc in the last 2
Sc around for 4 rounds
Sc in next 14 stitches, dec, sc in next 14, dec, dec
Sc around
Sc in next 13 stitches, dec, sc in next 12, dec, dec
*sc in next 5, dec* around
Sc around for 2 rounds then take a break and make sure those toes are stuffed the way you would like.
Inc, sc in the next 10 stitches, dec, sc in rest
Sc around
Inc, sc in the next 10 stitches, dec, sc in rest
Sc around for 3 rounds
Sc in next 11 stitches, dec, sc in rest
Sc in next 10 stitches, dec, dec, sc in rest
*dec, sc in next 5* around
*dec, sc in next 4* around, stuff and shape as needed. Don’t get carried away and stuff too firmly, you want it to be kinda flatish.
*dec, sc in next 3* around
*dec* around, leaving a long tail to sew close
That’s all… you can sew them together and then sew a ribbon on back for hanging or whatever you want to do with the feet!
Tip: How I sewed my feet together I just made sure that the second foot I left a really long tail and sewed the end closed, placed the other foot next to it and went from there. I then made the ribbon and used the same tail to sew that to the feet. Less chance of things coming undone and certainly less threading of the needle.
Operating this blog takes money and with thousands of hits a day it's not an insubstantial cost. This site will always remain ad-free but if you are able we appreciate any support you can offer!!


Recent Comments