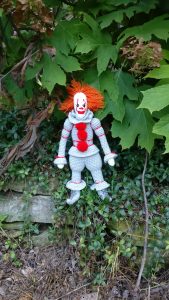
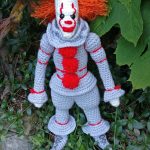
It is probably one of my favorite books. I do love the Gunslinger series, but I have read It a couple times now. Of course I had to make the updated Pennywise for my next Norbert calendar. I tried to keep him mostly basic without losing too much detail, but he is still a bit more complicated than some of my others. I choose not to use more than yarn and basic safety eyes on purpose… though that has a lot to do with my promise not to buy more yarn or supplies for a bit until I use up with I have with my husband.
Also keep in mind he ended up being about 14 inches tall without including his hair. I used a light gray for the suit because I didn’t have a closer silver color. Looking back, I wish I would have used an off white for the neck ruffles.
Worsted weight yarn in colors of choice
G size hook
9mm Safety eyes
Poly-fil
Legs(make two) with light gray
4 sc in magic circle
*inc, sc, dec* around
SC around for 2 rounds
*inc, sc* around
SC around for 5 rounds
inc, sc in next 2, hdc in rest
inc, sc in next 3, hdc in rest
sc in next 2, inc, sc in next 2, hdc in rest
sc in next 3, inc, sc in next 2, hdc in rest
sc around for 5 rounds
sc in BLO around
Stuff foot and continue to stuff as you go.
sc around for 8 rounds
*inc, sc in next* around
*inc, sc in next 2* around
sc around for 4 rounds
Bind off, but no need to leave a long tail for sewing.
Now turn the leg with the shoe side up and attach to the FLO that you left unworked on the leg. Do NOT join each round, work in a spiral.
*inc, sc in next* around
*inc, sc in next 2* around
*inc, sc in next 3* around
sc around, bind off and weave in end.
Now about joining the legs, what you need to do is hold the legs together and sl st through both the legs five times in the middle where they meet, from the front of the legs to the back (I made sure mine were facing slightly different directions because that’s the picture I was duplicating). Then continue around the legs. You should end with 5 sl st and 46 sc. Moving on to the body you will forgo the sl st and only work in the sc.
Body continuing with light gray
sc around for 5 rounds
sc in next 8, dec x2, sc in next 22, dec x2, sc in next 8
*dec, sc in next 4* around
*dec, sc in next 3* around
sc around
sc in BLO around (waist BLO)
sc around for 3 rounds
sc in next 5, inc x2, sc in next 14, inc x 2, sc in next 5
sc around for 10 rounds
*dec, sc in next 2* around
*dec, sc in next* around
sc in BLO around (shoulder BLO)
*dec, sc in next 2* around
sc in BLO around (neck BLO)
sc around (make sure to finish stuffing)
dec around and bind off, leave a long end to sew head on
Now turn the leg with the shoes up and attach your yarn to the FLO of the waist BLO. Do NOT join after each round, work in a spiral.
*inc, sc in next 2* around, inc in last st
*inc, sc in next 3* around, in the last 2 st do inc, sc
sc around for 3 rounds, bind off and weave in end.
Now turn the leg with the shoes up and attach your yarn to the FLO of the shoulder BLO. Do NOT join after each round, work in a spiral.
inc around
*inc, sc in next* around
*inc, sc in next 2* around
sc around, bind off and weave in end.
Now turn the leg with the shoes up and attach your yarn to the FLO of the neck BLO. Do NOT join after each round, work in a spiral.
inc around
*inc, sc in next* around
*inc, sc in next 2* around
sc around, bind off and weave in end.
Head in white
6 sc in magic circle
*inc, sc in next* around
sc around
*inc, sc in next 2* around
*inc, sc in next 3* around
*inc, sc in next 4* around
sc around for 3 rounds
inc, sc, inc, sc, inc, then sc in remaining
sc around for 5 rounds
Insert the safety eyes between rounds 8-9 (6sc in mc counts as round 1) and 2 sc in between. Make sure the last inc are facing out as the forehead. Go ahead and start to stuff the head, continuing as you close up.
*dec, sc in next 5* around
*dec, sc in next* around
dec around, bind off and close up hole. Go ahead and sew the head on the body holding the chin down against the ruffles.
Eyebrow in white
ch 9, using the back ridges (if you feel comfortable doing so if not, just sc normally) sc in 2nd ch from hook and across. Bind off, leave a tail to sew onto the head above the eyes.
Nose, mouth and face detail are stitched onto the head directly though you could make the mouth out of felt if you wanted. Felt and me are not typically good bedfellows, so I avoid it. The nose was made by 3 horizontal stitches 2 rounds below the eyes 2 stitches apart. The mouth was 2 rounds below that, 3 stitches apart with 5 horizontal stitches with oe vertical in the middle to bring the lips together. The lines up the face were just running stitch.
It will be easier to go ahead and make a running stitch in red right on top of the waist ruffle and both the leg ruffles.
Arms (make two) start with white
6 sc in magic circle
sc around
inc around
sc around for 3 rounds
*dec, sc in next 2* switch to gray
sc around in BLO, make sure to stuff lightly as you go for the arm part.
sc around for 13 rounds
*inc, sc in next 2* around, when stuffing these next parts, stuff a bit firmer than the arm.
sc around for 3 rounds
*dec, sc in next 2* around
*inc, sc in next 2* around
*inc, sc in next* around
sc around for 3 rounds
*dec, sc in next* around
*dec, sc in next 2* around
sc then dec around, bind off, leaving a long tail for sewing. Finish ruffle as flows, then sew onto the sides of the body immediately under the shoulder ruffle.
Now turn arm hand side up and attach gray yarn the the FLO of the BLO round. Do NOT join after each round, work in a spiral.
*inc, sc in next 2* around
*inc, sc in next* around
*inc, sc in next 2* around
sc around, bind off and sew in end.
Sew onto the sides of the body immediately under the shoulder ruffle. Then take more red yarn and stitch lines above the ruffle, twice on the arms and around the shoulders. I also made little bows above the ruffles as well.
Now make 3 small pom poms in red (gah! I know, in the book he has orange, but to match the updated Pennywise I went with the red ones) to attach to the front or if you have those small already made felt type pom pom (like they use for making the candy cane Rudolph the Red Nose Reindeer) you can sew those on.
For the hair I used orange strands of yarn and hooked them directly on to the head. I then split the yarn and lightly finger brushed out the yarn to get the desired effect.
Mad Hooking!


Thank you, he looks just like Pennywise! good job.
You’re quite welcome! I’m glad you like my work and I would love to see your work if you make it!
Do you have ay close up pics of his feet….for some reason I just can’t seem to get them right….it tells me it is time to stuff the foot…..what foot? It doesn’t look like a foot….please help meI am trying to make this for my grandson for Christmas…..do you have a video of this?
This is fab I’d love to make it but there is no stich count after each round and no round count so I would probably mess it up. Pity I’d love to make it for my son.
What does BLO and FLO. mean
FLO=front loop only
BLO=back loop only
I’m working on this pattern now and just want to say thank you for sharing! Your design is awesome!
FLO=front loop only
BLO=back loop only
Hi 👋
Thank you so much for this excellent Pennywise pattern 💖
I am a passionate fan of Stephen King’s books. I am now reading the book It for at least the fourth time. This Pennywise amigurumi goes top on my to-do list right after Christmas crochets. Thanks again and have a nice Christmas season 🎄🤶
Greetings from Finland
Titta 😘