Granny’s Backyard Blanket

IMG_4475

IMG_4477 IMG_4476

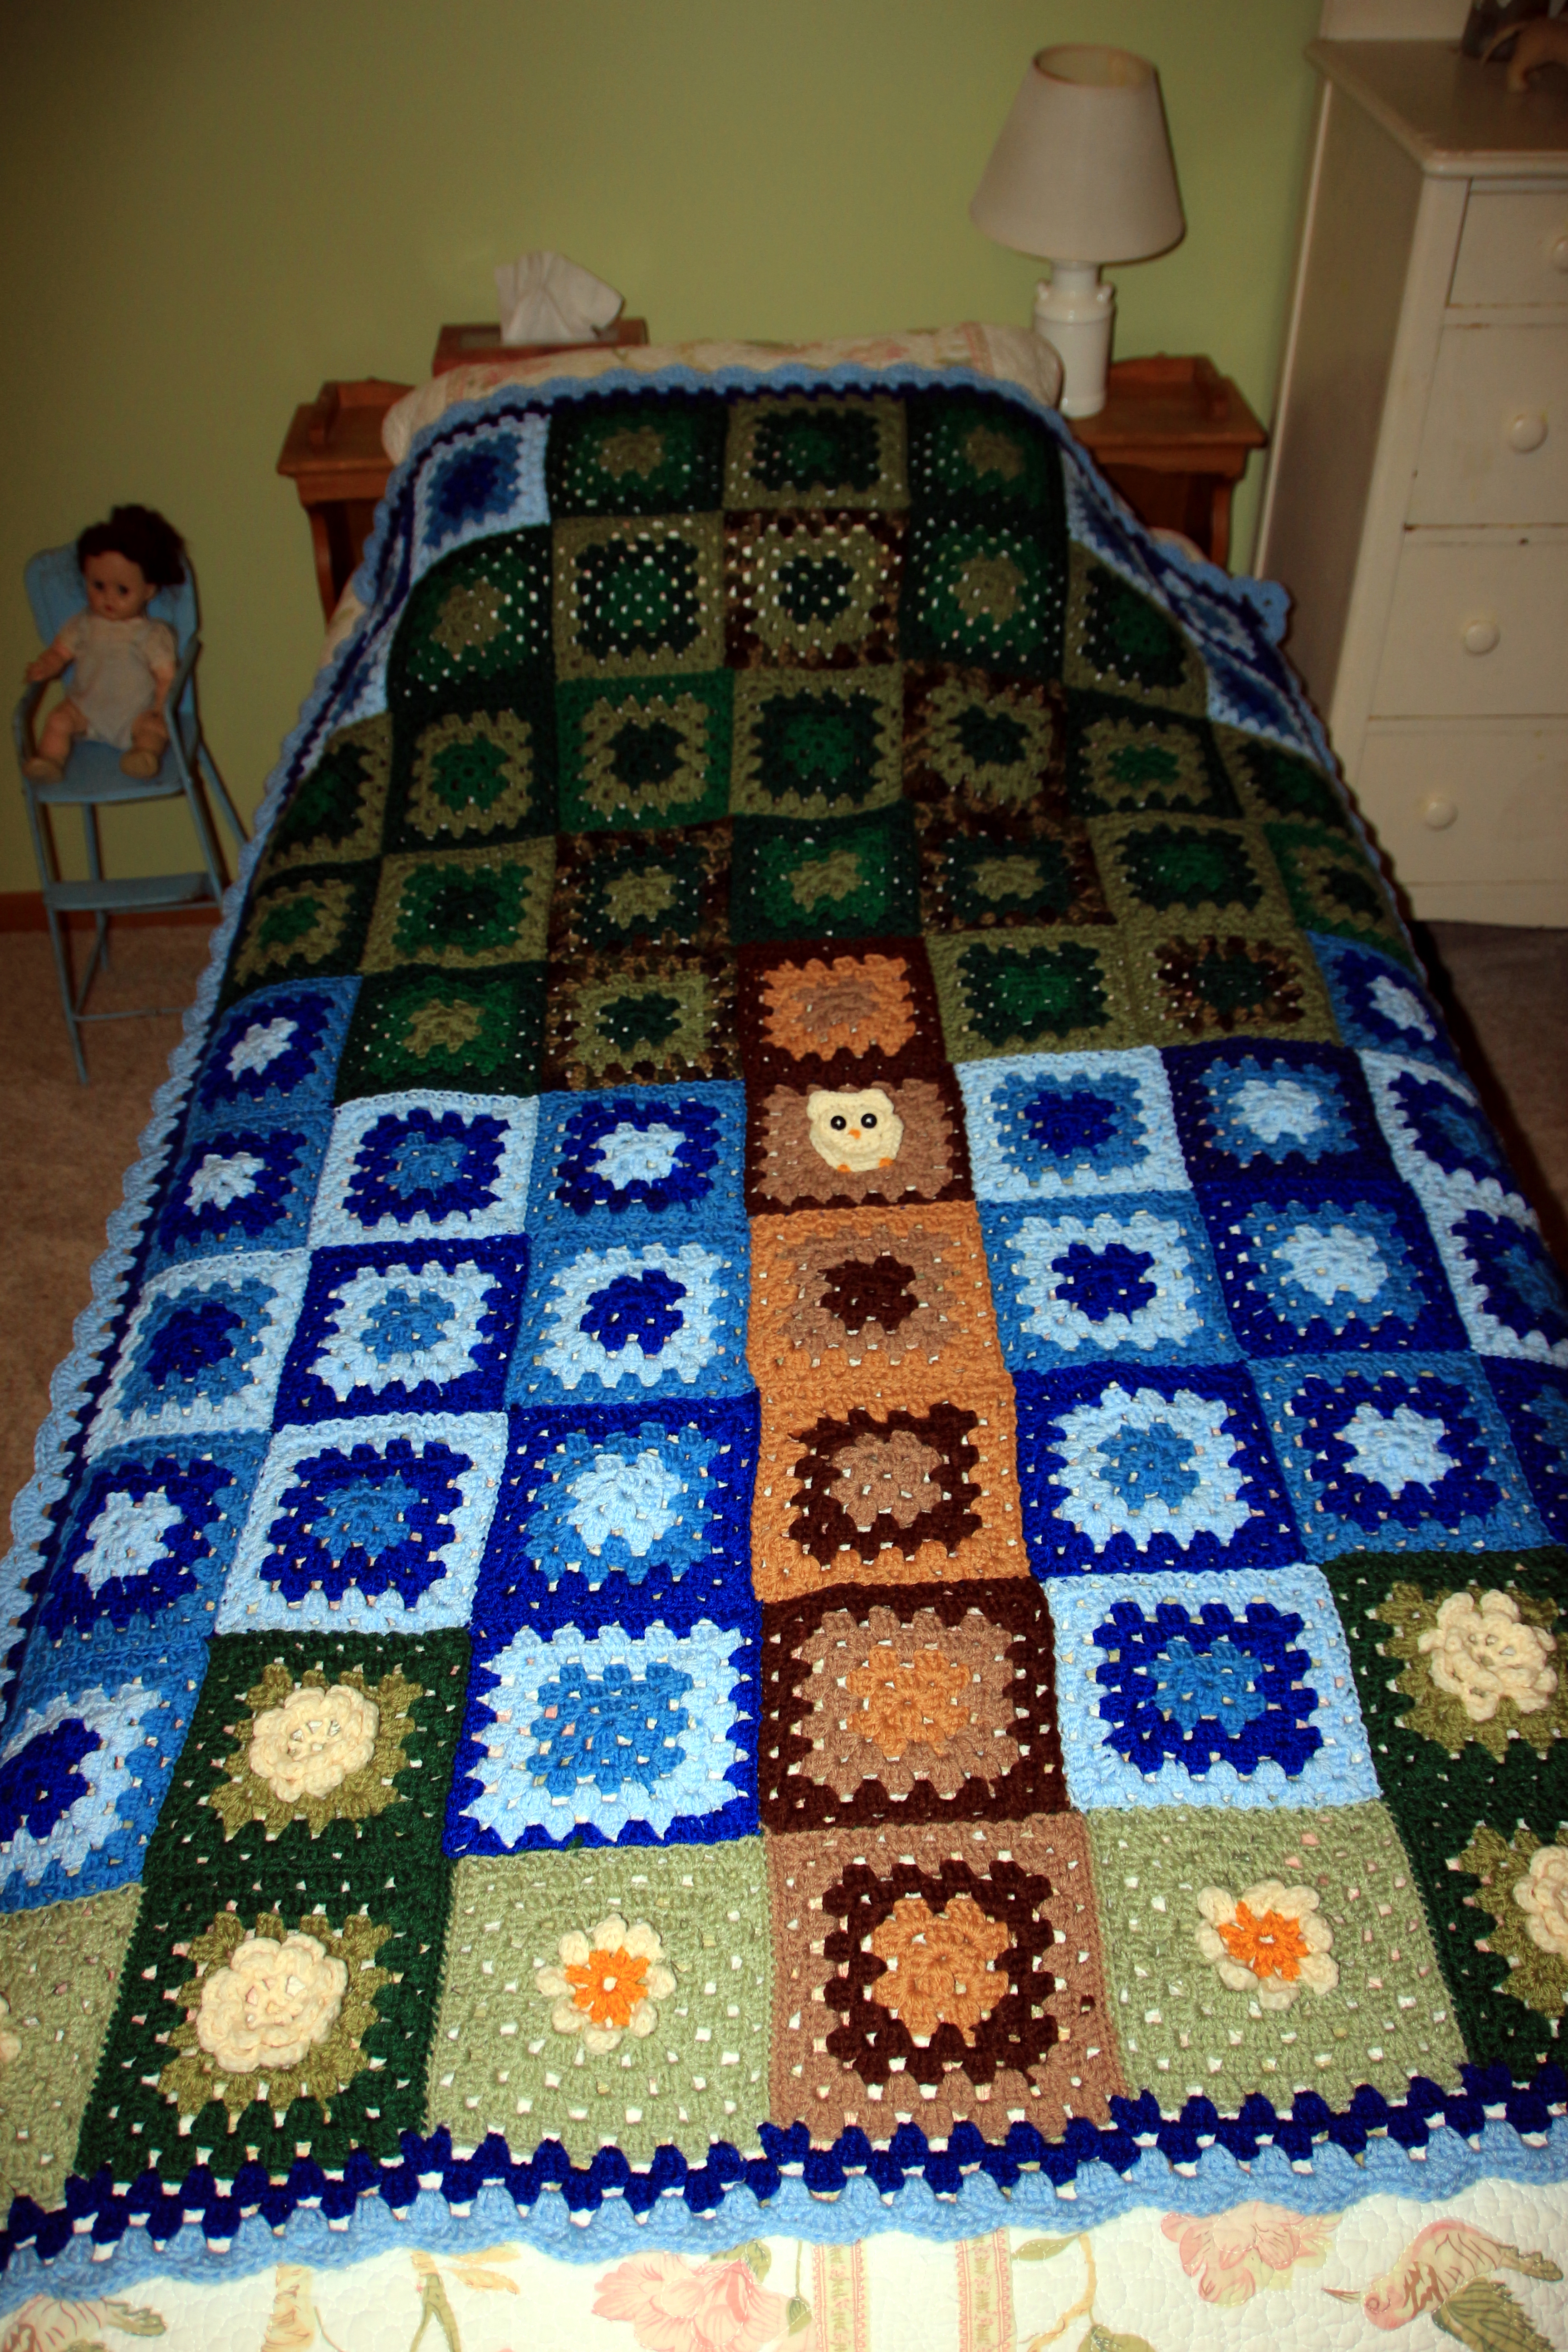
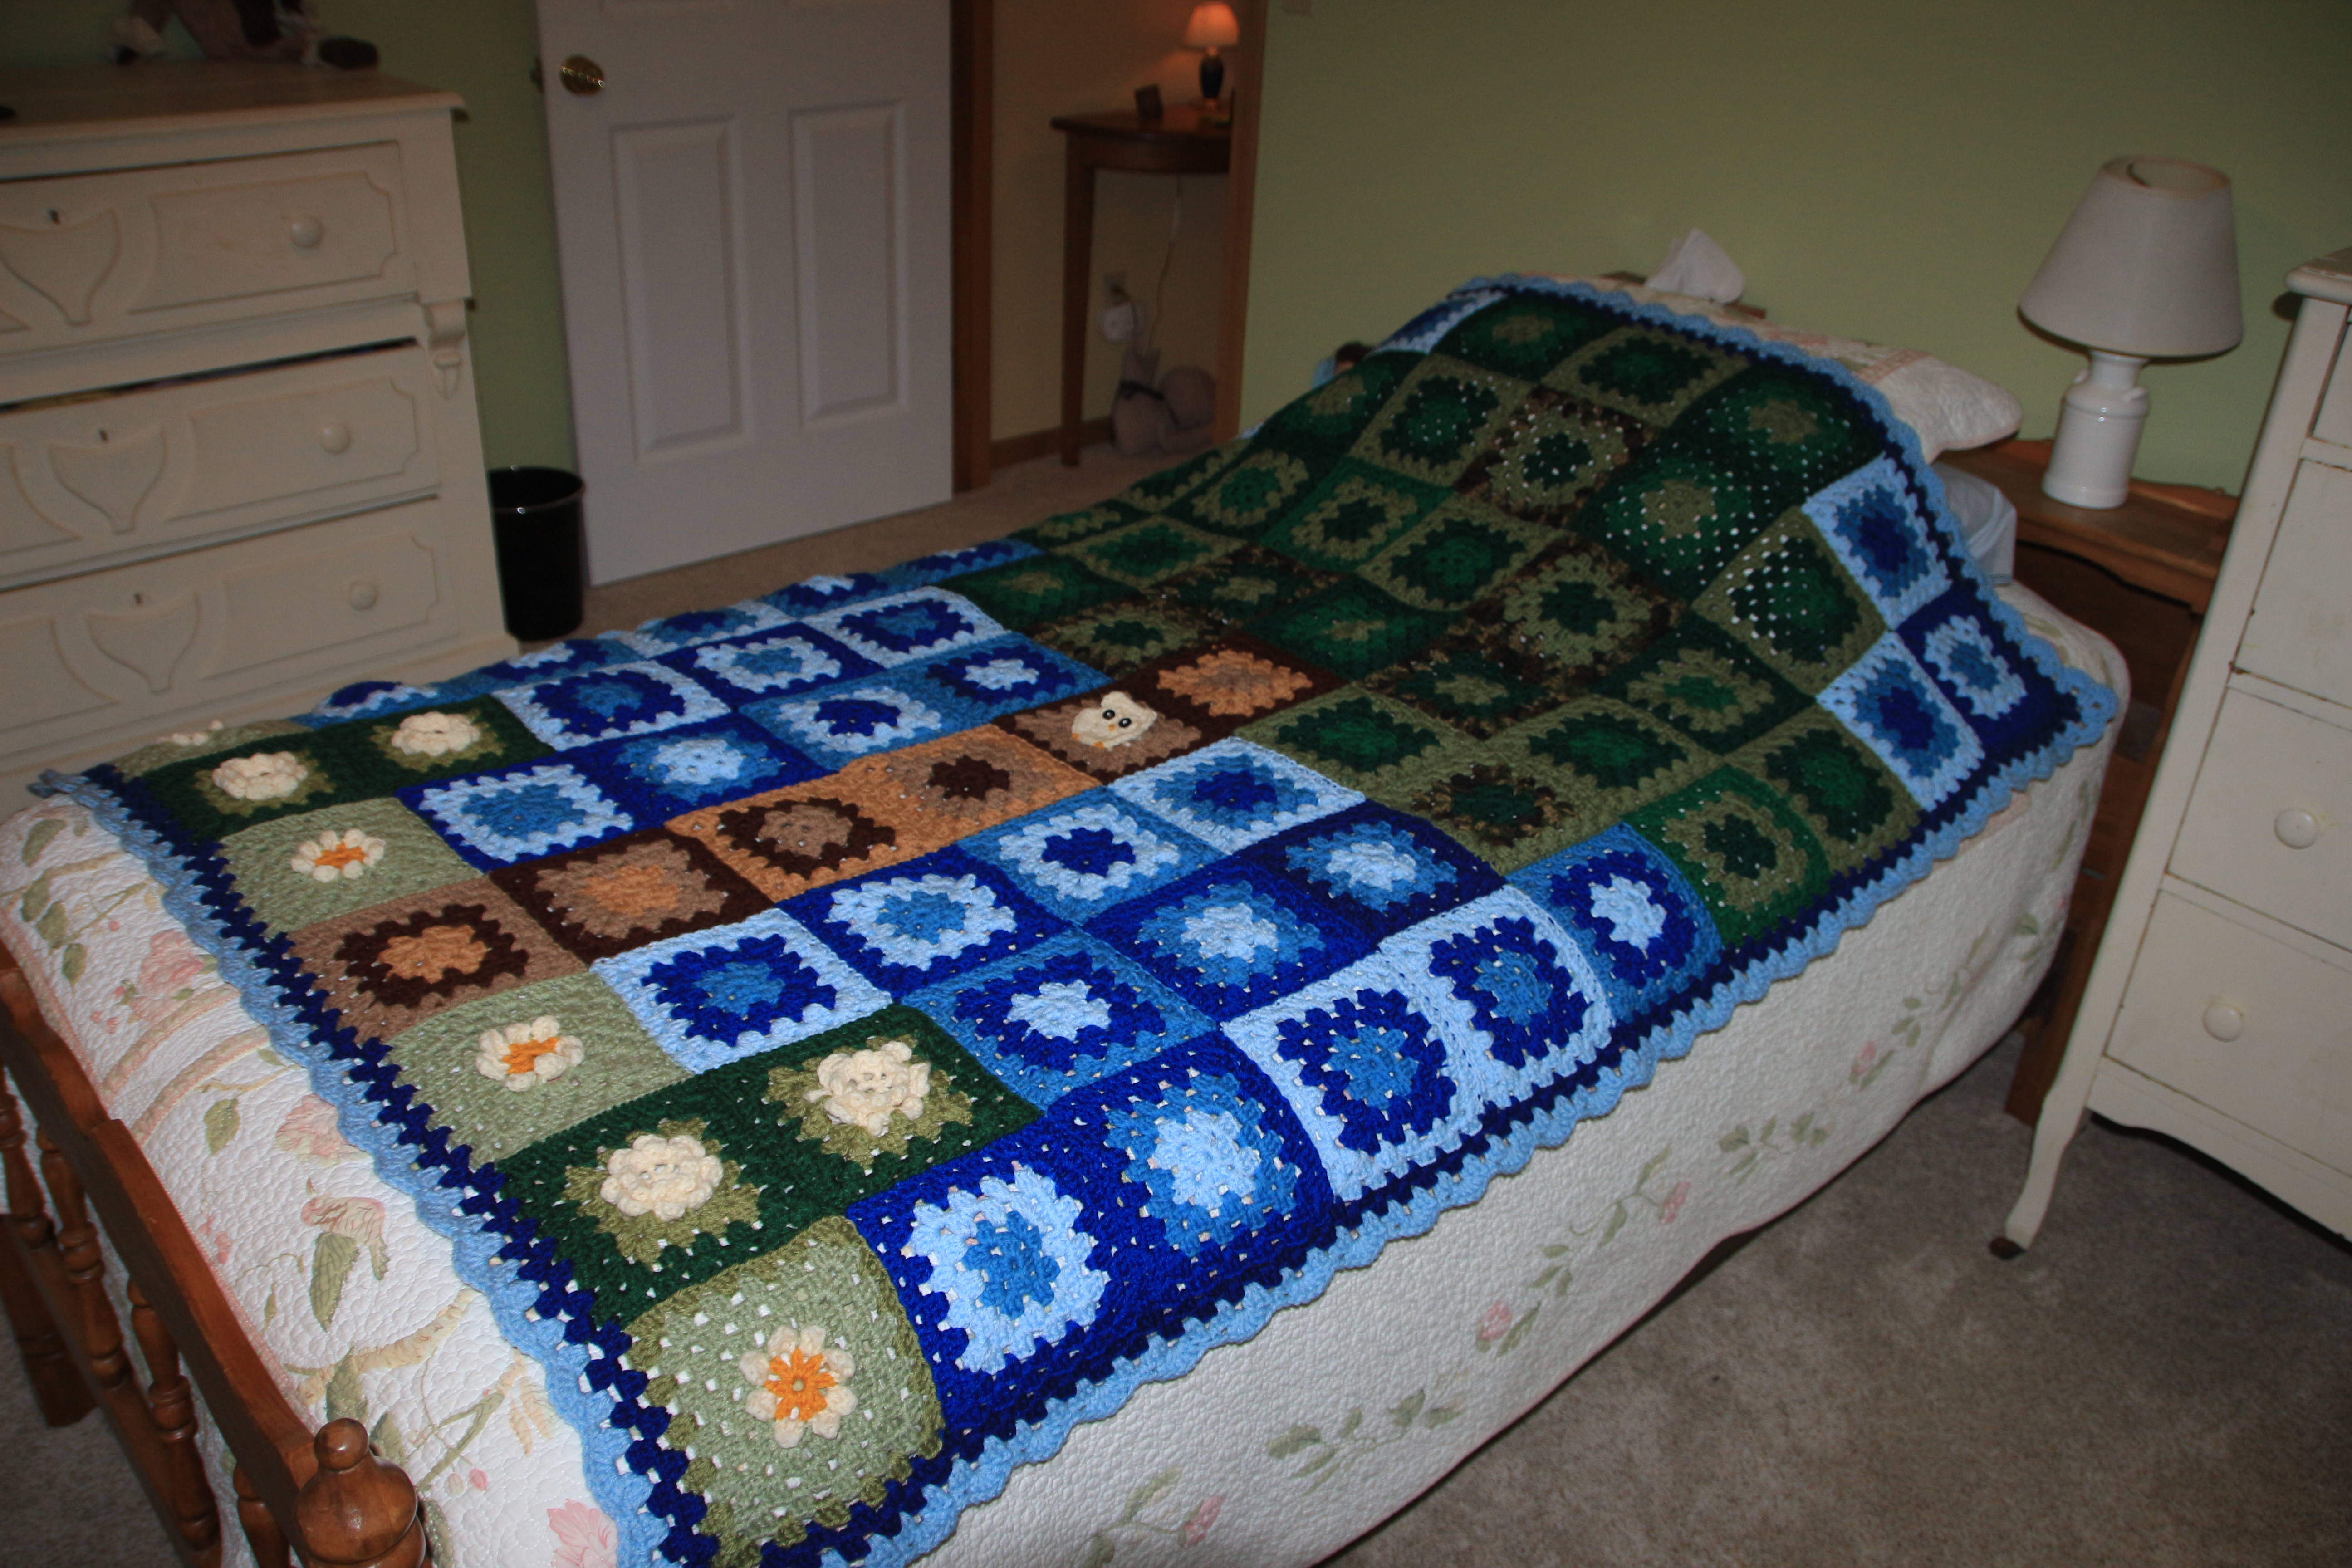
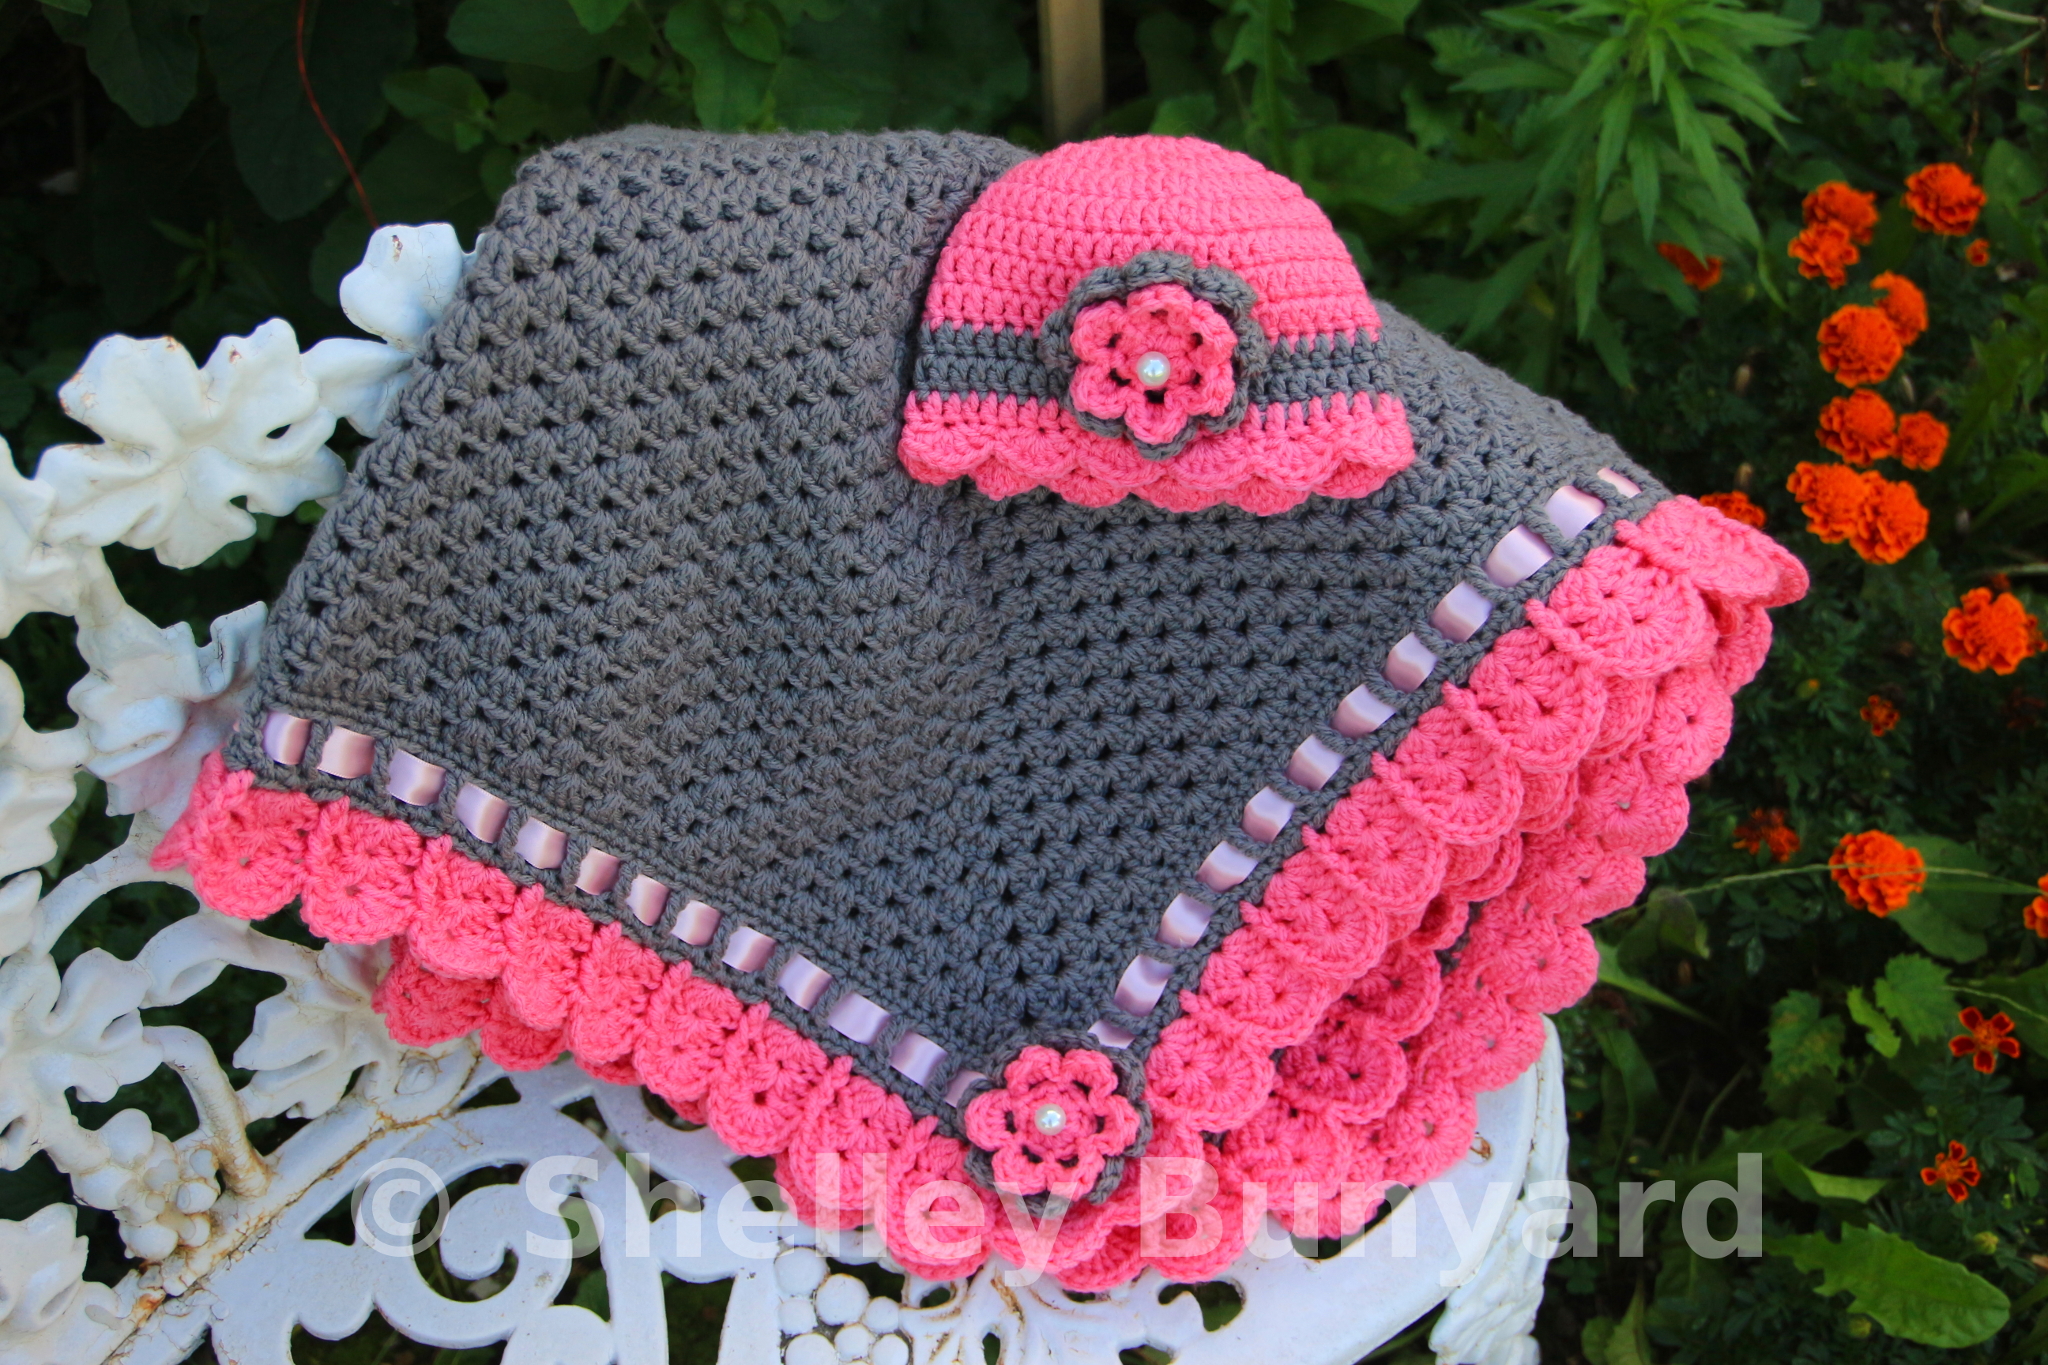
So this was an idea I had when trying to think of more ways to use up the stash of yarn I have residing in my house. Nothing special about this one, just a bunch of granny squares.

You are going to need a total of 70 squares to make up this blanket like I did. Now, you can always choose to do it differently, but I’m going to keep these instructions to what I did for this blanket.

Blanket measures 76″ tall by 46″ wide
Made with stash worsted weight yarn and H size hook

If you need a how to for the squares:
http://www.jpfun.com/patterns/free/granny_squares/f101001_basicgranny.shtml

As far as how big I made the squares, I did a total of six rounds which makes it to on the last round you have four groups of three in-between the corners. I choose to change colors every two rounds, making as many different combinations as I could.

You will need a total of:
30 blue colored granny squares
26 green colored granny squares
5 brown colored granny squares

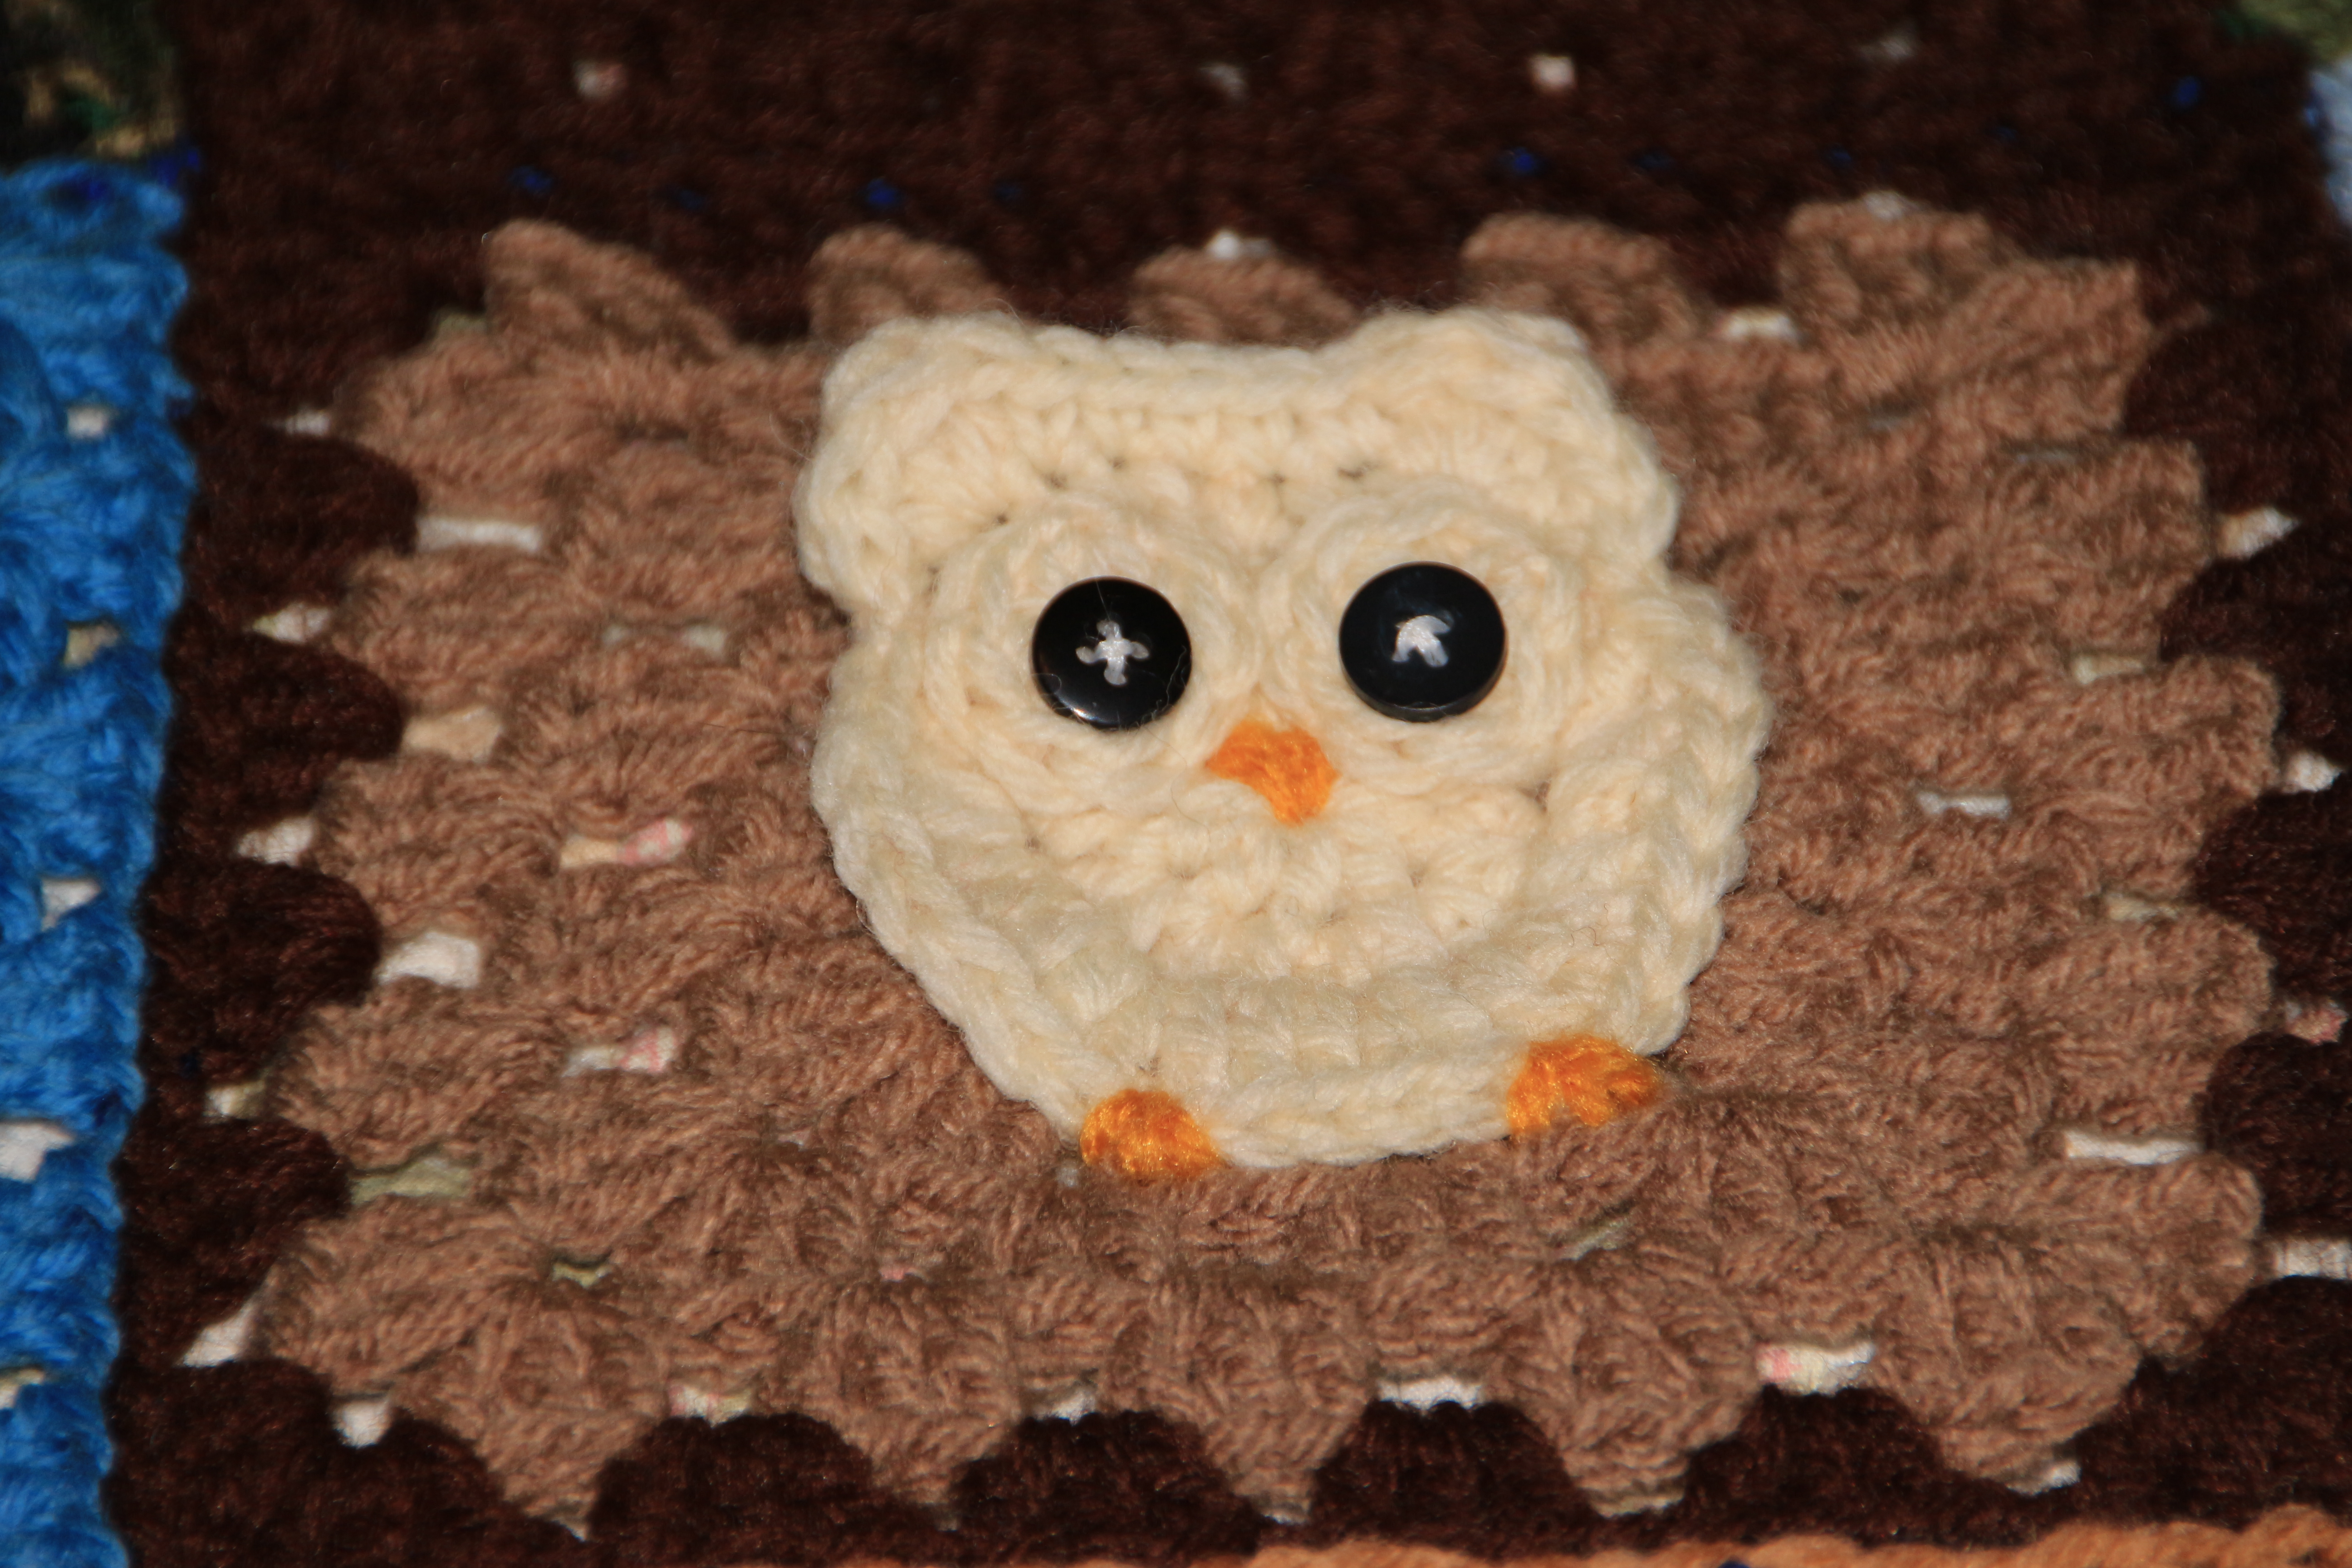
Now for the special granny squares. Just keep in mind to make them the same size as the plain ones. Just continue with the granny square pattern as needed.

1 owl granny square ( http://www.repeatcrafterme.com/2012/11/owl-granny-square-crochet-pattern.html?m=1)
4 of this flower granny square ( http://crochetmaryellen.blogspot.com/2007/06/easy-daisy-granny-square.html?m=1)
4 of this flower granny square ( http://rosehip.typepad.com/rose_hip_blog/2008/11/pattern.html)

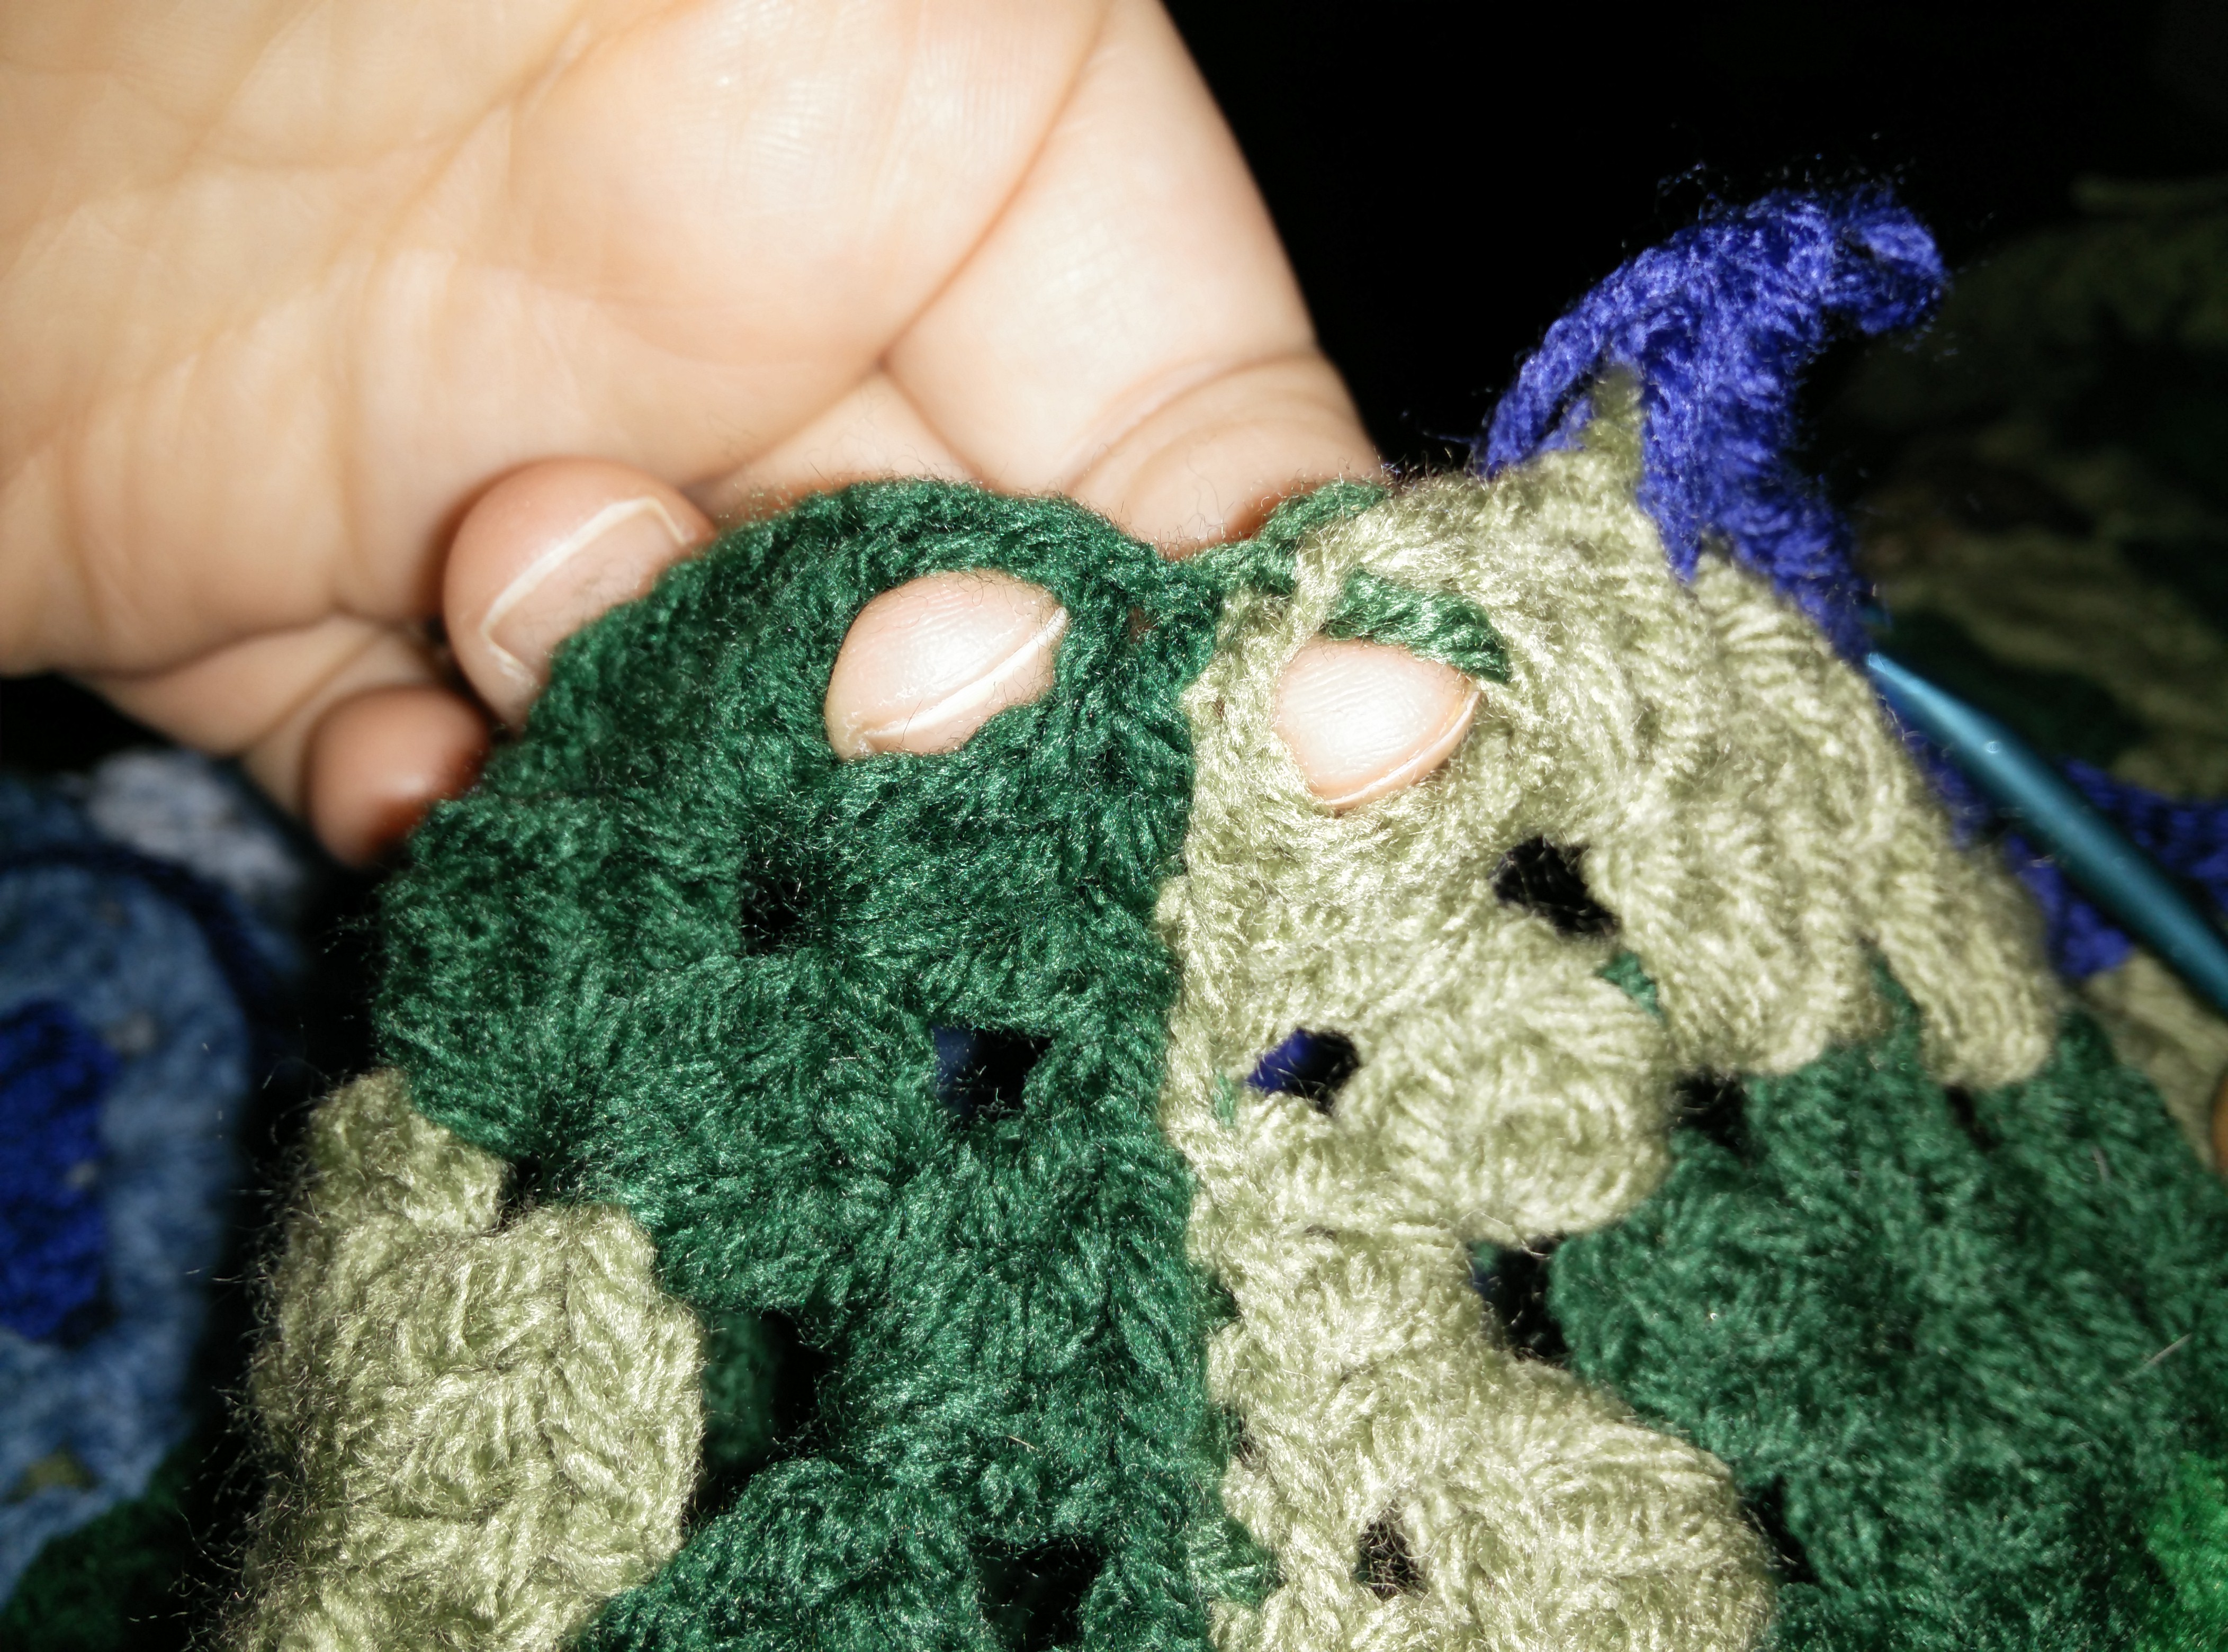
Now, for the fun part! Sewing all these together! Yeah… Now I used the ladder method of invisible join. I prefer it, but if you don’t choose what works for you. Use the picture of the pattern for placement.

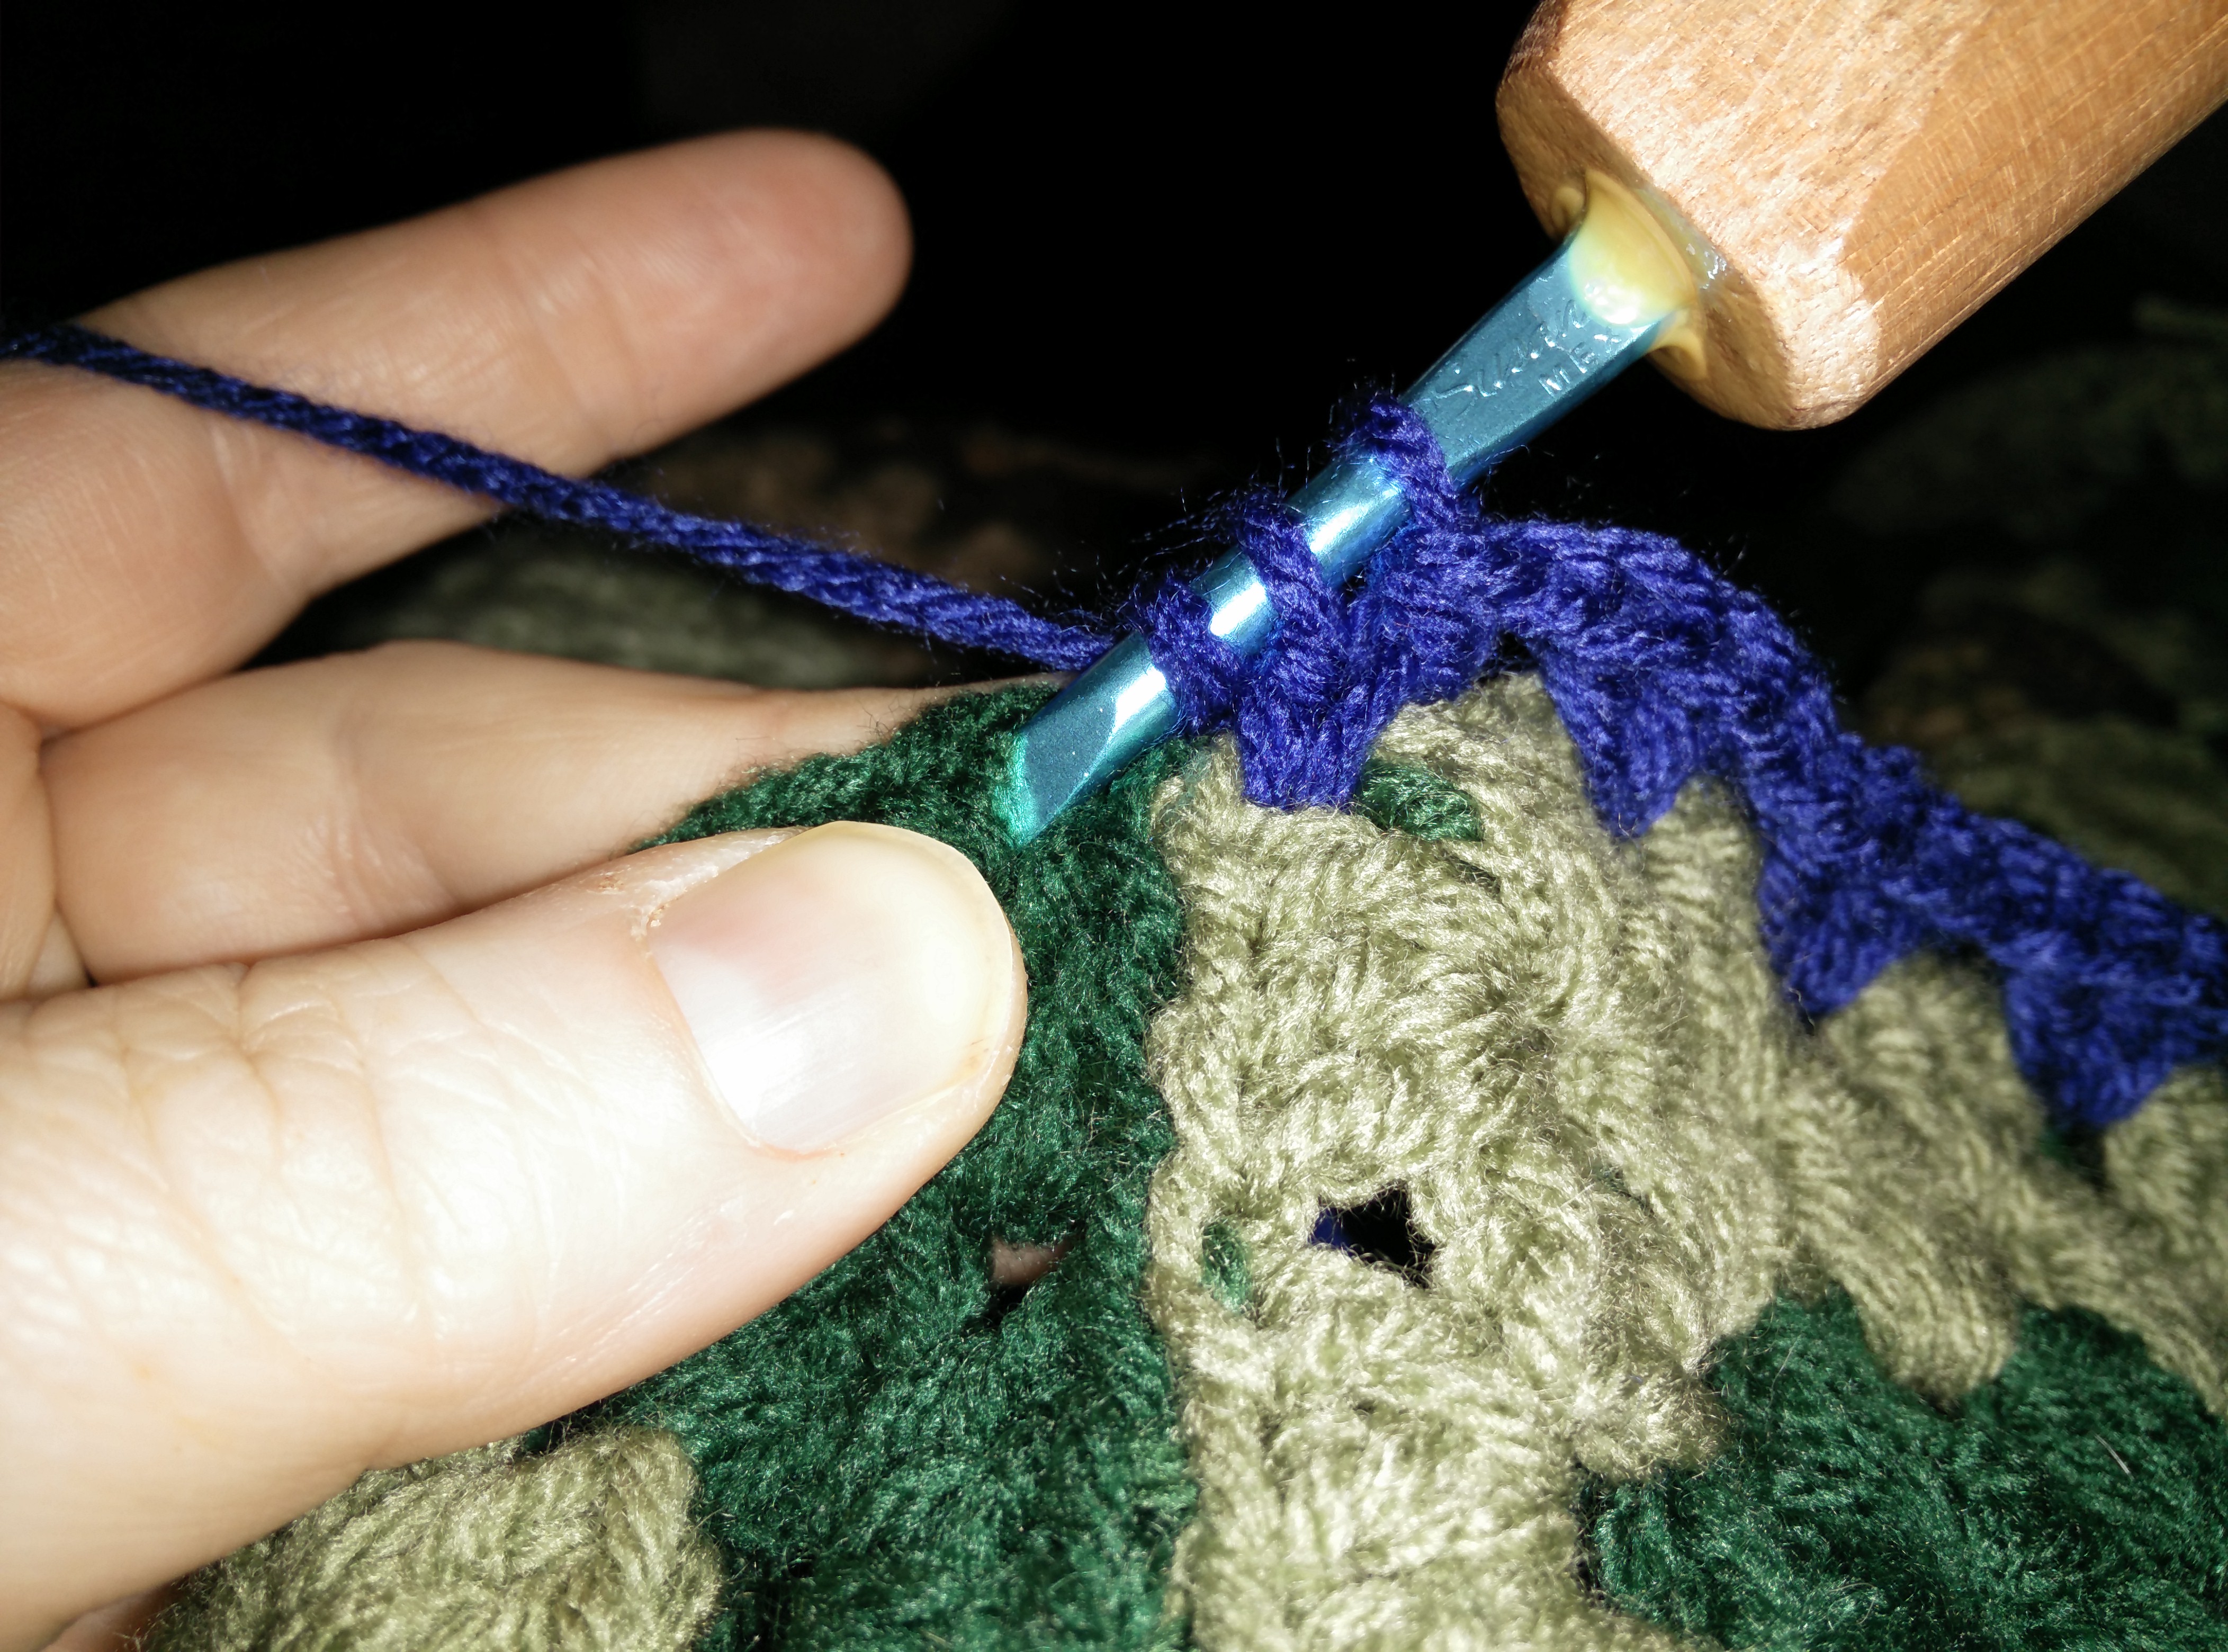
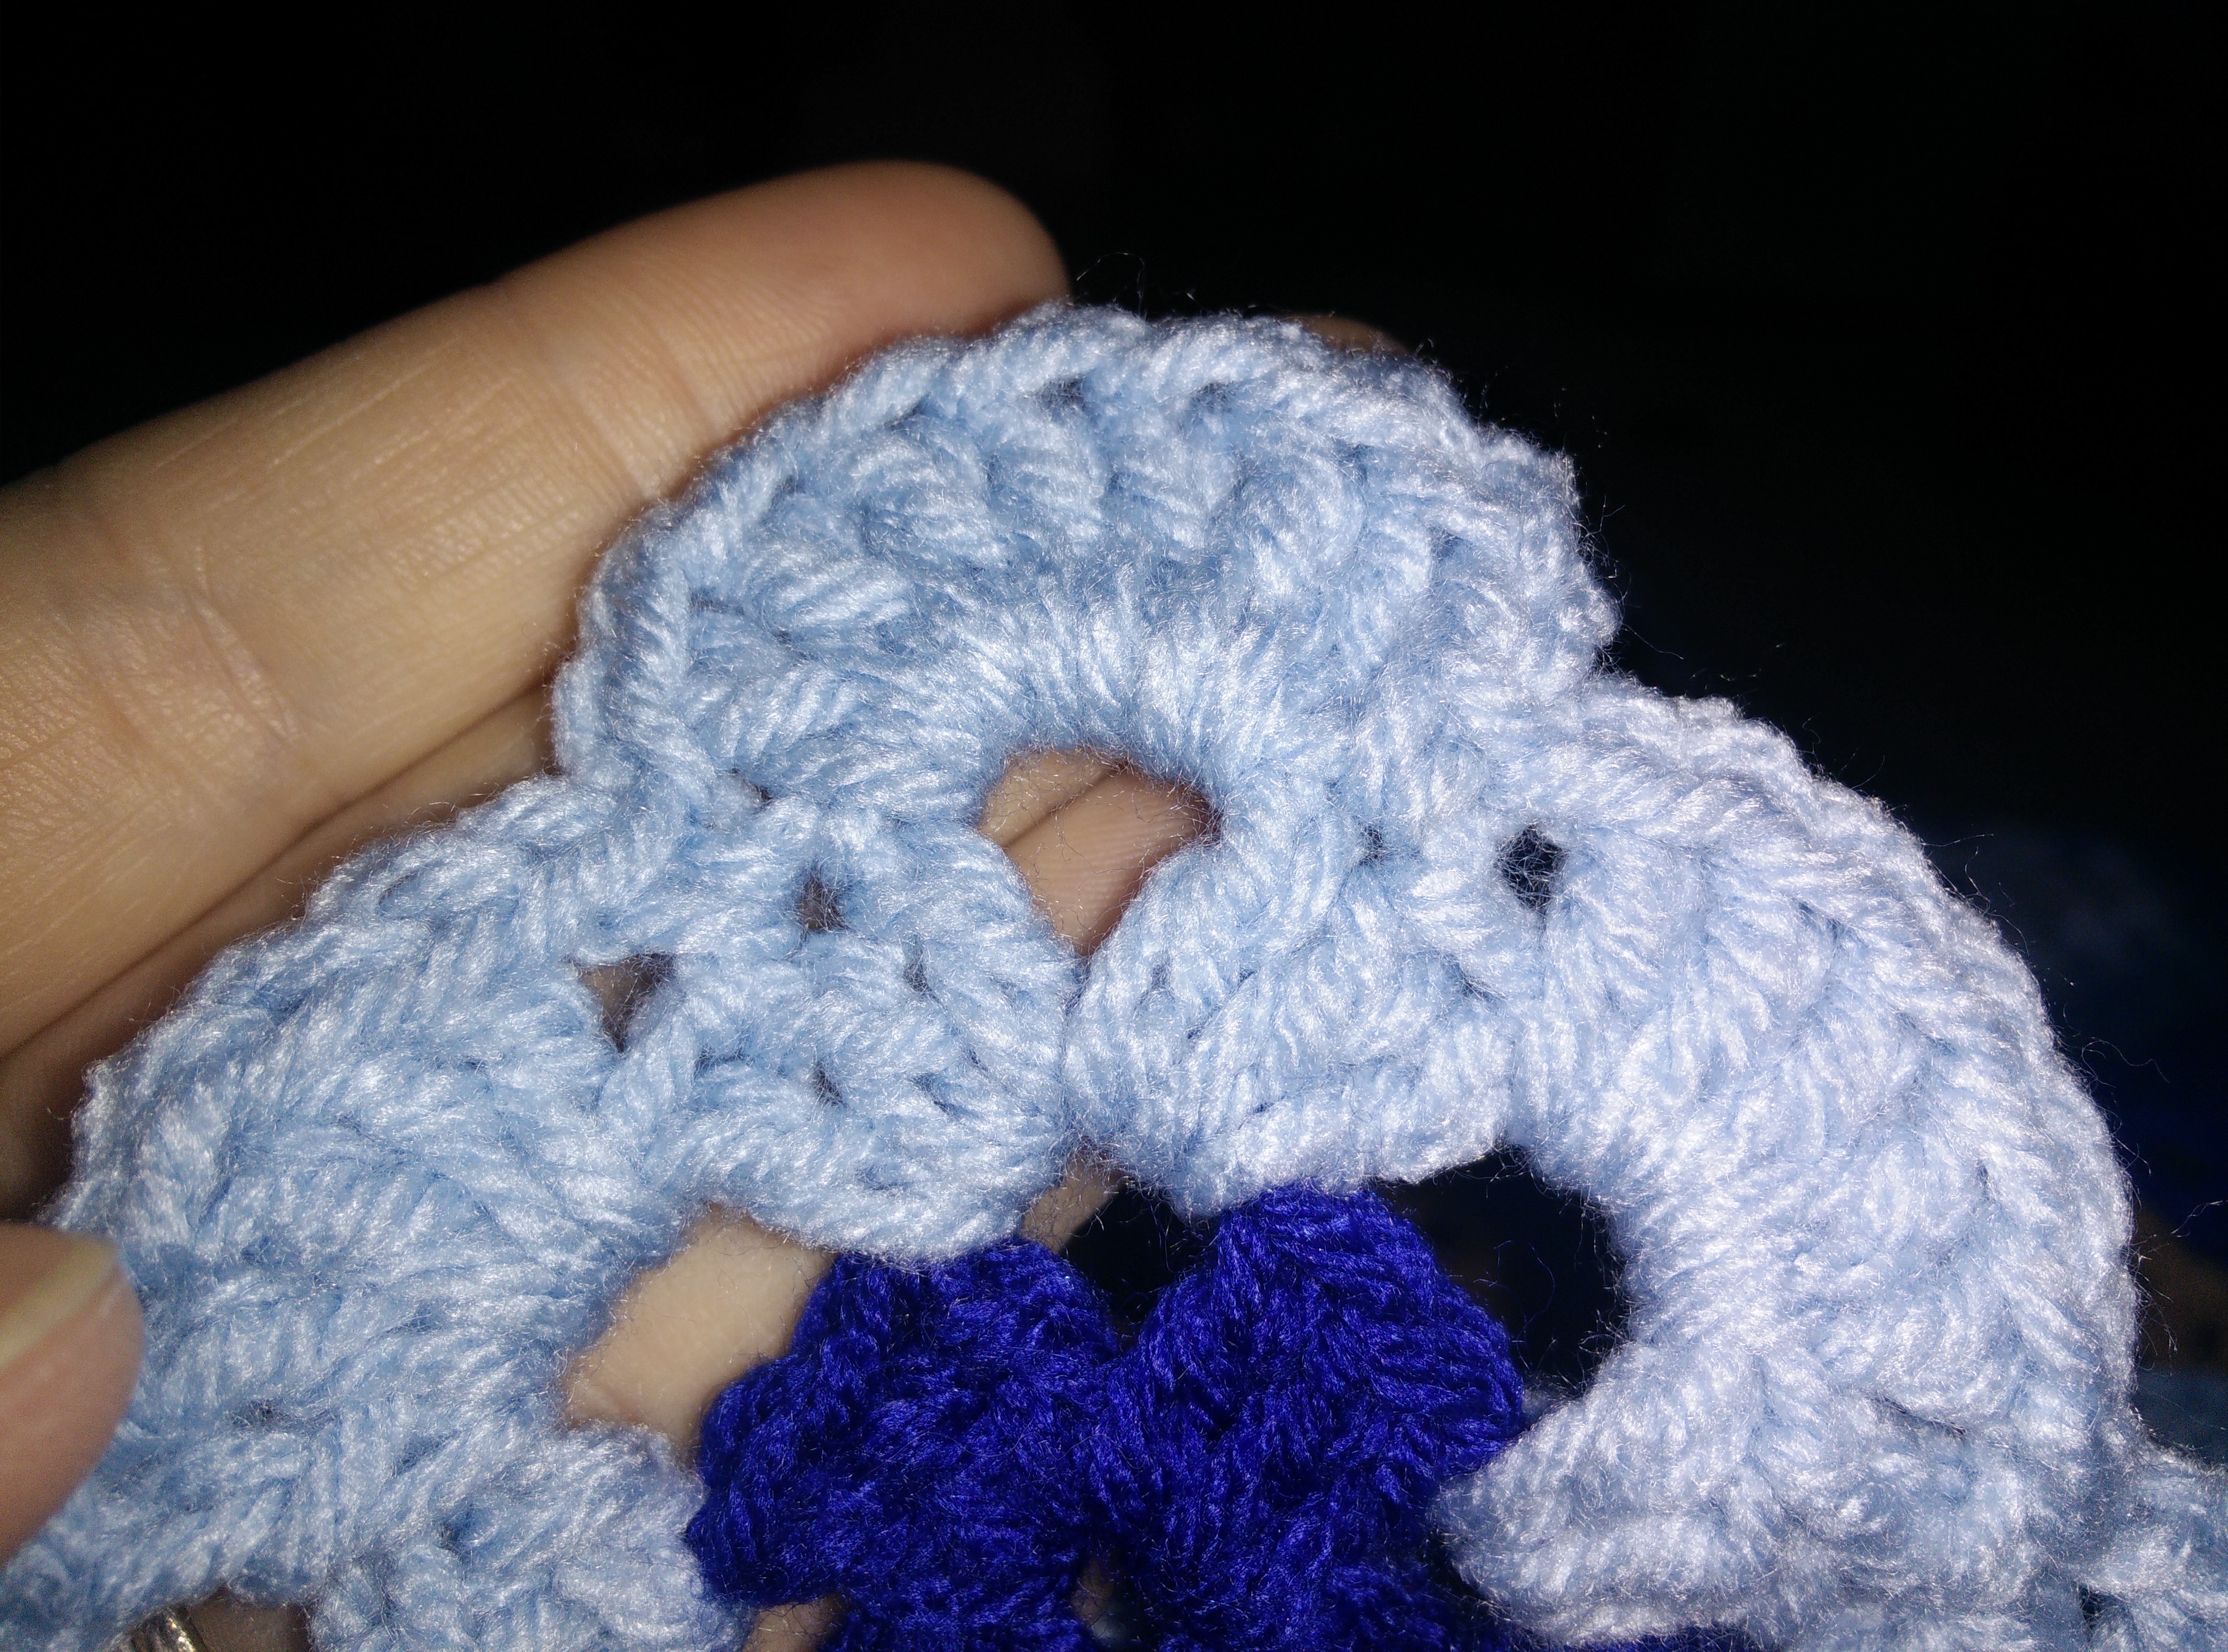
Finally done sewing? Now for the boarder. First three rows are basically the granny square pattern around the whole blanket.
Join in one of the corners, ch 3, 2 DC, ch 2, 3 DC. Ch 1
*In next space 3 DC, ch 1 and repeat until the corner
In corner, 3 DC, ch 2, 3 DC, ch 1* repeat around.
Now, the only thing is where two squares meet up. You are going to see the corner of one next to the corner of the other separated by the seam of sewing them together. Do your first DC in the first corner. Then you are going to do a DC tog (yarn over, insert hook in first corner, yarn over and pull through the corner. Now yarn over and pull through two loops. Yarn over and insert hook through next corner and pull through the corner. Now yarn over and pull through two loops. Yarn over and pull through the rest of the loops.) the last DC in the group will be in the second corner.

Pictures for reference:

IMG_20150207_160851 IMG_20150207_160905 IMG_20150207_160929 IMG_20150207_161001

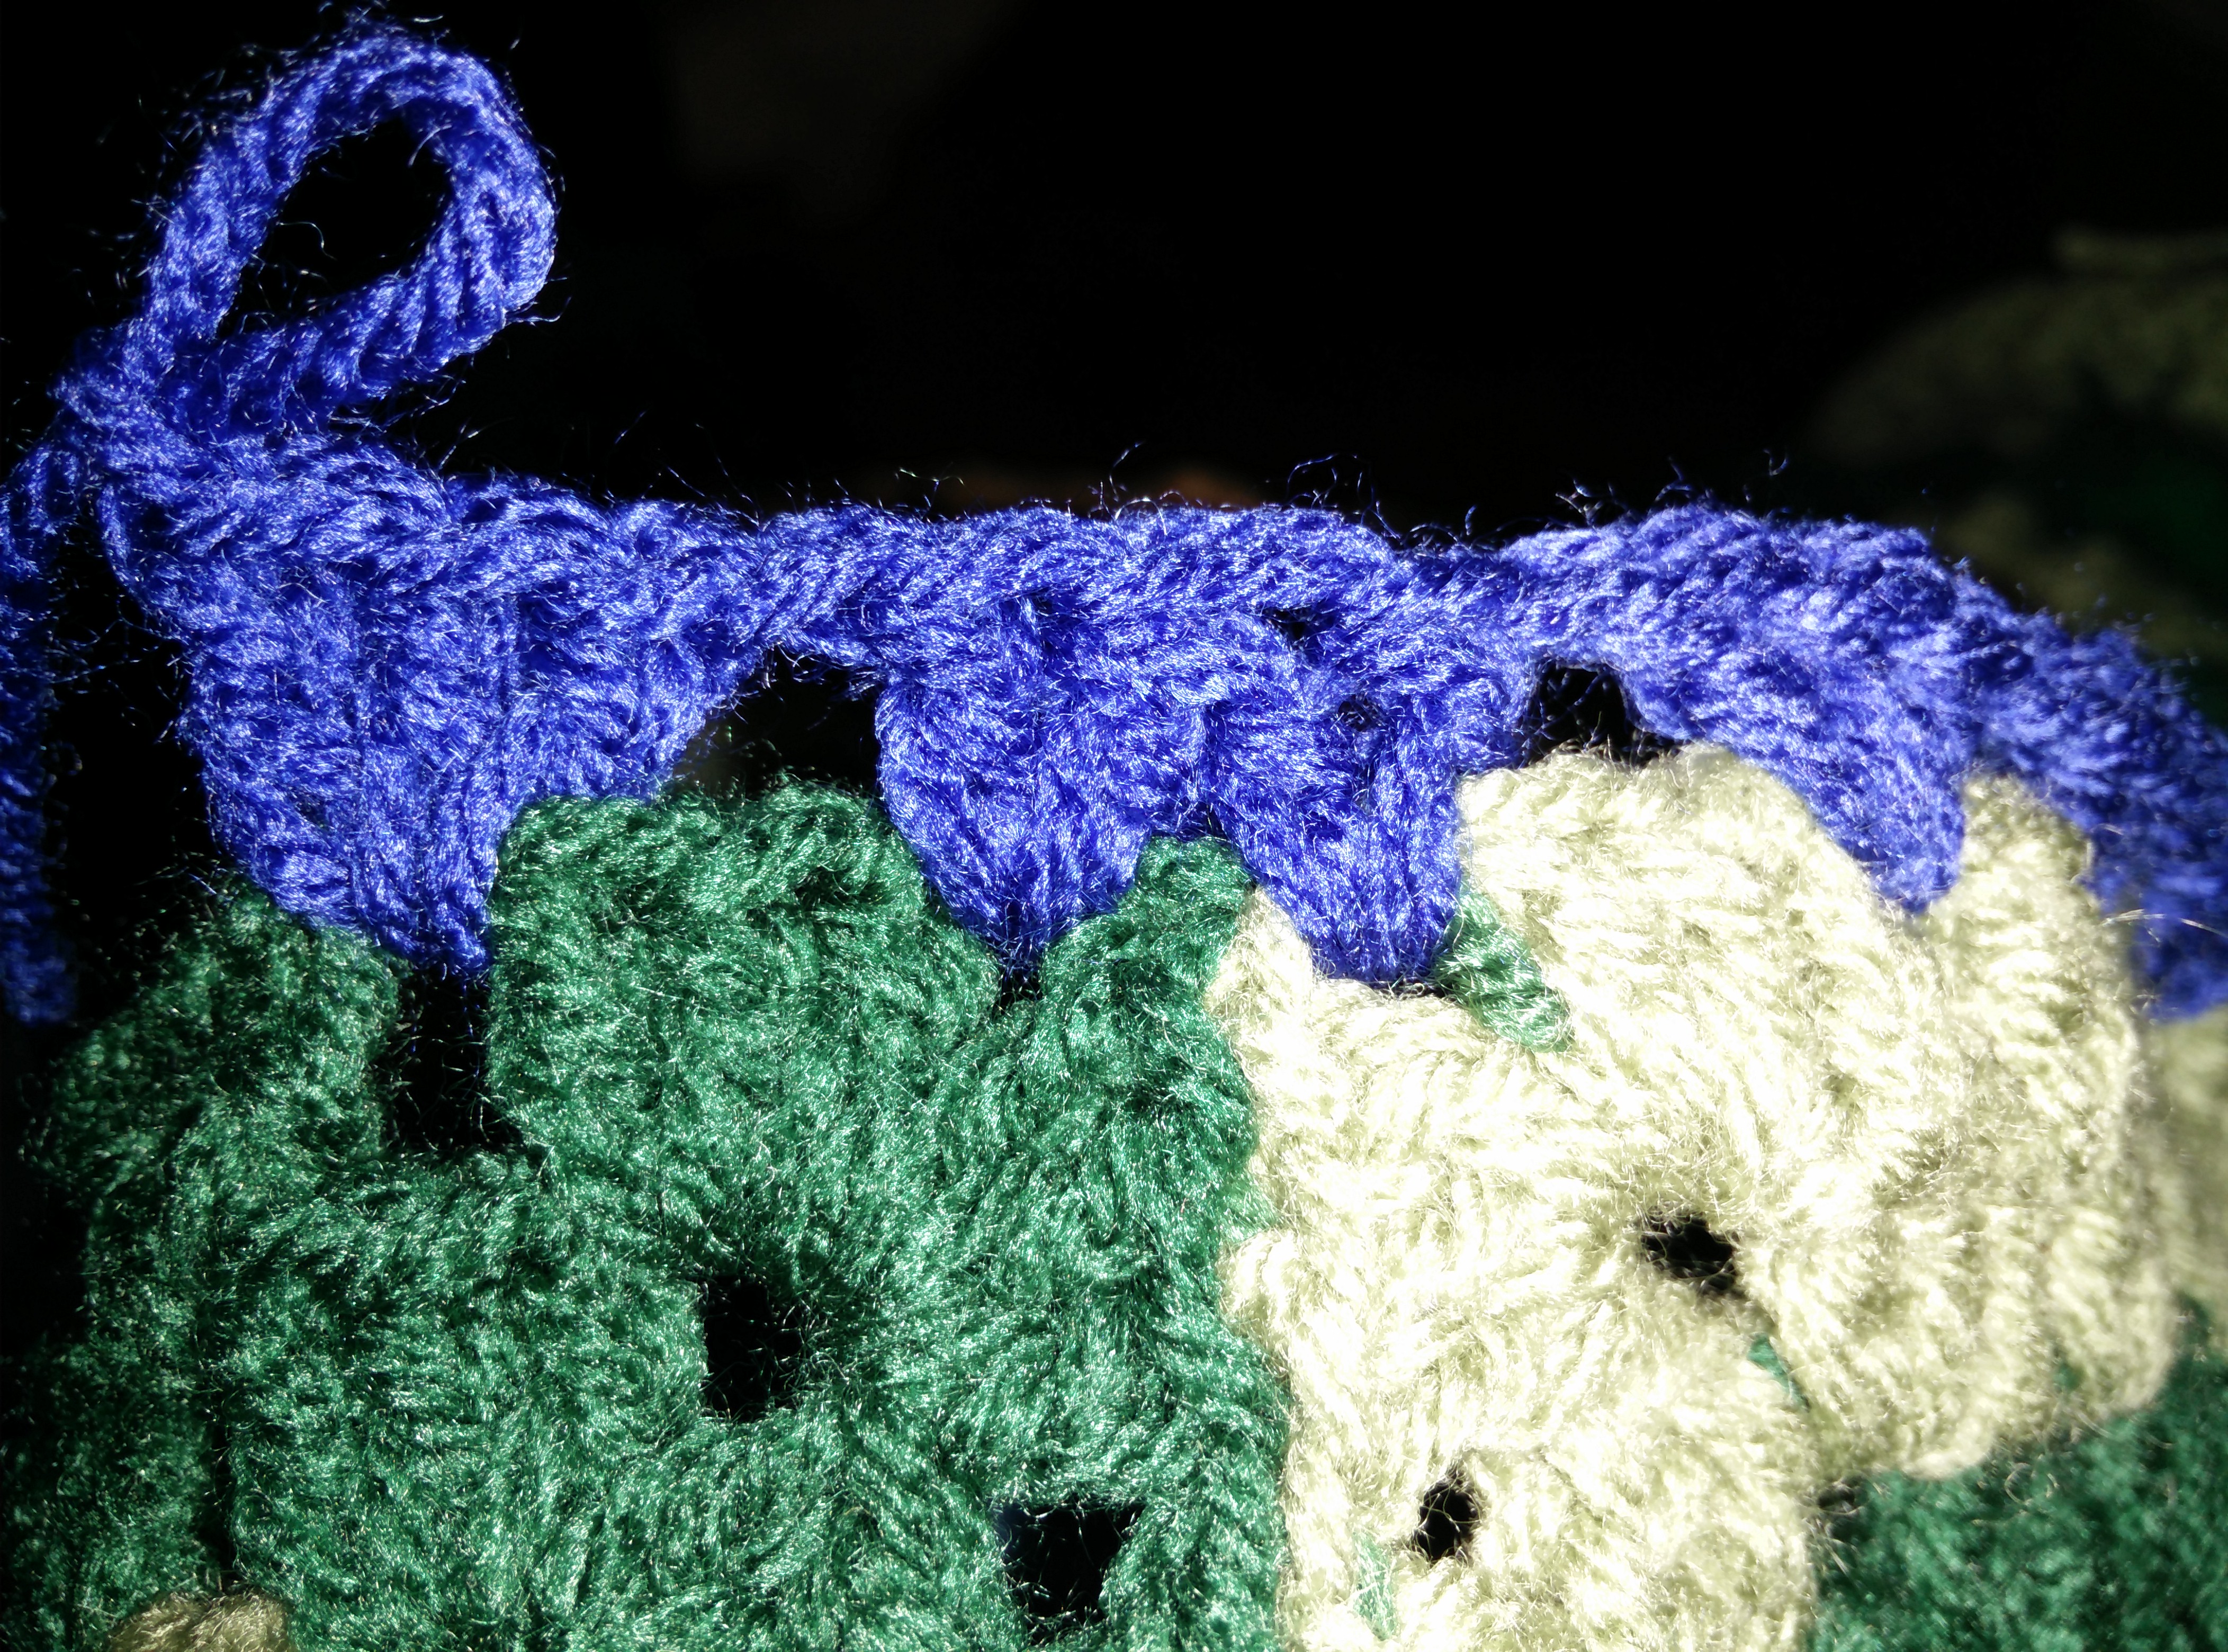
Last round of the boarder
Start in a corner, ch 3, 6dc, ch 1
*in next space SC, ch1.  Then in next space 5dc* continue until corner. The corner will have 7 DC in each. However I did have it happen where I didn’t end with the SC before the corner. If this happens just put the SC, ch 1 in the last DC before the corner, 7dc, ch 1, SC in first DC, ch 1.

IMG_20150208_134918

And you are done!
Mad hooking!

Granny Square and Ribbon Baby Blanket Set

IMG_3885

So this one started out as my sister finding this picture of a lovely blanket and wanted me to duplicate it for a gift. It isn’t my original idea and I couldn’t find the pattern listed in my usual hunting grounds, so of course this hooker made up one!

A warning. This isn’t an exact pattern. Depending on the size of your granny square will change the count for the edging and really that is all this blanket is… a traditional granny square with a fancy edging. The hat is a bit more exact.  The hat fits a 0-3 month baby.

Red Heart with Love yarn (I used gray and bubblegum pink)
H size hook
Ribbon (I used 5/8″ or 15mm wide and it took just under 18ft or 5.4m)
Accent pearl or button (or nothing)

Alright, start by making your granny square with the gray. You can find a tutorial just about everywhere, but here is one in case you need it and are feeling lazy (like me usually) and don’t want to search… just note as a personal choice I start my squares with a chain 6 and a decent size tail. This way it is easier to start then by pulling the tail and weaving it in it closes up and takes away the starting bump.

http://stephiescorner.blogspot.com/2013/10/crochet-101-make-basic-granny-square.html

I did 34 rounds so that the blanket would be roughly 3ft wide with the edging. How big you make the square is up to you… just make sure you have enough ribbon.

Edging:

Now, I have written down what to do. That being said you might have to add a stitch or skip an extra stitch to make it work with your granny square. Keep calm, have a glass of wine or beer, and know it will be fine.  It doesn’t need to be exact as the edging is very forgiving and will look great no matter what.  Nobody wants a grumpy hooker.

Don’t bind off yarn, just continue on with the gray.  Ch 1, sc in same st as joining then sc in every st.  Put 3 sc in the corner space. Sl st into first sc.

Ch 5, *skip 1 st then tc (triple crochet) in next st, ch 1* around. Corners:  In the 2nd sc of the 3sc corner do *tc, ch 1, tc, ch 1, tc, ch 1* then skip a st and continue down the row. This is the round where you will weave in your ribbon later.

Ch 1, sc in same st as joining then sc in every tc and in each ch 1 space.  Corners:  Put 3 sc in the corner tc (the second tc in the corner grouping). Sl st into first sc and cut and bind your yarn.

Now using pink join in the second st of any of the previous round corner grouping. Ch 3, (2 dc, ch 1, 3 dc) in same st as joining. Skip 1 st, *dc in next, skip 2 st then (3dc, ch 1, 3dc) in next st, skip 2 st* around. Corners:  When you get to the corners though you will only be skipping 1 st instead of the 2.  Sl st into top of beginning ch 3.

Sl st in the first two dc and into the space (just like you did for the granny square).  Ch 3, (2 dc, ch 1, 3 dc) in same space. *fpdc (front post double crochet) around the dc in middle of groups, (3dc, ch 1, 3dc) in next space* around. Corners:  Nothing special to do in the corners for a change. Sl st into top of beginning ch 3.

Sl st in the first two dc and into the space like last round. Ch 3 and do 8 dc in same space. *fpdc around previous round fpdc, 9 dc in ch 1 space* around.  Cornets:  Again, nothing special to do in the corners. Sl st into top of beginning ch 3. Bind off and weave in your ends.

Now weave in your ribbon doing the over/under in the triple crochet row. Keep the kids away because there will most likely be some choice words here trying to keep the ribbon from twisting.  Also be sure to pull your square into flatness before you cut the ribbon. It will pull the work together a little, but you don’t want to end up with a bunched up blanket and having to reweave the ribbon. Tie your ribbon, making sure it will be where the flower goes to cover it up.  I also got out my sewing needle and thread to add some stitches in all the corners to keep it from twisting and pulling weird.  This will also secure it a bit for future washings.

For the flower I used this pattern: http://www.sccmag.com/crochet-a-sweet-simple-flower-clip-for-spring/

The top part I did with the pink, bottom with gray then I sewed on a pearl bead in the middle.

Now for the 0-3 month old baby hat! And you thought you were done… silly hooker…

IMG_3886

In pink, ch 2 then 12 dc in first chain. Sl st to top of first dc.

Ch 2, 2 dc in joining and each st around. Sl st to top of first dc.

Ch 2, 2 dc in joining. *1 dc in next st, 2 dc in next st* around. Sl st to top of first dc.

Ch 2, 2 dc in joining. *1 dc in next 2st, 2 dc in next st* around. Sl st to top of first dc.

Ch 2, dc in joining and each st around. Sl st to top of first dc. Repeat for 4 rows.

Switch to gray. Ch 2, dc in joining and each st around. Sl st to top of first dc. Repeat for 2 rows.

Switch back to pink. Ch 2, dc in joining and each st around. Sl st to top of first dc. Only for 1 row.

Ch 1, sc in joining. *skip 1 st, 5 dc in next, skip 1 st, sc in next* around. Sl st in first sc and bind off, weaving in ends.

Sew on matching flower as blanket and now you are done! Woot, Woot!

Mad Hooking!